Miralinux Blog

  • Home
  • Linux
    • Scripts
    • CentOS
  • Apple
  • Microsoft
    • Features
    • Office
    • Windows
  • Learning
  • Games
  • Multimedia
    • XBMC
  • Other
    • About WordPress
  • Links
    • General
    • Software
      • Autocad
    • Hardware
      • BIOS
    • Linux
    • WiKieS

Author Archives: arno

VMware

Posted on 2012/08/30 by arno Posted in Uncategorized

HCL – Hardware compatibility

Intel® Server Adapters Will my Intel® Ethernet Adapter work with VMware*?

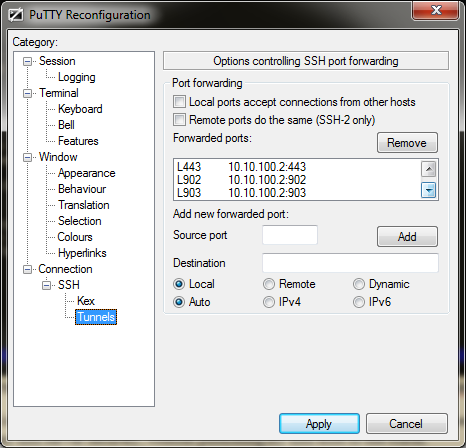
Tunneling a vSphere Client connection over SSH

Projects

Home LAB VMware

Scripts

ghettoUPSHostShutdown.pl

Hardware Health Alerting with ESXi | ESXi-5

Learning

VMware Certification

Links

Kaspersky Anti-Virus, VMware ESX(VMware vSphere Client), OSX (thumbprint mismatches)

VMI Paravirtualization support, list of OS’s
Baloon Memory (pdf)

 Downloads

ESX/ESXi Patches

Windows 7 (seven) features

Posted on 2012/08/14 by arno Posted in Features, Windows
[ Features | Office | IE | ]
[ Windows | XP | 7 (seven) | 8 | 10 | ] - [ Server | 2003SBS | 2008SBS | 2011SBS | 2016 | WSUS ]

Links

http://schinagl.priv.at/nt/hardlinkshellext/hardlinkshellext.html#customoverlayicons

Download Microsoft Drivers manualy (use Internet Explorer)

Pushing the Limits of Windows: Virtual Memory

KB / Hotfixes

Microsoft SURT | Forums: 7Forums | Sysnative | (Update stopped 8007370B)

A computer that is running Windows Server 2008 R2 or Windows 7 stops responding randomly
KB2265716 – The trust relationship between this workstation and the primary domain failed.

Utilities

DiskCleanup | options | switches | technet | Schedule


Removing Libraries

source: http://www.edugeek.net/forums/windows-7/46809-windows-7-removing-libraries.html


WebDAV with Basic Authentication and Windows 7

Written by Parashift on November 25, 2013

No, Watson, this was not done by accident, but by design.– Sherlock Holmes

WebDAV is a useful protocol that allows us to leverage off of web technologies to deliver file system like functionality.  From a security perspective, as it uses HTTP, you can use the same policies and procedures for securing a WebDAV service that you would use with a web server.  For instance, running it over SSL allows you to have multiple layers of security.  Another plus is that it’s supported widely on smart phones so mobility is enhanced greatly. With our eBoard service, we provide WebDAV as one of the methods of connection so that tablets can access our file services remotely.

One of the caveats with using WebDAV is that while it may work perfectly fine on smartphones, Linux or Mac OS X, using it on Windows is another matter entirely.

The Problem

Windows 7 does not support automatically reconnecting to a WebDAV share with Basic Authentication.  You may be able to add it as a network connection, but once your PC restarts, it will fail to connect.  This is documented here with a suggested workaround:

http://support.microsoft.com/kb/2673544

A common task within a Windows environment is the automatic mapping of drives via Group Policy.  In the earlier days, this was accomplished using a logon script.  Now Group Policy allows you to dedicate mapped drives within a Group Policy definition, but unfortunately does not work very well with WebDAV connections.

The Workaround

As suggested in the article, falling back to a logon script appears to be the easiest way, but there are a number of considerations that the article fails to mention before you can get this to work successfully:

  • SSL needs to be used, or the WebClient needs to be told to allow Basic Auth use on unencrypted connections.  This is not recommended in production, but you can change it by editing the following registry key value to 2 (to allow Basic Auth on SSL and non-SSL connections):
    HKEY_LOCAL_MACHINE\SYSTEM\CurrentControlSet\Services\WebClient\Parameters\BasicAuthLevel
  • The WebClient service needs to be running.  If it’s not running and you execute a net use command for a WebDAV share, it will fail with System error 67:
    C:\Users\example>net use X: https://alfresco.example.com/alfresco/webdav/ password /U:user /P:NO
    System error 67 has occurred.
    
    The network name cannot be found.
  • The WebDAV server needs to be reachable before you try to connect.  If it’s not, the WebClient service appears to be inoperable for that URL until it’s been restarted.  If you have a wireless connection that takes time to connect, then you will notice this issue quite dramatically.
  • You may not have your PC joined to the domain and can’t rely on group policy at all.

Luckily, there are two workarounds for this windows failing depending on whether or not you are using Group Policy.

Without Group Policy

If you want to automatically connect to a WebDAV share with Basic Authentication without Group Policy, follow the instructions here:

  1. Navigate to Services in Control Panel and make sure that WebClient is started automatically
  2. Follow these instructions to create a Task Schedule when the network is activated
  3. Go to the Actions tab, Create a new Action with the following settings:
    • Action: Start a Program
    • Program/script:
      net
    • Add arguments (Change to suit your settings):
      use X: https://alfresco.example.com/alfresco/webdav/ password /U:user /P:NO
  4. Log out and back in and confirm its working

With Group Policy

As alluded to earlier, you can use logon scripts to work around this issue, adding in a net use command upon login to sort out the network drive automatically.

One thing worth mentioning with this approach is that Administrators will execute logon scripts with elevated privileges. This means that network maps applied within a logon script with an administrator user won’t be accessible in explorer. There is a workaround for this also using the Task Scheduler:

UAC, Logon Scripts, and the Launchapp.wsf workaround

One could assume though that most environments wouldn’t have a large number of administrators for normal user accounts.

Creating a GPO

Please take caution and confirm that any settings changed here are compatible with your environment. Test this correctly before being put into production.

  1. Start by opening up your Group Policy Editor on your DC, navigating to your intended OU, right clicking and selecting Create a GPO…. and then giving it a meaningful name
  2. Edit the Group Policy and navigate to:
    Computer Configuration -> Policies -> Administrative Templates -> System -> Logon
  3. Set Always wait for the network at computer startup and logon to Enabled
  4. Navigate to:
    Computer Configuration -> Preferences -> Control Panel Settings -> Services
  5. Add a new Service with the following:
    • Startup: Automatic
    • Service Name: WebClient
  6. Navigate to:
    User Configuration -> Policies -> Windows Settings -> Scripts (Logon/Logoff)
  7. Double click Logon and select Show Files… to bring up a window where we’ll be putting our scripts
  8. Create a batch file named networkmap.bat with your net use command (changing to suit your settings):
    net use X: https://alfresco.example.com/alfresco/webdav/ password /U:user /P:NO
  9. Back in the Logon Properties window, select Add, and select the networkmap.batfile as the Script Name
  10. If you need Administrator users to work also, instead of using networmap.bat as the Script Name, do the following:
    1. Copy over the Launchapp.wsf file into the same folder
    2. Add a Script with the Script Name set to Launchapp.wsf
    3. Set the Script Parameters to the full path of the Script file. e.g.:
      \\DOMAIN\SysVol\DOMAIN\..\User\Scripts\Logon\networkmap.bat
  11. Run gpupdate /force on your test machine
  12. Run rsop.msc or gpresult /v to confirm that the computer has pulled down the appropriate GPO
  13. Log out and log back in to confirm that it’s working

Conclusion

The above methods propose workarounds to allow you to use WebDAV with Basic Authentication as a network drive. We have demonstrated two possible workarounds in place, both of which will allow WebDAV to be used with the Native Windows Integration. It would also be possible to use a WebDAV client or connect into the service in another way.

It may be in future that another solution will present itself, or Microsoft will get round to fixing their Credential Storage, but for now the use of a well crafted logon script is the easiest workaround.


Missing Windows Installer Cache Files Will Require a Computer Rebuild

https://support.microsoft.com/en-us/kb/2667628

No cure, reinstall windows!


How to restore windows 7 update environment

http://www.sevenforums.com/windows-updates-activation/169153-how-repair-windows-update-service.html

How do I reset Windows Update components

Fix Windows corruption errors by using the DISM or System Update Readiness tool


Setup Windows UEFI – GPT partition

http://forums.bit-tech.net/showthread.php?t=209045


How To Fix: Windows Update Blocked by Group Policy

source: http://brianseekford.com/index.php/2011/05/04/how-to-fix-windows-update-blocked-by-group-policy/

Problem: I cannot check for updates, it says “Some settings are managed by your system administrator”
Solution:
So, you can’t get windows update because some yahoo in IT blocked your access, eh?

First, type gpedit.msc in run,
In the window drill down User configuration>administrative templates>windows components>windows Update.
In the right pane double click on remove access to access all windows update features and make it disabled.

If that doesn’t work, change the following key:
Disable and remove links to Windows Update

(User Configuration\AdministrativeTemplates\Start Menu & Taskbar) NoWindowsUpdate

(HKCU\Software\Microsoft\Windows\CurrentVersion\Policies\Explorer)

There are a few other keys and settings that could affect it.
Check this link out for all the registry locations for Group Policy.


Windows 7 LIP (Language Interface Pack)

http://www.sevenforums.com/tutorials/158161-display-language-force-overwrite-all-users.html

http://www.sevenforums.com/tutorials/87317-display-language-change.html

http://www.sevenforums.com/tutorials/87313-display-language-packs-install-uninstall.html


Fix Corrupt or Blank Windows 7 System Tray Icons

source: http://www.fixitjim.net/2012/11/fix-corrupt-or-blank-windows-7-system.html

I see this a lot where I work and while I haven’t yet been able to track down the source of the problem, the fix is as follows:

  1. Open Regedit via Start–>Search
  2. Open Task Manager via CTRL-ALT-DEL
  3. Find Explorer.exe in the list and end the Process
  4. Go back to Regedit
  5. Select HKEY_CURRENTUSER
  6. Click Edit–>Find
  7. Search for IconStreams
    1. Or navigate directly to HKEY_CURRENTUSER\SOFTWARE\CLASSES\Local Settings\Software\Microsoft\Windows\CurrentVersion\TrayNotify\
  8. Delete IconStreams
  9. Search or navigate to PastIconStreams
  10. Delete this key as well
  11. Hit CTRL-ALT-DEL
  12. Start Task Manager
  13. Click File–>Run
  14. Type, Explorer.exe
  15. The issue should be resolved.

Network Wizard only creates Dial-up VPN

  1. Go to device manager and select “Show Hidden Devices” under the View menu.
  2. Expand Network adapters. You should see the WAN Miniport (PPTP)
  3. Try right clicking on it and uninstalling it. More than likely it won’t allow you to.
    To get around this update the driver to something “uninstallable” like the MAC Bridge.
    To do this right click on it and select update driver. Choose no to look on windows update. Then choose to specify a location.
    Next choose dont search. Next unselect show compatible hardware and find the MAC Bridge under Microsoft.
    Force it to install it. After thats done you should be able to uninstall your new ‘MAC Bridge Miniport.”
  4. Now that it’s gone, lets reinstall it. Go fetch the devcon.exe
    package from Microsoft (Search for devcon.exe on google) and extract it somewhere.
  5. Go to the command prompt / console (cmd.exe) and get to the folder with devcon.exe in it.
  6. Run this command: devcon.exe install c:\windows\inf\netrasa.inf MS_PptpMiniport
  7. Go back to the device manager. You should see the WAN Miniport (PPTP) back.
  8. Try making yourself a fresh VPN connection now.

Deleting old user profiles

symptoms: Windows 7 starting with a temporary profile, trying to delete an old profile.

1-6-2011, source: http://social.technet.microsoft.com/Forums/en/w7itprogeneral/thread/5ec0b949-effa-4e30-ba09-dc948a4c7a8b
You only have to do these steps:

  1. Logon with local admin profile. (or other account different that you want to use, but with admin privileges).
  2. Open regedit and go to HKLM\SOFTWARE\Microsoft\Windows NT\CurrentVersion\ProfileList.
    Here you can see all SIDs of loaded profiles and probably you’ll have some of them repeated but with .bak extensions.
  3. So if you want to recover your profile, desktop icons, ect… you only have to delete the profile with no .bak extension
    and rename the other, deleting only the .bak extension of it:
    Ex: In Regedit (HKLM\SOFTWARE\Microsoft\Windows NT\CurrentVersion\ProfileList) I have:
    SID-1292428093-343818398-2115-158554 (1º Delete this Key)
    SID-1292428093-343818398-2115-158554.bak  (2º Rename This Key to SID-1292428093-343818398-2115-158554).
  4. Restart your computer or Logoff and Logon with the profile that you want to restore and that’s all, your profile will be restored Perfectly.

 Corruption of the /Windows/Installer/ folder

http://support.microsoft.com/kb/971187


My Document folder locations if data disk failed.

source: http://www.windows-commandline.com/2010/08/change-my-documents-location-registry.html

We can change the target location of My Documents folder by editing the registry key. We can use reg.exe utility from command line for this. An example command for changing my documents location is given below.

reg.exe add “HKEY_CURRENT_USER\Software\Microsoft\Windows\CurrentVersion\Explorer\User Shell Folders” /v Personal /t REG_SZ /d “d:\mydocs” /f

The above command will set the target folder for my documents as d:\mydocs.

Instead you can open registry editor by running regedit and manually change the registry value

Personal under the key HKEY_CURRENT_USER\Software\Microsoft\Windows\CurrentVersion\Explorer\User Shell Folders


SATA drives Safely remove hardware

SATA 3 6GB showing up in safely remove hardware?

Internal and External SATA Port Configuration

http://64os.info/tips/troubleshooting-device-and-bsod/


Disappearing DVD-CDrom drive

I brought my Vista machine out of hibernation this morning to discover that the physical DVD-RW drive had disappeared from My Computer.
In fact, the virtual CD-ROM drive provided by Daemon Tools had disappeared, too.
After a typical round of troubleshooting (reboot, check bios, uninstall driver from Device Management and reboot, etc)
followed by a brief googling I discovered the solution below.

The solution comes from this post on The Vista Forums (unofficial) website.
It turns out some kind of strange registry mishap occurs and the Windows CD-ROM (cdrom.sys / cdrom.inf) drivers decide not to load anymore.
When you look at the Device Manager, you’ll see the yellow warning (!) icon in front of the CD/DVD ROM devices; when double
clicking them you’ll be greeted with the error “Windows cannot load the device driver for this hardware.
The driver may be corrupted or missing. (Code 39)”.

Luckily, the solution is painless and simple: just import this registry file to fix the problem (code below):

Windows Registry Editor Version 5.00
;Fixes issues with cdrom drives not working properly

[HKEY_LOCAL_MACHINE\SYSTEM\CurrentControlSet\Control\Class\{4D36E965-E325-11CE-BFC1-08002BE10318}]
“UpperFilters”=-
“LowerFilters”=-

[HKEY_LOCAL_MACHINE\SYSTEM\ControlSet001\Control\Class\{4D36E965-E325-11CE-BFC1-08002BE10318}]
“UpperFilters”=-
“LowerFilters”=-

[HKEY_LOCAL_MACHINE\SYSTEM\ControlSet003\Control\Class\{4D36E965-E325-11CE-BFC1-08002BE10318}]
“UpperFilters”=-
“LowerFilters”=-

Update (2007-11-29):After looking through my Event Viewer today I noticed the following error in the System logs:

“The following boot-start or system-start driver(s) failed to load:
PxHlpa64”

Quick googling took me to Microsfot KB314060, which mentions the above fix for this problem.


SSD Info (Trim VSS Intel Optimizer)

source: forums.anandtech.com

1. System Restore is designed with work with the Volume Shadow Service (i.e. Shadow copy):
Quote:

Beginning with Windows Vista, VSS is also used by the System Protection component which creates and maintains periodic copies of system and user data on the same local volume (similar to the Shadow Copies for Shared Folders feature in Windows Server) but allows it to be locally accessed by System Restore. System Restore allows reverting to an entire previous set of shadow copies called a Restore point. Prior to Windows Vista, System Restore was based on a file-based filter that watched changes for a certain set of file extensions, and then copied files before they were overwritten.[2]

Incidentally this explains the improvements in how System Restore works beginning with Vista re: taltamir’s experiences.

2. Intel’s toolbox works “around” VSS when attempting manual TRIM:
Quote:

“The VSS (Volume Shadow Copy) service is either disabled or not functioning properly. If you run the Intel® SSD Optimizer with the VSS service disabled, previously-created restore points or other shadow copies created by the operating system or third-party applications may become corrupt. If you intentionally disabled the VSS service for performance or other reasons and wish to continue running the Intel SSD Optimizer, click Continue.”

3. More evidence of VSS interfering with TRIM (error message in SSD toolbox):
Quote:

Intel SSD Optimizer could not run due to the presence of Volume Shader Copy Service data. Likely cause is a backup in progress. Please try again when the backup is finished.

4. Direct advice from readme.rtf in the SSD Toolbox documentation:
Quote:

To reduce the amount of time the Intel SSD Optimizer takes to run, reduce the number of System Protection restore points. The amount of time the Intel SSD Optimizer takes to complete is related to the number of System Protection restore points and the number of total files of the system. See Microsoft FAQ on System Protection restore points here:  http://windows.microsoft.com/en-US/w…sked-questions

I think we have pretty good evidence, though not incontrovertible, that System Restore does indeed interfere with TRIM.


SSD tweaks

Cleanup | Cleanup Windows.eDB file | Windows-InstallerFolder-Cleanup |

Tip: – http://www.tweakhound.com/ssd-tweak-guide-sort-of/

Tweaks | http://www.overclock.net/t/1156654/seans-windows-7-install-optimization-guide-for-ssds-hdds

http://www.mydellmini.com/forum/windows-7/2441-windows-7-ultimate-solid-state-drive-speed-tweaks.html

http://www.overclock.net/t/1133897/windows-7-ssd-tweaking-guide

http://forums.mydigitallife.info/threads/36440-Windows-7-8-SSD-Optimization

Verify TRIM is enabled on your SSD

  1. Click start and type in cmd and hit the enter key
  2. Type in fsutil behavior query disabledeletenotify

– DisableDeleteNotify = 1 (Windows TRIM commands are disabled)
– DisableDeleteNotify = 0 (Windows TRIM commands are enabled)

Disable automatic defragmenting

  1. Click the Windows start button and type Disk Defrag and hit Enter.
  2. Click the Configure Schedule Button.
  3. Uncheck the box for Run On a Schedule then click Ok and Close.
  4. Never Defrag a Solid State Drive

Reduce Page File Size

  1. Hit Start and right-click on Computer and select Properties
  2. On the left side of the window, click Advanced System Settings.
  3. Under the Advanced tab, in the Performance section click Settings…
  4. Click the Advanced tab, and under Virtual Memory, Click Change
  5. Uncheck Automatically manage paging file size for all drives.
  6. Highlight your SSD and underneath it, click the Custom Size radio button.
  7. Under Initial size and Maximum size, type in 1024 and then click Set and click OK.
  8. You must reboot for this to take effect

Move your temp files to a Mechanical hard drive. (If Users Folder is being used on the SSD)

  1. Hit Start and right-click on Computer and select Properties
  2. On the left side of the window, click Advanced System Settings.
  3. Under the Advanced tab, in the on the bottom click Environmental Variables…
  4. Click on the variable TEMP then click Edit…
  5. Under the Variable Value: box, enter in the new path you would like for your temp files, ex. D:\Temp Files\TEMP
  6. Click on the variable TMP then click Edit…
  7. Under the Variable Value: box, enter in the new path you would like for your temp files, ex. D:\Temp Files\TMP
  8. Click Ok and you must reboot for this to take effect.

Disable Hibernation

  1. Type cmd in the windows start menu search box, then right click on cmd.exe and choose Run as administrator.
  2. In the command prompt type in “powercfg –h off” and hit enter. You must reboot for this to take effect.

Moving or Disabling Memory Dumps (Especially helpful for us overclockers)

  1. Hit Start and right-click on Computer and select Properties.
  2. On the left side of the window, click Advanced System Settings.
  3. Under the Advanced tab, in the on the Startup and Recovery box, click Settings…
  4. Under the System failure section, you will see Write debugging information and a dropdown box.
    To disable memory dumbs click the dropdown box and select (none)
  5. If you would like to keep memory dumps change the path in the Dump file: box
    for example; D:\Temp Files\Memory Dumps\MEMORY.DMP

Disable Superfetch / Prefetch
(SSDs are Fast enough to disable Superfetch/Prefetch to free up RAM)

  1. In the Windows start menu search box, type regedit and hit enter.
  2. Navigate to: HKEY_LOCAL_MACHINE\SYSTEM\CurrentControlSet\Control\Session Manager\Memory Management\PrefetchParameters
    and you will see a Binary Value called EnablePrefetcher
  3. Double click on EnableSuperfetch and change the value from 3 to 0.
  4. Double click on EnablePrefetcher and change the value from 3 to 0.
  5. You must reboot for this to take effect.

Disable ClearPageFileAtShutdown and LargeSystemCache

Windows is quick to implement things that are no longer necessary.
An SSD operates on flash memory, making it possible to easily overwrite things on the disk. Therefore,
the page file doesn’t need to be erased while the computer’s shutting down.


  1. In the Windows start menu search box, type regedit and hit enter.
  2. Navigate to: HKEY_LOCAL_MACHINE\CurrentControlSet\Control\SessionManager\Memory Management
  3. Double click on “ClearPageFileAtShutdown” and change the value from 1 to 0.
  4. Double click on “LargeSystemCache” and change the value to 1.
    IMO LargeSystemCache should be enabled limiting the writes on the SSD for systemcache.
  5. You must reboot for this to take effect.


Disable Recycling Bin on your SSD

  1. Right click on your Recycling Bin and click Properties.
  2. Under Settings for selected location you will see a radio button called Don’t move files to the Recycling Bin.
  3. Remove files immediately

when deleted. Click this radio button and click OK.

Enable Write Caching on your SSD

A)Open up your Computer. In Computer, right click on the drive that is your SSD and click Properties.
B)Click on the Hardware tab at the top.
C)Double click on the Disk Drive that is your SSD. Now in the new window click the Policies tab.
D)Under the Write-caching policy box, make sure Enable write caching on this device and Turn off Windows write-cache buffer flushing on the device are both checked. Now click OK and exit.

Disable Indexing on your SSD

  1. Open up your Computer. In Computer, right click on the Drive that is your SSD and click Properties.
  2. Click on the General tab at the top.
  3. At the bottom you will see a box called Allow files on this drive to have contents indexed in addition to file properties, uncheck this box and hit Apply.
  4. Make sure the radio button for Apply changes to the drive C:\, subfolders and files is selected and click OK.
  5. You will be prompted with a window that says Error Applying Attributes,
    click Ignore All and it will disable indexing on all files on your SSD, this will take some time.
  6. Click OK to close the window.

Disable Reliability Monitor (If OS in on SSD)

  1. Type cmd in the windows start menu search box, then right click on cmd.exe and choose Run as administrator.
  2. In the command prompt type in: and hit enter.
    schtasks.exe /change /disable /tn \Microsoft\Windows\RAC\RacTask
  3. If you want to enable reliability monitor run the command: and hit enter.
    schtasks.exe /change /enable /tn \Microsoft\Windows\RAC\RacTask
    If a SUCCESS message comes up after the command is entered then it worked.

Disable System Restore (If OS is on SSD)
(Not preferred, autobackup!)

  1. Hit Start and right-click on Computer and select Properties
  2. On the left side of the window, click System Protection.
  3. Highlight the Drive located on your SSD and click Configure.
  4. Click the radio button to Turn Off System Restore, click Ok, and Close

Web Browser Cache Managing for Chrome, Firefox, and Internet Explorer

Firefox Cache

How to Move Disk Cache Location
  1. Open Firefox and in the address bar type about:config and hit enter.
  2. Click I’ll be careful, I promise! Navigate to browser.cache.disk.capacity and then double click to edit the value.
    Enter in the amount of disk cache you would like to use for Firefox in Kilobytes.
    I use 30mb so I enter in 30000 and hit OK.
  3. Right click on the web page and choose New then String.
    In the Preference name box add browser.cache.disk.parent_directory and hit OK. Under the browser.cache.disk.parent_directory box,
    enter in where your Firefox Cache location will be.
    I have mine set to S:\Temp Files\Firefox Cache.
How to Disable Disk Cache and Use Ram Cache
  1. Open Firefox and in the address bar type about:config and hit enter.
  2. Click I’ll be careful, I promise! Navigate to browser.cache.disk.enable and then double click to so that it is set to false.
  3. Right click on the web page and choose New then String. In the Preference name box add cache.memory.capacity and hit OK.
    Under cache.memory.capacity, enter in the amount of RAM you would like to use in kilobytes.
    I use 30mb so you would enter 30000 in the box for that.

Chrome Cache

How to Move Disk Cache Location
  1. Right click on the desired chrome shortcut and click Properties.
  2. Next to the Target: you will see the path for the chrome.exe location; after chrome.exe
    type in –disk-cache-dir=”S:\TempFiles\Chrome Cache”
    *NOTE: S:\TempFiles\Chrome Cache is an example, you would enter in where you want the chrome cache to be stored on your computer.
How Change Disk Cache Size
  1. Right click on the desired chrome shortcut and click Properties.
  2. Next to the Target: you will see the path for the chrome.exe location; after chrome.ex
    type in –disk-cache-size=1 –media-cache-size=1″. This will change the maximum cache to 25mb.
    *NOTE: If you want to edit Chrome to change the directory and cache size,
    it would look like this: –disk-cache-dir=”S:\TempFiles\Chrome Cache –disk-cache-size=1 –media-cache-size=1″

Extra

I also made a guide to move users off of your OS drive to a different partition/drive For more SSD Tweaks to help reduce useless SSD writes, improve performance, and save more space Here

WINDOWS 7 AND VISTA USER AND PROGRAM DATA REDIRECTION GUIDE

This guide is helpful for people trying to reduce writes to their SSD’s and save some space for software and other data. It is especially helpful for people without TRIM, the anal retentive enthusiasts, and people in the technical field who can use this information in many different scenarios. This is the proper way to move the Users and Program Data Folders to a different Drive or Partition.

Windows 7/Vista Installation

  1. Boot to appropriate Windows 7 or Vista media
  2. When you get to the installation screen, do not partition the drive. Use the whole drive and windows will create a separate partition by itself. You do not need to partition the hard drive yet.
  3. Once the installation is complete after a few reboots, you will be asked for a username and PC name. STOP HERE

Audit Mode

  1. Once Windows is waiting for a username and password, press CTRL+SHIFT+F3. This will cause Windows to reboot and then it will load up without drivers in audit mode.
  2. You are currently logged in as a temporary administrator. Any user changes you make will not save. Ignore the Sysprep.exe box for now
  3. Open up Disk Management
  4. Format the appropriate new drive or partition with the appropriate drive letter which will be the drive you will be using to store Program Data and Users folders.

Info on how to do this

  1. Now you will create the .xml file to relocate the Users and Program Data folders to your new drives.
  2. Open up notepad and Copy this text to it and save it as usermove.xml and save it to the root a flash drive or any other removable media.

    D:\Users
    D:\ProgramData

    -Note: Where it says Windows 7 Professional, you would edit it to whichever version of Windows you installed.
    -Note:The Drive letter in these lines is the drive letter that you assigned to the Drive or Partition that you are moving the ProgramData and User Data folders to.

    D:\Users
    D:\ProgramData

    -Note: On the line “wim:E:/sources/install.wim#Windows 7 PROFESSIONAL” — E: is the drive letter assigned to your removable media where the xml file is stored.

  3. Open a command prompt and type: cd c:\windows\system32\sysprep
  4. In command prompt, type: sysprep.exe /audit /reboot /unattend:E:\usermove.xml
    (E: is whatever the assigned drive letter of your flash drive or removable media is)Your computer will now reboot and come back into audit mode.
  5. Once Windows boots back up, you will be prompted with a Sysprep.exe box again.
  6. In the first drop down of the Sysprep.exe box, choose OOBE and only check the Generalize box if the computer is being used for a base image, otherwise, leave it unchecked.
  7. Now click Reboot and the regular windows installation will continue on with the User and Program Data folders on a separate drive/partition.

Using this method to move the users folder will also help prevent the corrupted user profiles that can happen when moving them after already creating users in Windows.


Windows Location awareness how does it !work

http://www.google.com/search?q=windows+7+no+internet+access+with+yellow+warning+icon

Windows 7 Network Awareness: How Windows knows it has an internet connection

Appendix K: Network Connectivity Status Indicator and Resulting Internet Communication

http://blog.tiensivu.com/aaron/archives/1509-Why-www.msftncsi.com-keeps-showing-up-in-firewall-logs-with-Vista-and-why-it-can-cause-problems-with-internet-captive-portals-and-WiFi-hot-spots.html

Disabled required password on wakeup

http://www.sevenforums.com/tutorials/10024-password-require-wakeup.html
http://blogs.technet.com/b/richardsmith/archive/2007/11/29/powercfg-useful-if-you-know-the-guids.aspx

powercfg -L
powercfg -SETACVALUEINDEX <profile> SUB_NONE CONSOLELOCK 0
powercfg -SETDCVALUEINDEX <profile> SUB_NONE CONSOLELOCK 0

Disable the libraries feature

http://www.howtogeek.com/howto/21462/how-to-enable-or-disable-the-libraries-feature-in-windows-7/

http://www.mydigitallife.info/how-to-disable-and-remove-libraries-from-windows-7-explorer/

Recently I found a fix to a problem a hand full of people were having.
After searching for hours I found no solution. The problem was that
when creating a new VPN network connection in Windows XP using the new
connection wizard, it would only create a dialup connection regardless
if you chose the connection to be a dial-up connection or a virtual
private connection.

The solution involved reinstalling the WAN Miniport (PPTP) driver.
Here’s how I did it:

1. Go to device manager and select “Show Hidden Devices” under the
View menu.

2. Expand Network adapters. You should see the WAN Miniport (PPTP)

3. Try right clicking on it and uninstalling it. More than likely it
won’t allow you to. To get around this update the driver to something
“uninstallable” like the MAC Bridge. To do this right click on it and
select update driver. Choose no to look on windows update. Then choose
to specify a location. Next choose dont search. Next unselect show
compatible hardware and find the MAC Bridge under Microsoft. Force it
to install it. After thats done you should be able to uninstall your
new ‘MAC Bridge Miniport.”

4. Now that it’s gone, lets reinstall it. Go fetch the devcon.exe
package from Microsoft (Search for devcon.exe on google) and extract
it somewhere.

5. Go to the command prompt / console (cmd.exe) and get to the folder
with devcon.exe in it.

6. Run this command: devcon.exe install c:\windows\inf\netrasa.inf
MS_PptpMiniport

7. Go back to the device manager. You should see the WAN Miniport
(PPTP) back.

8. Try making yourself a fresh VPN connection now.


Keyboard fails windows cannot start device hardware registry error code 19

source: http://answers.microsoft.com/…

Windows Registry Editor Version 5.00
[HKEY_LOCAL_MACHINE\SYSTEM\CurrentControlSet\Control\Class\{4d36e96b-e325-11ce-bfc1-08002be10318}]
"UpperFilters"=hex(7):6b,00,62,00,64,00,63,00,6c,00,61,00,73,00,73,00,00,00,00,00


W32 old Help files support

http://www.microsoft.com/nl-nl/download/details.aspx?id=91


Retrieve BIOS Serial number – servicetag

Obtain Service Tag locally with command line
In the command prompt type the following and press Enter/Return.

wmic csproduct get vendor,name,identifyingnumber

Obtain Service Tag remotely with command line
If VNC or remote desktop connection to the remote-host is not available,
execute the following from the local-host to get the service tag of the remote-host.

wmic /user:administrator /node:remote-host bios get serialnumber

You will be prompted for the password for account administrator.

NOTE :: type the command exactly like it appears above only replacing the remote-host
part with the workstations name or IP address you’re querying.
If you want to use a user account other than administrator, replace ‘administrator’ with the account you wish to use.


Mallware

Locked by Police Cybercrime Investigation


User profile(s)

The User Profile Service failed the logon


Apple OS X 10.8.0 Mountain Lion

Posted on 2012/08/13 by arno Posted in Apple, Mac OSX

New Features

Webwereld: Nieuwe commandline-programma’s in Mountain Lion

Hardware review – OCZ Vertex 3/4

Posted on 2012/07/25 by arno Posted in Uncategorized Leave a comment

OCZ Vertex 4 sata-iii 2.5″ SSD | support forum | download fw

OCZ Vertex 3 sata-iii 2.5″ SSD | support forum | download fw

Reviews

http://www.guru3d.com/article/ocz-vertex-4-ssd-review/
http://www.anandtech.com/show/5719/ocz-vertex-4-review-256gb-512gb/

http://www.hardwarecanucks.com/forum/hardware-canucks-reviews/52963-ocz-vertex-4-512gb-ssd-review.html
http://hexus.net/tech/reviews/storage/37357-ocz-vertex-4-ssd-256gb-512gb/

Tweaks

Agility 3 Stutter fix
Intel-Enterprise-drivers-seem-to-solve-Vertex-3-BSOD

OCZ – Windows 7 Ultimate Tweaks & Utilities


Apple OSX my experiances

Posted on 2012/07/19 by arno Posted in Apple, Mac OSX, Uncategorized

Mac mini

2011 Mac Mini Hard Drive Upgrade Video

Ervaringen met OS X 10.7.4 – 10.8.4

Hier mijn ervaringen met OS X 10.7.4 op een Mac mini (mid 2011) i5-2.5Ghz

(Mac mini Server specificaties)
De omschakeling van Windows naar OS X is behoorlijk wennen, maar wel de moeite waard 🙂
Ik heb vaak de momenten van dat het toch ook soms zo voor de hand liggend is en dat het gewoon werkt.
Snelheid van deze mac mini is wat moeilijk in te schatten vanwege dat het te kort hiervoor mee gewerkt heb.
Wel is het zo dat deze soms een “rechter muis knop” een seconde duurt voordat het menu naar voren komt.
Bij de aankoop (2011) van de Mac mini stond OS X 10.7.x Lion, nu (juli 2012) staat OS X 10.8.x Mountain Lion op het moment van uitkomen.
In deze versie zijn er een aantal (200+) veranderingen,
met name de “cloud” functies wat je documenten op internet centraal opslaat en toegankelijk maakt vanaf de meeste apple apparaten

Toetsenbord layout

– Nederlands / VS-Internationaal
Hierbij is de vraag hoe je toetsenbord gewend bent, zelf heb ik al sinds 1983 een VS-Internationale indeling, hiervan wil ik ook niet meer afwijken.
het is aan te raden om ook je windows machines waar je veel op werkt ook te voorzien van een apple keyboard om er sneller aan te kunnen wennen.

Standaard wordt overal een Nederlandse indeling gebruikt en verkocht, meestal hebben ze geen vs-internationaale indeling.
Het verschil zit hem in de  <enter>, <back-slash>, <insert>, <delete> en Numerieke blok.
Normaal toetsenbord met numeriek blok hiervan komt de indeling overeen met een PC Toetsenbord,
dit vindt ik zelf prettiger werken dan een Bluetooth keyboard.
De layout van een Bluetooth keyboard komt overeen met de MacBooks (laptops) van Apple.

Werkgeheugen

Standaard word de mac met een relatief lage hoeveelheid geheugen (4Gb) geleverd, uitbreiden hiervan kost bij Apple aanzienlijk ( extra 4Gb = € 100).
Zelf heb ik een upgrade naar 8Gb (Kingston geheugen) vrijwel direct uitgevoerd.
Dit was het aangegeven maximum door Apple, uit MacTracker (zie software)
staat dat 16Gb ook mogelijk is, ook specificaties van Intel Processor geeft dit aan.
Vandaag heb ik een upgrade besteld naar totaal 16Gb besteld bij mycom.nl voor €91 inc.BTW
Het geheugen dat in gebruik is met een aantal applicaties open is bij mij 5Gb, zelf heb ik het vermoeden dat het geheugen vrij snel vol loopt.

Harddisk

Standaard zit er één harddisk in de mac mini, er is plek voor twee, een ander type kabeltje is verkrijgbaar.
Hiermee kunnen er twee SATA600 harddisks worden aangesloten (bijv. een SSD)
Deze is verkrijgbaar bij Visual Information Services (UK), de store heet AppleMacParts
Deze upgrade zal het systeem zeer snel maken vanwege dat SSD de SATA600 poort volledig benut. Nadeel is dat dit vrij prijzig is.
Bij het installeren van software valt op dat je de installatie lokatie ook op een ander volume (schijf) kan installeren
wat de noodzaak om een grote SSD (+480Gb) niet noodzakelijk maakt.

Software

Ervaringen met software die niet door mac is gemaakt is dat de standaard invoer wijze soms niet hetzelfde is.
Tip. Promo’s van MacUpdate – http://www.mupromo.com (bij hun heb ik een 10 software pakketen waaronder KeyQue en Parallels gekocht)
KeyQue, snel én eenvoudig weergeven van globale en programma snelkoppelingen.
TimeMachineEditor, als je een back-up systeem TimeCapsule in je netwerk hebt zitten dan kan je hiermee de interval tijd aanpassen.
Flux, pas de kleur temperatuur aan van het scherm, aan de hand van de tijd van de dag. Wat het beeld rustiger maakt.
Carbon copy cloner, Om OS X systeem te klonen naar een andere harddisk.
MacTracker, Apple apparaten specificaties, alles in één programma.

Apple:

iTunes, Werkt nog even sloom als we gewend zijn.
Update: v11.0 is stukken verbeterd maar ook een grote verandering in het interface.
De sidebar is terug te halen met <alt>-<command>-“S”
Mail, werkt fijn is zeer basic, als je Microsoft Outlook gewend ben zal je het een beetje missen.

Virtualisatie (Machines)

Windows, Linux of andere besturingen systemen draaien op een Apple OS X.
Voor zover heb ik VMware en Parallels geprobeerd, wat mij direct opviel is dat de bediening van de software.
Bij Parallels veel meer mac gericht is én ook een betere ondersteuning heeft van het aansturen van de grafische presentatie.
Over het algemeen werkt het niet super soepel, maar het is wel werkbaar om specifieke windows software te kunnen gebruiken.
Tot nu toe heb ik het nog niet uitvoerig gebruikt en kan hierdoor er ook nog niet veel over vertellen.
Tweaks – Hints
Disable dashboard (source)
$ defaults write com.apple.dashboard mcx-disabled -boolean Yes
$ killall Dock
Parallels – turn of Ads (source)
$ defaults write com.parallels.Parallels\ Desktop ProductPromo.ForcePromoOff -bool YES
Where does $LANG variable gets set in Mac OS X? (http://apple.stackexchange.com)
[ Terminal > Preferences > Settings > [profile] > Advanced ] Set locale environment variables on startup
Then the locale will default to “C” with no language specified, and most programs will then default to English.

Hide any program’s dock icon (source)

sudo chmod 464 /Applications/System Preferences.app/Contents/Info.plist
edit or add KEY "NSUIElement" and change STRING variable to "1".
<key>NSUIElement</key>
<string>1</string>

Software

Linux

TimeMachine, Onder linux kan je deze “emuleren” met “netatalk” service.
FileServer, http://joserocks.com/2012/10/how-to-set-up-centos-6-as-a-replacement-os-x-file-server/ (link downstairs)
AirVideoServer, (java) een centraal video streaming service, op ipad/iphones met app “Air Video” kan je dan kijken.
AirPrintServer, (linux) Link 1, Link 2

OS X

TimeMachineEditor, RHEL/CentOS/SLS6 software for Mac OS X Leopard, Snow Leopard and Lion that lets you change the default one-hour backup interval of Time Machine.

Lion Diskmaker, Mac OS X 10.6, 10.7 and OS X 10.8 to burn a DVD or build a bootable drive.

Reminders, Making the Most of Reminders and Notes in OS X Mountain Lion

File Server, Howto CentOS 6 As a replacement osx file-server

Windows

MagicMouse utility

Links

Apple Software Volume Licensing
Apple OS X keyboard shortcuts and characters
http://hints.macworld.com

References

How to Set Up CentOS 6 as a Replacement OS X File Server

source: http://joserocks.com/2012/10/how-to-set-up-centos-6-as-a-replacement-os-x-file-server/

So, Apple has abandoned the XServe.  There is not 1U product that is available that Apple is making to take its place.  Yeah, I don’t get it either, but whatever.  Apple obviously knows what they are doing at this point.  After failing to convince our network guys to take up precious space in the server room with a Mac Pro tower, I was told that we will be replacing our Mac OS X file servers with 1U Dell servers running Red Hat Linux.  Ok, it’s been a while since I have used Red Hat servers (I’ve used Ubuntu in the recent past) however, I decided that it couldn’t be that much different.  Trouble is, I couldn’t find a straight-forward how-to about setting this up on Red Hat (or CentOS…this is what I used to ensure this was going to work.  Since CentOS is the free implementation of Red Hat, I will refer to it for the remainder of this article).  I wanted to use the AFP (Apple File Protocol)  implementation on CentOS, so I won’t have to change scripts, server connections, and backup programs on all of our Mac clients just to satisfy a new server setup.  Below are the steps I used to achieve this.  My hope is that other people who want to do this same thing, will not have to cobble together information from different sources to do this, and that this article will help them.  This article will take you through the entire process, from server OS install to AFP/Bonjour  configuration.   If you don’t care about server set up, and just need the good stuff, skip to step 11 below.

****WARNING****

This is only meant to be a BASIC GUIDE to set up a CentOS or Red Hat Linux server to replace a Mac OS X file server.  There are some huge security issues not addressed in this guide.  Please use common sense and do your research before you roll this out in an important environment.  This guide ONLY addresses the basics of how to setup a Linux server that caters to the AFP protocol and Macs connecting to it natively.

****End of Warning****

Alright, crack the knuckles.  Let’s get started.

These instructions are tested and verified for CentOS Linux Server edition 6. May work on other Linux distros.

1.) The first step is to visit CentOS.org and download the CentOS 6.  I went with the minimal edition.

http://mirror.mojohost.com/centos/6/isos/

Pick your platform (32-bit or 64-bit) and download the ISO.  Burn the ISO to a CD (not covered in this tutorial, but this information can be easily found via Google or whatever search engine you prefer).

2.) Install CentOS minimal install with CD.

Follow all of the prompts.  For the purposes of this tutorial, I did not install any additional services during the install.

3.) OK, after the install, the network card must be enabled.  They aren’t kidding when they call this a minimal install!

  • navigate to /etc/sysconfig/network-scripts/
  • vi ifcfg-eth0    ## your network card may be called something else.  Most defaults will be eth0.
  • Change ONBOOT=”no” to ONBOOT=”yes” save changes and exit
  • ifconfig eth0 up
  • service network restart  ## just to make sure your network daemon restarts your eth0 connection.

4.) Alright, now to install some basics

  • Install the following with yum (yum install xxxx)
  • wget
  • sudo
  • nano
  • ntp
  • gcc
  • make
  • perl
  • kernel-headers
  • system-config-network-tui

5.) It’s probably a good idea to create a non-root user.  Ubuntu has spoiled me so, I am used to sudoing all of my root commands.  This way, I (usually) never accidentally do anything that I don’t mean to do as root:

  • useradd monkeyman
  • passwrd monkeyman

6.) Ok, now you need to add your new user to the sudoers file:

  • visudo (the /etc/sudoers file must be edited with visudo command)
  • Add the following line to the bottom of the file:
  • monkeyman ALL=(ALL) ALL

A quick break down of the above line is as follows:

monkeyman : name of user to be allowed to use sudo
ALL : Allow sudo access from any host/IP address
(ALL) : Allow sudo command to be executed as any user.
ALL : Allow all commands to be executed

Groups and domain users can be added as well.  For example:

single domain users:

DOMAIN_NAME\\monkeyuser ALL=(ALL) ALL   ## where “DOMAIN_NAME” is your domain name and “monkeyuser” is the name of a user on your domain.

or a group:

%DOMAIN_NAME\\monkeytribe ALL=(ALL) ALL  ## where “monkeytribe” is the name of a group of users on your Active Directory domain.

note the % sign must be present for group designations.

Got that?  Good.  I hope that is clear enough.  I remember trying to figure some of that out for hours the first time I tried to set it up.
7.) Save the file and exit the editor.

8.) Disable SELinux:

  • SELinux is the extra security layer that is utilized by CentOS.  It is really well implemented however, Like-Wise Open will not install with this enabled.  So it’s got to go.
  • sudo nano /etc/selinux/config
  • set the “SELINUX” status line to disabled.  SELINUX=disabled
  • reboot    ## I know, you should be able to just restart a service.  However, SELinux tells you to reboot after turning it off.  As a side note, you could set this setting to “permissive” however, you will get a lot of weird messages when you do certain things.  These messages are only informative, but screw it, they annoy me.  So, I just turn it off.  Security admins, you can start screaming.   I don’t care.  This is just a “brief” how-to, remember?

9.) Once you get rebooted, it’s time to install like-wise open (now called pbis-open), so we can get this bad boy on our domain:

  • Look, freaking go to http://www.powerbrokeropen.org/, register and legally get their software.  It’s free, and all you have to give them is a first name, last name, and your email address.  However, for the sake, and out of pity, for those *nix admins that might be reading this at 2 am, who just want to go home, go to sleep, and let their tired, broken hands rest for a few hours, here is the link to get the software:
  • wget http://download.beyondtrust.com/PBISO/7.0.4/918/pbis-open-7.0.4.918.linux.x86.rpm.sh
  • (this is the current path as of the writing of this article, and may change in the future. Check http://www.powerbrokeropen.org for more information)
  • sudo chmod a+x (pbis-open file name)     ## got to get this thing in a state that we can execute it.
  • sudo ./(pbis-open file name)     ## and now we install it.
  • reboot    ## just do it, OK!  If you want to restart every service that needs restarting, do it and stop complaining!

10.) Ok, once we have PBIS-Open installed, it’s time to join our server to the domain

  • sudo domainjoin-cli join DOMAIN_NAME monkeyuser     ## where DOMAIN_NAME is your domain name, and monkeyuser is a user on your domain with admin rights to add machines to your domain.
  • success message should appear

11.) Alright, at this point, we should be added to the domain, and have a basic server platform to get what we need done.  Now comes the main part of this article.  Download and install netatalk and avahi (the AFP and Bonjour pieces needed for Macs to see AFP shares on Linux):

  • Enable EPEL (Extra Packages for Enterprise Linux)
  • (again as current of this writing: sudo rpm -Uvh http://dl.fedoraproject.org/pub/epel/6/i386/epel-release-6-7.noarch.rpm)  ## this will add EPEL to your yum repository.
  • sudo yum install netatalk     ## this will create the AFP fileserver on your linux server
  • sudo yum install avahi.i686  ## this is essentially the open source version of ZeroConf, better known in the Apple world as Bonjour.
  • sudo nano /etc/netatalk/afpd.conf
  • Uncomment and add this to the bottom of the file:
  • – -tcp -noddp -uamlist uams_dhx.so,uams_dhx2_passwd.so -nosavepassword -setuplog “default log_info /var/log/afpd.log”

12.) Time to define your AFP shares:

  • sudo nano /etc/netatalk/AppleVolumes.default
  • Scroll to the bottom and add the share location:
  • In this case, the share is a folder called “Storage” that was created in “/opt/Storage)

# End of File

/opt/Storage “Storage” cnidscheme:dbd

13.) Make services start at boot time.   Netatalk and avahi-daemon will need to be configured to start at boot. Do this with chkconfig:

  • sudo chkconfig netatalk on
  • sudo chkconfig avahi-daemon on
  • reboot

Mac computers should now see a share on the Linux server that it thinks is a natural AFP share, called “Storage”. Be aware that you may have to modify the permissions to your share (in this case “/opt/Storage”) so that users can read and write to it.  In this tutorial, there is no firewall on the server.  However, your sever probably will be using one.  Make sure TCP port 548 is open so Mac clients can see the shares and authenticate correctly.  One more side note, I read somewhere that a space in your AFP share declaration (“Storage Sever” as opposed to “StorageServer” or just plain “Storage”) may cause some strange things with your Mac clients not being able to connect to your AFP share.  I did not experience this, but just something to check if you run into issues.

And that, is just about it. Again, this is just a bare-bones how-to, but hopefully it will get some of you guys and gals where you need to be.  I would not have been able to do this without some how-tos and resources.  I ‘d like to thank the people below for the information that they originally posted, and helped me to cobble enough information to do this on CentOS 6.

Jose would like to thank:

Barry Price:
http://www.barryprice.co.uk/2012/05/04/apple-file-server-on-ubuntu-12-dot-04/

Did this with Ubuntu and gave me an idea where to start for CentOS 6

rathelm:
http://rathelm.wordpress.com/2012/02/03/cent-os6-2-and-netatalk-2-2-0/

pointed me in the right direction for the EPEL packages for CentOS 6

Beyondtrust.com and the people that originally developed Like-Wise Open (now PBIS Open)
http://www.powerbrokeropen.org/

Chris Colotti
http://www.chriscolotti.us/technology/how-to-get-started-with-centos-minimal/

Gave me some direction on getting basic services needed for CentOS.  There is seriously almost nothing on the minimal install!

Happy Installing (and maintaining, and updating, and tweaking, and optimizing, and recovering…)!

Support – Disktools Western Digital

Posted on 2012/07/16 by arno Posted in Uncategorized Leave a comment

Mobile harddisk power adapters

Disk Tools

http://www.osforensics.com/tools/mount-disk-images.html

Protected: Hardware T bak

Posted on 2012/07/15 by arno Posted in Uncategorized

This content is password protected. To view it please enter your password below:

Links – AutoCAD

Posted on 2012/07/02 by arno Posted in Learning, Links Leave a comment


http://www.we-r-here.com/cad/tutorials/index.htm


iPhone paths

Posted on 2012/07/01 by arno Posted in Apple

Call history database – /var/mobile/Libary/CallHistory/call_history.db
SMS history – /private/var/mobile/Library/SMS

Synced folders:
Notes – /private/var/mobile/Library/Notes
Favorites – /?

Synced Folders/Exchange:
Calender – /private/var/mobile/Library/Calendar
Contacts – /private/var/mobile/Library/AddressBook
Mail – /?

* This is where you’ll find Contacts, Notes and Calls:
“private/var/mobile/Library”
* This is where you’ll find your captured photos of the Camera Roll:
“private/var/mobile/Media/DCIM/100APPLE”
* This is where you’ll find your Memos:
“private/var/mobile/Media/Recordings”
* This is where you’ll find the Backups of the Mobile Substrate files:
“Library/MobileSubstrate”
* This is where you’ll find your Cydia’s Sources:
“private/etc/apr/sources.list.d” Or “var/lib/apt/lists”
* This is where you’ll find your Cydia’s Applications:
“private/var/stash/Applications/xxxx”
* This is where you’ll find your AppStore’s Applications:
“private/var/mobile/Applications/xxxx/” (Use Applinks to decrypt the names of the Folders)
* This is where you’ll find your Winterboard Themes:
“private/var/stash/Themes/xxxxx”
* This is where you’ll find your Ringtones:
“private/var/stash/Ringtones/xxxx”
* This is where you’ll find Files related to the system’s sounds:
“System/library/Audio/UISounds”
* This is where you’ll find your SBSetting’s Themes:
“private/var/mobile/Library/SBSettings/Themes”
* This is where you’ll find your videos captured using Cycorder:
“var/mobile/Media/videos”
* This is where you’ll find your videos captured using iPhone Video Recorder:
“var/mobile/Media/iphonevideorecorder3g”
* This is where you’ll find your videos downloaded using MxTube:
“var/mobile/Media/mxtube”
* This is where you’ll find files related to your Contacts:
“/var/Mobile/Library/AdressBook”
* This is where you’ll find files related to the Calendar:
“/var/Mobile/Library/Calendar”
* This is where you’ll find files related to the Notes:
“/var/Mobile/Library/Notes”
* This is where you’ll find files related to the bookmarks of Safari:
“/var/Mobile/Library/Safari/Bookmarks”
* This is where you’ll find files related to the Mail:
“/var/Mobile/Library/Mail”
* This is where you’ll find files related on the Call History:
“/var/Mobile/Library/CallHistory”
* This is where you’ll find files related on the SMS:
“private/var/mobile/Library/SMS”
* This is where you’ll find the files downloaded using MewSeek:
“/var/mobile/Media/MewSeek/Downloads”
* This is where you’ll find your videos captured using DisplayRecorder:
“private/var/mobile/Library/KeyBoard/DisplayRecorder”
* This is where you’ll find your messages of BiteSMS:
“/private/var/mobile/Library/BiteSMS/BiteSMS.db”
* This is where you’ll your favorites of the Maps.app:
“/private/var/mobile/Library/Maps/Bookmarks.plist”

sources: http://us.hackyouriphone.org/interesting-paths-for-ifile-and-ssh.html

Apple

Microsoft WSUS Service

Posted on 2012/07/01 by arno Posted in Microsoft

Configure Clients in a Non–Active Directory Environment

http://forums.overclockers.co.uk/showthread.php?t=18250825

http://www.sevenforums.com/windows-updates-activation/63158-configuring-windows-7-home-premium-wsus-updates.html

Manage WSUS 3.0 SP2 Storage

Troubleshooting WSUS

Move Database

Posted on 2012/07/01 by arno Posted in Microsoft

http://social.msdn.microsoft.com/Forums/en-US/sqlgetstarted/thread/5c0e5ba5-1e1a-4c38-ac92-3e5c50ac6c7b/

Outlook 2010 Templates and reports

Posted on 2012/07/01 by arno Posted in Microsoft, Office

Outlook howto – http://www.howto-outlook.com/howto/messagetemplates.htm

Download the Policy Templates

The Policy Templates and documentation are included in the Office Resource Kit. Use the links below to download the Resource Kit for your Outlook version.

  • Outlook 2000 ORK
  • Outlook 2002/XP ORK
  • Outlook 2003 ORK
  • Office 2007 Policy Templates
  • Office 2010 Policy Templates

Windows XP/2003 location – C:\Windows\inf Windows 7/2008 location – C:\Windows\PolicyDefinitions

Reports

Creating a Simple Time-Reporting Tool Based on the Outlook 2010 Calendar

http://msdn.microsoft.com/en-us/library/hh144973(v=office.14).aspx

http://www.howto-outlook.com/howto/timespent.htm

[billing information] field – http://www.pcreview.co.uk/forums/billing-information-field-t3995746.html

http://www.gregthatcher.com/Scripts/VBA/Outlook/GetEmailInfo.aspx

http://office.microsoft.com/en-us/outlook-help/track-billable-hours-by-using-outlook-HA001226396.aspx

http://msdn.microsoft.com/en-us/library/ee692173(v=office.14).aspx


Hardening website

Posted on 2012/07/01 by arno Posted in Uncategorized Leave a comment

Hardening website

http://stackoverflow.com/questions/593922/ip-restriction-with-htaccess

http://perishablepress.com/stupid-htaccess-tricks/

Windows Features XP

Posted on 2012/06/19 by arno Posted in Features, Windows
[ Features | Office | IE | ]
[ Windows | XP | 7 (seven) | 8 | 10 | ] - [ Server | 2003SBS | 2008SBS | 2011SBS | 2016 | WSUS ]

User profile stuck in “Backup” status.

How to copy data from a corrupted user profile to a new profile in Windows XP.
User Profile Hive Cleanup Service

I deleted the temp-newly created profile and renamed the profile key in the registry (there was one with a “.bak” behind it).
“HKEY_LOCAL_MACHINE\SOFTWARE\Microsoft\WindowsNT\Cu rrentVersion\ProfileList\<SID>”

WSUS Features

Posted on 2012/06/15 by arno Posted in Uncategorized Leave a comment
[ Features | Office | IE | ]
[ Windows | XP | 7 (seven) | 8 | 10 | ] - [ Server | 2003SBS | 2008SBS | 2011SBS | 2016 | WSUS ]

Microsoft Windows 7 / WSUS in a SBS 2003 domain

http://www.edugeek.net/forums/windows-server-2008-r2/80624-how-setup-wsus-2003-2008-2008-r2-server.html

Install and configure WSUS 3.0 SP2 – Step-By-Step

Disable windows clients wsus GPO usage.

HKEY_LOCAL_MACHINE\SOFTWARE\Policies\Microsoft\Windows\WindowsUpdate\AU

Windows 7 commandline

Posted on 2012/06/08 by arno Posted in Uncategorized, Windows Leave a comment

Shutdown

Shutdown %windir%\System32\shutdown.exe -s

Reboot %windir%\System32\shutdown.exe -r

Logoff %windir%\System32\shutdown.exe -l

Standby %windir%\System32\rundll32.exe powrprof.dll,SetSuspendState Standby

Hibernate %windir%\System32\rundll32.exe powrprof.dll,SetSuspendState Hibernate

Microsoft Software Updates

Posted on 2012/05/30 by arno Posted in Features Leave a comment

2019-05 | G-Hacks

20120412 – kb2553248 causes outlook to ask for smart card

KB2849973 – Outlook 2010 hotfix Outlook-Calendar property missing

Linux WiFi access

Posted on 2012/05/18 by arno Posted in Linux

source: http://blog.sudonetworks.com/2010/03/configuring-wpawpa2-on-linux-clients.html

Configuring WPA/WPA2 for WiFi access on Linux Clients

Configuring a Linux WiFi client is not always as easy as with Windows or MAC OS X. In this first post I will show you how to configure your Linux client to associate with an access point. For this example, I use Ubuntu version 8.x. This procedure may vary from one Linux variant to another. The SSID I want to connect to is APN and my WiFi interface is wlan1. Here are the steps for WPA/WPA2 PSK (commands are in boldface):

1. Generate your WPA/WPA2 passphrase

~# wpa_passphrase [APN]
# reading passphrase from stdin
[enter yoursecretkey]
network={
ssid="APN"
#psk="yoursecretkey"
psk=9ae7a5f631ecc688db8dcc6bbf317b4a551b39e9ee9c20effb5393e342bd954b
}

2. Copy your wpa_passphrase

output to /etc/wpa_supplicant/wpa_supplicant.conf from the above step, it starts with “Network={” and ends with a closing curly brace “}”.
You may want delete the comment “#psk=yoursecretkey”

~# wpa_passphrase [APN] > /etc/wpa_supplicant/wpa_supplicant.conf
[enter yoursecretkey]
~# vi /etc/wpa_supplicant/wpa_supplicant.conf

3. Enable your wireless interface

~# ifconfig wlan1 up

4. Scan for existing WLANs or SSIDs

~# iwlist wlan1 scanning | grep -i essid

ESSID:”BELL078″
ESSID:”APN”
ESSID:”2mix”

You now have a confirmation your target SSID APN is detected.

5. Configure your wireless interface for your specific SSID

~# iwconfig wlan1 essid APN

6. Start WPA/WPA2 authentication

~# wpa_supplicant -i wlan1 -c /etc/wpa_supplicant/wpa_supplicant.conf
ioctl[SIOCGIWSCAN]: Resource temporarily unavailable
CTRL-EVENT-SCAN-RESULTS
Trying to associate with 00:25:4b:0a:a3:f5 (SSID='APNSmallBang' freq=2437 MHz)
CTRL-EVENT-SCAN-RESULTS
Associated with 00:25:4b:0a:a3:f5
WPA: Key negotiation completed with 00:25:4b:0a:a3:f5 [PTK=CCMP GTK=CCMP]
CTRL-EVENT-CONNECTED - Connection to 00:25:4b:0a:a3:f5 completed (auth) [id=0 id_str=]

7. Assign IP address via DHCP

Open a new shell to type the following command:

~# dhclient wlan1
Internet Systems Consortium DHCP Client V3.1.1
Copyright 2004-2008 Internet Systems Consortium.
All rights reserved.
For info, please visit http://www.isc.org/sw/dhcp/

Listening on LPF/wlan1/00:c0:ca:2f:94:0d
Sending on   LPF/wlan1/00:c0:ca:2f:94:0d
Sending on   Socket/fallback
DHCPDISCOVER on wlan1 to 255.255.255.255 port 67 interval 3
DHCPOFFER of 172.16.22.5 from 172.16.22.1
DHCPREQUEST of 172.16.22.5 on wlan1 to 255.255.255.255 port 67
DHCPACK of 172.16.22.5 from 172.16.22.1
bound to 172.16.22.5 -- renewal in 33064 seconds.

8. Check if IP address assigned correctly

ifconfig wlan1

wlan1     Link encap:Ethernet  HWaddr 00:c0:ca:2f:94:0d
inet addr:172.16.22.5  Bcast:172.16.22.255  Mask:255.255.255.0
inet6 addr: fe80::2c0:caff:fe2f:940d/64 Scope:Link
UP BROADCAST RUNNING MULTICAST  MTU:1500  Metric:1
RX packets:7 errors:0 dropped:0 overruns:0 frame:0
TX packets:10 errors:0 dropped:0 overruns:0 carrier:0
collisions:0 txqueuelen:1000
RX bytes:1092 (1.0 KB)  TX bytes:1580 (1.5 KB)

At this point, you should be connected to your AP

Linux

AVM Fritz box

Posted on 2012/05/16 by arno Posted in Uncategorized Leave a comment

VPN Portal

http://www.64k-tec.de/2010/02/fritzbox-tuning-part-2-access-your-home-network-with-openvpn/

Firewall

http://hansmi.ch/articles/fritzbox-m0n0wall-vpn

Telefone codes

http://www.wehavemorefun.de/fritzbox/Tastencodes

Configuration files

fritzbox/Ar7.cfg

Project links

http://fritzing.org/projects/
Wehavemorefun.de/fritzbox | Ar7.cfg

http://www.koerner.in/

FRITZ!Box tuning part 1: Enable remote access over ssh

FRITZ!Box tuning part 2: Access your home network with OpenVPN

FRITZ!Box tuning part 3: Using the VoIP phone line from everywhere

FRITZ!Box tuning part 4: Cross-building and installing additional applications

Links

Whirlpool.net.au – Fritz.box and Cisco SPA500
Wehavemorefun.de – Firmwarecfg-Konsole
Tweakers.net Userreview FB7390

http://v2.nat32.com/fritz.htm

FAQ

Q: CLIP (Nummerweergave) over POTS (analoog telefoon)
http://xs4all.adsl.narkive.com/IEwhFeo2/fritzbox-7340-geen-nummerweergave
http://www.codehacker.nl/nummernummerweergave
https://forum.www.trosradar.nl/viewtopic.php?t=68329
Converter EX710 DTMF-FSK | EX700 (limocom)

Google search clip dtmf fsk | dtmf fsk converter

Notes

**** CFGFILE:ar7.cfg
/*
 * /var/flash/ar7.cfg
 * Wed Jun 19 17:17:08 2013
 */

ar7cfg {
        igddenabled = no;
        igdd_control_enabled = no;

        dslifaces {
                enabled = no;
        } {
                enabled = no;
                name = "voip";
                dsl_encap = dslencap_inherit;

**** END OF FILE ****
**** CFGFILE:usb.cfg
/*
 * /var/flash/usb.cfg
 * Sat Jan  1 01:04:12 2000
 */

usbhost {
        ftp_server_enabled = no;
        samba_server_enabled = no;
}

media {
        media_server_enabled = no;
}

Outlook 2010 Features

Posted on 2012/05/10 by arno Posted in Features, Office

Links

Inleiding tot Outlook-gegevensbestanden

kb2553248 causes outlook to ask for smartcard

http://www.sevenforums.com/tutorials/129318-outlook-2010-always-send-default-account.html

To force all new messages to use the default account, browse to the following registry subkey:
HKEY_CURRENT_USER\Software\Microsoft\Office\14.0\Outlook\Options\Mail
Create a new DWORD value named NewItemsUseDefaultSendingAccount
Value: 1

Outlook, Multiple Accounts and the Default Account

Creating a Simple Time-Reporting Tool Based on the Outlook 2010 Calendar

Proofing  Custom dictionary | Autocorrect (C:\Users\<username>\AppData\Roaming\Microsoft\Office\*.acl)

Outlook PST/OST limits |  The file size limits of .pst and .ost files (2010/2013) | configure limits

Dutch function-names has changed

http://support.microsoft.com/kb/2551525/nl

Nederlands
De volgende tabel bevat de Nederlandse werkbladfuncties die zijn gewijzigd in Service Pack 1:

Engelse functie 2010 Excel 2010 Excel 2010 SP1
CHOOSE KIES KIEZEN
CLEAN SCHOON WISSEN.CONTROL
DAVERAGE DGEMIDDELDE DBGEMIDDELDE
DAYS360 D360 DAGEN360
DCOUNT DAANTAL DBAANTAL
DGET DHAAL DBLEZEN
DOLLAR VALUTA EURO
DSTDEV DSTDEV DBSTDEV
DSUM DSOM DBSOM
FIND VINDEN.ALLES VIND.ALLES
LOOKUP OPZOEKEN ZOEKEN
LOWER KLEINELETT KLEINE.LETTERS
MID MIDDEN DEEL
NPV HNW NHW
PMT AFLOSSING BET
PROPER BEGINKAP BEGINLETTERS
REPLACE VERVANG VERVANGEN
ROUND AFRONDING AFRONDEN
SLN RAA LIN.AFSCHR
SQRT VWORTEL WORTEL
UPPER HOOFDLETT HOOFDLETTERS
VALUE GETAL WAARDE
VDB VAP VDB

De volgende tabel bevat de Nederlandse werkbladfunctiemacro’s die zijn gewijzigd in Service Pack 1:

Engelse functie 2010 Excel 2010 Excel 2010 SP1
BREAK EINDE ONDERBREKEN
FOR VOOR VAN
GOTO GANAAR GA.NAAR
GROUP GROEP GROEPEREN
NOTE OPMERKING NOTITIE
RESTART OPNIEUW OPNIEUW.STARTEN

Features

Printer tray not changing (document settings overrule printer settings)

The printer settings are ignored when you print a Word document

Application Settings Take Precedence over Printer Driver Settings for Tray Selection and Other Paper Setup Settings

« Previous Page
Next Page »
  • Login
  • Mother of all Portals
  • .Handy .Handig
  • Links – wikis – wikies

Archives

  • June 2022
  • October 2021
  • June 2021
  • September 2016
  • April 2016
  • March 2016
  • November 2014
  • September 2014
  • August 2014
  • July 2014
  • April 2014
  • March 2014
  • November 2013
  • October 2013
  • August 2013
  • July 2013
  • June 2013
  • May 2013
  • April 2013
  • February 2013
  • December 2012
  • September 2012
  • August 2012
  • July 2012
  • June 2012
  • May 2012
  • April 2012
  • March 2012
  • January 2012
  • December 2011
  • November 2011
  • October 2011
  • September 2011
  • August 2011
  • July 2011
  • June 2011
  • May 2011
  • April 2011
  • February 2011
  • January 2011
  • December 2010
  • November 2010
  • October 2010
  • September 2010
  • August 2010
  • July 2010
  • June 2010
  • May 2010
  • April 2010
  • March 2010
  • February 2010
  • January 2010
CyberChimps ©2025