Miralinux Blog

  • Home
  • Linux
    • Scripts
    • CentOS
  • Apple
  • Microsoft
    • Features
    • Office
    • Windows
  • Learning
  • Games
  • Multimedia
    • XBMC
  • Other
    • About WordPress
  • Links
    • General
    • Software
      • Autocad
    • Hardware
      • BIOS
    • Linux
    • WiKieS

Category Archives: Features

MBR2GPT Prepairing for Windows 11

Posted on 2022/06/17 by arno Posted in Features, Windows

source: https://answers.microsoft.com/en-us/windows/forum/all/convert-an-existing-windows-10-installation-from/aa8c2de3-460b-4a8c-b30b-641405f800d7

Pre-requisites:

  1. The MBR disk must have at most 3-partitions.
  2. The OS must be 64-bit.
  3. Bitlocker or encryption must be turned off.
  4. There should be an Operating system on the disk.
  5. One of the partitions must be active(confirm that from disk Management).
  6. No dual boot.
  7. Windows 10 version must be at least version 1703.

Step 1: Boot to the Recovery environment

To boot to WinRE, from where Windows can trigger the MBR2GPT tool, please see the steps below:

  1. On the Lock screen, press and hold the Shift key while choosing Restart from the Power menu. Continue pressing the shift key until you see the Windows Recovery environment, asking you to select an option.
  2. Click Troubleshoot>Advanced options>Command Prompt.
  3. The computer would restart.
  4. Login to your account.

Step 2: Validate if the MBR2GPT tool can convert your disk 

On the Command Prompt Window, our next step would be to check if the tool can convert the disk to GPT. To do this, execute the following command:

mbr2gpt.exe /validate

The output should tell you if the validation is successful. If the disk is validated, conversion is possible.

Step 3: Convert the disk.

The next step is to convert the disk. For that, use the /convert switch.

mbr2gpt.exe /convert

The process would take some minutes and tell you the output.

Step 4: Change the boot order in firmware Settings

Now to boot from GPT, the settings in the firmware need to be changed. Boot to the PC’s firmware settings, and do the following:

  1. Boot method: UEFI from Legacy.
  2. UEFI-CSM: Disabled.
  3. Secure Boot: ON.

The boot order would usually show Windows Boot Manager at the top. Save the changes in the BIOS menu.
The device should now have a UEFI boot method with a GPT disk layout.

Troubleshooting

If the MBR2GPT tool is failing to convert your installation, here are some steps you can try.

  1. Make sure the existing MBR disk has only three partitions or less: If the qualifying hard disk has more than three partitions, this tool would not work. To confirm the number of partitions, you can invoke the disk management tool from the Start menu. The three-count includes System partitions as well. If that is the case, decrease partitions using the Disk Management tool by merging and try again. 
  2. Run a disk check: If there is corruption on the disk, the tool may fail. To fix this, run a full disk check, preferably from the Recovery environment. See the steps here.
  3. Try running from a USB Installation media: Another option to invoke the MBR2GPT tool from a USB Installation media. After the computer has booted from the Installation media, click Repair your computer>Troubleshoot>Command Prompt.
  4. Return codes: If the conversion failed, the tool would return a code, which would tell you what went wrong. Appendix A table explains the return codes.
  5. Investigate Log files: If nothing has helped, it may be wise to look at the logs to see what went wrong. By default, the MBR2GPT tool creates Setupact.log and Setuperr.log in the C:/Windows directory, which records the process. Setuperr.log contains all the errors encountered during the conversion, which may give a hint. In addition, /logs switch can also redirect logging to a custom path if you need, like for an external drive which helps investigate later. The command for logging to a custom path would be like this(replace D:\Work with your desired path).
    1. mbr2gpt.exe /convert /logs:D:\Work
  6. If nothing has helped, perform a clean installation of Windows 10 using the GPT partition scheme. You must back up the data before, as a clean install would remove everything. As the Media Creation tool makes the media according to the existing method, which is likely MBR, use Rufus to create Installation media and choose GPT partition scheme for UEFI. My colleague Shawn has a good tutorial on this on Tenforums.

Appendix 1:

Return CodeDetails
0Conversion completed successfully.
1User canceled.
2Internal error occurred.
3Disk initialization error.
4Command-Line parameters were incorrect.
5MBR2GPT could not read the disk layout.
6One of the volumes was encrypted on the disk.
7The disk does not meet the requirements.
8EFI Partition could not be created.
9Error installing boot files.
10Error while applying GPT layout.

Windows offline files

Posted on 2021/10/20 by arno Posted in Features

Method one: use registry entry

  1. Open up registry editor (WARNING: Only for Advanced Users)
  2. Browse to HKEY_LOCAL_MACHINE\SYSTEM\CurrentControlSet\Services\Csc
  3. Add a new key (folder) called Parameters
  4. Under HKEY_LOCAL_MACHINE\SYSTEM\CurrentControlSet\Services\Csc\Parameters, add a new DWORD called FormatDatabase and set its value to 1
  5. You will need to reboot the PC afterwards.

Method two: clear the CSC folder

  1. Located to C:\Windows\CSC
  2. To access this folder, you need take ownership firstly.
  3. Right-click CSC folder that you want to take ownership of, and then click Properties.
  4. Click the Security tab, click Advanced, and then click the Owner tab.
  5. Click Edit. If you are prompted for an administrator password or confirmation, type the password or provide confirmation.
  6. Click the name of the person you want to give ownership to.
  7. .If you want that person to be the owner of files and subfolders in this folder, select the Replace owner on subcontainers and objects check box.
  8. Click OK.
  9. Then clear all content in this folder.

Offline files and DFS where the CSC needs to be cleared (4.)

REG ADD "HKLM\System\CurrentControlSet\Services\CSC\Parameters" /v FormatDatabase /t REG_DWORD /d 1 /f

Office 2003/2007/2010/2013 Features

Posted on 2016/03/13 by arno Posted in Features, Office

[ Features | Office | IE | ]
[ Windows | XP | 7 (seven) | 8 | 10 | ] - [ Server | 2003SBS | 2008SBS | 2011SBS | 2016 | WSUS ]


Downloads

Download Microsoft office [ 2010 | English |  Nederlands ] [ 2013 | English | Nederlands ] [ 2016 | Office.com Setup ]

Office 2013 | All Direct Downloads | Professional

UnInstall | 2013 |

Office viewers – Nederlands – English

Office 365

HOWTO: Make OWA your default mailer.

1.  Add the following to a .reg file
Windows Registry Editor Version 5.00
[HKEY_LOCAL_MACHINE\SOFTWARE\Clients\Mail\OWA]
@="Outlook Web Access"
[HKEY_LOCAL_MACHINE\SOFTWARE\Clients\Mail\OWA\shell\open\command]
@="\"C:\\Program Files\\Internet Explorer\\iexplore.exe\" http://server/exchange/alias/"

2.  Import it into the registry by double-clicking the .reg file  (Please know that mucking with the registry is potentially dangerous and can make your system unstable).
3.  Boot IE
4.  Go to IE's Tools / Options...  Programs tab
5.  Choose “Outlook Web Access” from the E-mail dropdown.
6.  Hit OK.

Now when you hit the “Mail” button on your MS keyboard you get OWA coming up automatically.  You can also add OWA to the Start Menu now, just right+click on it and choose Properties, then click the Customize start menu and choose “Outlook Web Access” from the E-mail dropdown.

source: http://blogs.msdn.com/b/tmeston/archive/2004/01/08/48837.aspx

Office 2016

Setup | Office.com Setup |  Download Office 2013, 365 links

Downgrade rights | Site 1 | Site 2 O365 |
Downgrade rights info from MS – “The OEM License Terms for OEM versions of application software do not grant downgrade rights.”

Office 2013

Office 365 (2013) Subscription


Save Attachments

http://www.pixelchef.net/content/rule-autosave-attachment-outlook

Public Sub saveAttachtoDisk(itm As Outlook.MailItem)
    Dim objAtt As Outlook.Attachment
    Dim saveFolder As String
    saveFolder = "h:\Archive\folder\"
        For Each objAtt In itm.Attachments
            objAtt.SaveAsFile saveFolder & "\" & objAtt.DisplayName
            Set objAtt = Nothing
        Next
End Sub

Public Sub save2Finbox(itm As Outlook.MailItem)
    Dim objAtt As Outlook.Attachment
    Dim saveFolder As String
    saveFolder = "H:\_FinBox"
        For Each objAtt In itm.Attachments
            objAtt.SaveAsFile saveFolder & "\" & objAtt.DisplayName
            Set objAtt = Nothing
        Next
End Sub

Move an offline Outlook Data File (.ost)

http://office.microsoft.com/en-us/outlook-help/move-an-offline-outlook-data-file-ost-HA010378297.aspx


Remove Suggested Contacts From Outlook 2010

In Outlook 2010, Microsoft has included a nifty feature called Suggested Contacts that keeps track of address’.  This is alot like the Outlook cache feature in 2003/2007 (.nk2 autocomplete).  The problem comes when Outlook syncs these contacts with your phone and you end up with various unnecessary contacts in your mobile address book.

Here is the procedure for removing the suggested contacts option and any previously created unwanted contact entries…

To Turn off the Suggested Contacts Feature:
Open Outlook and click File > Options > Contacts > uncheck “Automatically create Outlook contacts…” and click OK.

To Delete the Address Book:
1)      Click File > Account Settings > Address Books
2)      Select “Outlook Address Book” and click change
3)      Select “Suggested Contacts” and click remove address book
4)      Exit and restart Outlook.

Here’s the tricky part (sometimes that doesn’t quite do it):
1)      Log into OWA (webmail)
2)      Delete the suggested contacts folder


Office 2010 templates

http://gregmaxey.mvps.org/Customize_Ribbon.htm
http://www.mysysadmintips.com/clients/54-ms-outlook-2010-create-email-template-and-assign-a-quick-launch-button
http://msdn.microsoft.com/en-us/library/ee814735.aspx

http://msdn.microsoft.com/en-us/library/cc508991%28office.11%29.aspx#UsingtheCustomUIEditor2_AddingTemplatestotheCustomUIEditor
http://social.technet.microsoft.com/Forums/en/word/thread/e79d5649-1d1d-46bb-8c19-36dd1ebd1b18
http://office.microsoft.com/en-us/word-help/enable-or-disable-macros-in-office-files-HA010354316.aspx
http://office-watch.com/t/n.aspx?a=968

eMail Templates

http://www.mysysadmintips.com/clients/54-ms-outlook-2010-create-email-template-and-assign-a-quick-launch-button


How to save space in your outlook rules

source: http://www.sperrysoftware.com/Outlook/how-to-save-space-in-Outlook-rules.asp


Stop Processing More Rules

source: http://www.msoutlook.info/question/340

What exactly does the action “stop processing more rules” do and how/when/why should I use this when setting up rules?

All messages that are being received or sent are checked against all the rules that you have configured. This checking begins with the first rule in the list and ends with the last rule. If a rule applies to a message and this rule has the “stop processing more rules” action enabled, then that message will not be checked against any other rules and Outlook will skip to the next received/sent message that will be checked against all rules again starting with the first rule.

So when using the “stop processing more rules” action, make sure you also sort your rules accordingly to make sure that the correct rules are being fired against a message and that other rules will not be executed when a certain rule applies to a received or sent message.

A typical situation in which you might want to use this action is to prevent duplication of emails via a move action, when multiple move rules could apply to a single message.


Office [fields] update all

source: http://superuser.com/questions/196703/how-do-i-update-all-fields-in-a-word-document

Sub UpdateAll()
Dim oStory As Range
For Each oStory In ActiveDocument.StoryRanges
oStory.Fields.Update
If oStory.StoryType <> wdMainTextStory Then
While Not (oStory.NextStoryRange Is Nothing)
Set oStory = oStory.NextStoryRange
oStory.Fields.Update
Wend
End If
Next oStory
Set oStory = Nothing
End Sub

source: http://www.devblog.com/2007/12/update-all-fields-in-word-document.html

Sub UpdateALL()
 ActiveDocument.PrintPreview
 ActiveDocument.ClosePrintPreview
End Sub

source: http://www.informit.com/articles/article.aspx?p=731710&seqNum=19


Updating All Fields Automatically

When you’re working with fields, it’s common to need to update all of a document’s fields at one time.
One way to do this is to select the entire document and press F9. This works, but it’s a hassle because not only must you perform
the extra step of selecting the entire document, but that extra step also means that you lose your current cursor position.

To avoid this problem, use the VBA macro in Listing 3.11 to update all the document’s fields.

Listing 3.11. A Macro to Update All the Fields in the Active Document

Sub UpdateAllFields()
    ActiveDocument.Fields.Update
End Sub

Add this macro to a Quick Access toolbar button or assign it a keyboard shortcut (I use Ctrl+Alt+Shift+F9).

It’s also often useful to update all of a document’s fields when the document is opened. Word doesn’t do that by default, but you can create a macro that does.

Launch the Visual Basic Editor and open the project that corresponds to your document. In the project’s Microsoft Word Objects branch, double-click the ThisDocument object.
In the code window that displays, select Document in the object list and select Open in the event list. Add the following statement to the Document_Open() stub that displays:

ThisDocument.Fields.Update

Outlook shared agenda as default

No! – http://groups.google.com/group/microsoft.public.outlook.calendaring/msg/b55927cf1250a381


Reporting time spend

Mileage calculations from Tasks and Calendar

3 Methods to report time spent on Meetings, Tasks and Journal items


Backup Add-in and Outlook 2010

Outlook 2007/2003/2002 Add-in: Personal Folders Backup

Backup Add-in for Outlook 2010, Outlook 2013 or Outlook 2016


Fixes

How to fix Outlook Error 0x80042108?

Outlook 2010 only starts in Safe Mode after installing KB3114409

http://www.howto-outlook.com/news/outlook-2010-safe-mode-kb3114409.htm

https://support.microsoft.com/en-gb/kb/3114305

Outlook Only Starts in Safe Mode?


Microsoft Nags Office Software

Windows 8 Features

Posted on 2013/05/29 by arno Posted in Features, Windows

[ Features | Office | IE | ]
[ Windows | XP | 7 (seven) | 8 | 10 | ] - [ Server | 2003SBS | 2008SBS | 2011SBS | 2016 | WSUS ]


The Start Menu

http://startisback.com/

http://www.classicshell.net/

http://www.iobit.com/iobitstartmenu8.php

https://www.pokki.com/windows-8-start-menu

http://www.stardock.com/products/start8/

http://virtualizationreview.com/blogs/virtual-insider/2012/08/windows-2012-traditional.aspx

The Gadgets

http://teamwindows8.com/2013/02/install-desktop-gadgets-and-sidebar-in-windows-8/

Features

Skip “Sign in to your Microsoft account” (Windows 8.1 Setup)

You should be able to click “Create an account”, then at the bottom
of the following screen there is a (nicely hidden) link that says “use existing account”,
which uses the local account yous set up when you installed Windows 8.

Windows 8.1 Features! WSUS

Windows Update Client does not scan against WSUS 3.0 SP2 if HTTPS is configured and TLS 1.2 is not enabled

fix restart problems after you install update rollup 2919355 in Windows 8.1 or Windows Server 2012 R2

Tweaks

Imaging Windows 8.1 with Imagex?


Reviews

Windows 8.1 review – Still stupendously stupid


Windows Features

Posted on 2013/05/14 by arno Posted in Features, Windows

[ Features | Office | IE | ]
[ Windows | XP | 7 (seven) | 8 | 10 | ] - [ Server | 2003SBS | 2008SBS | 2011SBS | 2016 | WSUS ]


Memory Limits for Windows Releases

Windows lifecycle fact sheet

Windows Tweaks

https://www.technipages.com/windows-enable-disable-superfetch

Internet Explorer Features

Posted on 2013/02/19 by arno Posted in Features

[ Features | Office | IE | ]
[ Windows | XP | 7 (seven) | 8 | 10 | ] - [ Server | 2003SBS | 2008SBS | 2011SBS | 2016 | WSUS ]


Internet Explorer is not responding, appcrash NTDLL.DLL

http://pcsupport.about.com/od/fixtheproblem/a/ntdlldll.htm

Uninstall Internet Explorer 10

http://www.puryear-it.com/blog/2013/03/29/downgrade-internet-explorer-10-to-internet-explorer-9/

Windows 7 (seven) features

Posted on 2012/08/14 by arno Posted in Features, Windows

[ Features | Office | IE | ]
[ Windows | XP | 7 (seven) | 8 | 10 | ] - [ Server | 2003SBS | 2008SBS | 2011SBS | 2016 | WSUS ]


Links

http://schinagl.priv.at/nt/hardlinkshellext/hardlinkshellext.html#customoverlayicons

Download Microsoft Drivers manualy (use Internet Explorer)

Pushing the Limits of Windows: Virtual Memory

KB / Hotfixes

Microsoft SURT | Forums: 7Forums | Sysnative | (Update stopped 8007370B)

A computer that is running Windows Server 2008 R2 or Windows 7 stops responding randomly
KB2265716 – The trust relationship between this workstation and the primary domain failed.

Utilities

DiskCleanup | options | switches | technet | Schedule


Removing Libraries

source: http://www.edugeek.net/forums/windows-7/46809-windows-7-removing-libraries.html


WebDAV with Basic Authentication and Windows 7

Written by Parashift on November 25, 2013

No, Watson, this was not done by accident, but by design.– Sherlock Holmes

WebDAV is a useful protocol that allows us to leverage off of web technologies to deliver file system like functionality.  From a security perspective, as it uses HTTP, you can use the same policies and procedures for securing a WebDAV service that you would use with a web server.  For instance, running it over SSL allows you to have multiple layers of security.  Another plus is that it’s supported widely on smart phones so mobility is enhanced greatly. With our eBoard service, we provide WebDAV as one of the methods of connection so that tablets can access our file services remotely.

One of the caveats with using WebDAV is that while it may work perfectly fine on smartphones, Linux or Mac OS X, using it on Windows is another matter entirely.

The Problem

Windows 7 does not support automatically reconnecting to a WebDAV share with Basic Authentication.  You may be able to add it as a network connection, but once your PC restarts, it will fail to connect.  This is documented here with a suggested workaround:

http://support.microsoft.com/kb/2673544

A common task within a Windows environment is the automatic mapping of drives via Group Policy.  In the earlier days, this was accomplished using a logon script.  Now Group Policy allows you to dedicate mapped drives within a Group Policy definition, but unfortunately does not work very well with WebDAV connections.

The Workaround

As suggested in the article, falling back to a logon script appears to be the easiest way, but there are a number of considerations that the article fails to mention before you can get this to work successfully:

  • SSL needs to be used, or the WebClient needs to be told to allow Basic Auth use on unencrypted connections.  This is not recommended in production, but you can change it by editing the following registry key value to 2 (to allow Basic Auth on SSL and non-SSL connections):
    HKEY_LOCAL_MACHINE\SYSTEM\CurrentControlSet\Services\WebClient\Parameters\BasicAuthLevel
  • The WebClient service needs to be running.  If it’s not running and you execute a net use command for a WebDAV share, it will fail with System error 67:
    C:\Users\example>net use X: https://alfresco.example.com/alfresco/webdav/ password /U:user /P:NO
    System error 67 has occurred.
    
    The network name cannot be found.
  • The WebDAV server needs to be reachable before you try to connect.  If it’s not, the WebClient service appears to be inoperable for that URL until it’s been restarted.  If you have a wireless connection that takes time to connect, then you will notice this issue quite dramatically.
  • You may not have your PC joined to the domain and can’t rely on group policy at all.

Luckily, there are two workarounds for this windows failing depending on whether or not you are using Group Policy.

Without Group Policy

If you want to automatically connect to a WebDAV share with Basic Authentication without Group Policy, follow the instructions here:

  1. Navigate to Services in Control Panel and make sure that WebClient is started automatically
  2. Follow these instructions to create a Task Schedule when the network is activated
  3. Go to the Actions tab, Create a new Action with the following settings:
    • Action: Start a Program
    • Program/script:
      net
    • Add arguments (Change to suit your settings):
      use X: https://alfresco.example.com/alfresco/webdav/ password /U:user /P:NO
  4. Log out and back in and confirm its working

With Group Policy

As alluded to earlier, you can use logon scripts to work around this issue, adding in a net use command upon login to sort out the network drive automatically.

One thing worth mentioning with this approach is that Administrators will execute logon scripts with elevated privileges. This means that network maps applied within a logon script with an administrator user won’t be accessible in explorer. There is a workaround for this also using the Task Scheduler:

UAC, Logon Scripts, and the Launchapp.wsf workaround

One could assume though that most environments wouldn’t have a large number of administrators for normal user accounts.

Creating a GPO

Please take caution and confirm that any settings changed here are compatible with your environment. Test this correctly before being put into production.

  1. Start by opening up your Group Policy Editor on your DC, navigating to your intended OU, right clicking and selecting Create a GPO…. and then giving it a meaningful name
  2. Edit the Group Policy and navigate to:
    Computer Configuration -> Policies -> Administrative Templates -> System -> Logon
  3. Set Always wait for the network at computer startup and logon to Enabled
  4. Navigate to:
    Computer Configuration -> Preferences -> Control Panel Settings -> Services
  5. Add a new Service with the following:
    • Startup: Automatic
    • Service Name: WebClient
  6. Navigate to:
    User Configuration -> Policies -> Windows Settings -> Scripts (Logon/Logoff)
  7. Double click Logon and select Show Files… to bring up a window where we’ll be putting our scripts
  8. Create a batch file named networkmap.bat with your net use command (changing to suit your settings):
    net use X: https://alfresco.example.com/alfresco/webdav/ password /U:user /P:NO
  9. Back in the Logon Properties window, select Add, and select the networkmap.batfile as the Script Name
  10. If you need Administrator users to work also, instead of using networmap.bat as the Script Name, do the following:
    1. Copy over the Launchapp.wsf file into the same folder
    2. Add a Script with the Script Name set to Launchapp.wsf
    3. Set the Script Parameters to the full path of the Script file. e.g.:
      \\DOMAIN\SysVol\DOMAIN\..\User\Scripts\Logon\networkmap.bat
  11. Run gpupdate /force on your test machine
  12. Run rsop.msc or gpresult /v to confirm that the computer has pulled down the appropriate GPO
  13. Log out and log back in to confirm that it’s working

Conclusion

The above methods propose workarounds to allow you to use WebDAV with Basic Authentication as a network drive. We have demonstrated two possible workarounds in place, both of which will allow WebDAV to be used with the Native Windows Integration. It would also be possible to use a WebDAV client or connect into the service in another way.

It may be in future that another solution will present itself, or Microsoft will get round to fixing their Credential Storage, but for now the use of a well crafted logon script is the easiest workaround.


Missing Windows Installer Cache Files Will Require a Computer Rebuild

https://support.microsoft.com/en-us/kb/2667628

No cure, reinstall windows!


How to restore windows 7 update environment

http://www.sevenforums.com/windows-updates-activation/169153-how-repair-windows-update-service.html

How do I reset Windows Update components

Fix Windows corruption errors by using the DISM or System Update Readiness tool


Setup Windows UEFI – GPT partition

http://forums.bit-tech.net/showthread.php?t=209045


How To Fix: Windows Update Blocked by Group Policy

source: http://brianseekford.com/index.php/2011/05/04/how-to-fix-windows-update-blocked-by-group-policy/

Problem: I cannot check for updates, it says “Some settings are managed by your system administrator”
Solution:
So, you can’t get windows update because some yahoo in IT blocked your access, eh?

First, type gpedit.msc in run,
In the window drill down User configuration>administrative templates>windows components>windows Update.
In the right pane double click on remove access to access all windows update features and make it disabled.

If that doesn’t work, change the following key:
Disable and remove links to Windows Update

(User Configuration\AdministrativeTemplates\Start Menu & Taskbar) NoWindowsUpdate

(HKCU\Software\Microsoft\Windows\CurrentVersion\Policies\Explorer)

There are a few other keys and settings that could affect it.
Check this link out for all the registry locations for Group Policy.


Windows 7 LIP (Language Interface Pack)

http://www.sevenforums.com/tutorials/158161-display-language-force-overwrite-all-users.html

http://www.sevenforums.com/tutorials/87317-display-language-change.html

http://www.sevenforums.com/tutorials/87313-display-language-packs-install-uninstall.html


Fix Corrupt or Blank Windows 7 System Tray Icons

source: http://www.fixitjim.net/2012/11/fix-corrupt-or-blank-windows-7-system.html

I see this a lot where I work and while I haven’t yet been able to track down the source of the problem, the fix is as follows:

  1. Open Regedit via Start–>Search
  2. Open Task Manager via CTRL-ALT-DEL
  3. Find Explorer.exe in the list and end the Process
  4. Go back to Regedit
  5. Select HKEY_CURRENTUSER
  6. Click Edit–>Find
  7. Search for IconStreams
    1. Or navigate directly to HKEY_CURRENTUSER\SOFTWARE\CLASSES\Local Settings\Software\Microsoft\Windows\CurrentVersion\TrayNotify\
  8. Delete IconStreams
  9. Search or navigate to PastIconStreams
  10. Delete this key as well
  11. Hit CTRL-ALT-DEL
  12. Start Task Manager
  13. Click File–>Run
  14. Type, Explorer.exe
  15. The issue should be resolved.

Network Wizard only creates Dial-up VPN

  1. Go to device manager and select “Show Hidden Devices” under the View menu.
  2. Expand Network adapters. You should see the WAN Miniport (PPTP)
  3. Try right clicking on it and uninstalling it. More than likely it won’t allow you to.
    To get around this update the driver to something “uninstallable” like the MAC Bridge.
    To do this right click on it and select update driver. Choose no to look on windows update. Then choose to specify a location.
    Next choose dont search. Next unselect show compatible hardware and find the MAC Bridge under Microsoft.
    Force it to install it. After thats done you should be able to uninstall your new ‘MAC Bridge Miniport.”
  4. Now that it’s gone, lets reinstall it. Go fetch the devcon.exe
    package from Microsoft (Search for devcon.exe on google) and extract it somewhere.
  5. Go to the command prompt / console (cmd.exe) and get to the folder with devcon.exe in it.
  6. Run this command: devcon.exe install c:\windows\inf\netrasa.inf MS_PptpMiniport
  7. Go back to the device manager. You should see the WAN Miniport (PPTP) back.
  8. Try making yourself a fresh VPN connection now.

Deleting old user profiles

symptoms: Windows 7 starting with a temporary profile, trying to delete an old profile.

1-6-2011, source: http://social.technet.microsoft.com/Forums/en/w7itprogeneral/thread/5ec0b949-effa-4e30-ba09-dc948a4c7a8b
You only have to do these steps:

  1. Logon with local admin profile. (or other account different that you want to use, but with admin privileges).
  2. Open regedit and go to HKLM\SOFTWARE\Microsoft\Windows NT\CurrentVersion\ProfileList.
    Here you can see all SIDs of loaded profiles and probably you’ll have some of them repeated but with .bak extensions.
  3. So if you want to recover your profile, desktop icons, ect… you only have to delete the profile with no .bak extension
    and rename the other, deleting only the .bak extension of it:
    Ex: In Regedit (HKLM\SOFTWARE\Microsoft\Windows NT\CurrentVersion\ProfileList) I have:
    SID-1292428093-343818398-2115-158554 (1º Delete this Key)
    SID-1292428093-343818398-2115-158554.bak  (2º Rename This Key to SID-1292428093-343818398-2115-158554).
  4. Restart your computer or Logoff and Logon with the profile that you want to restore and that’s all, your profile will be restored Perfectly.

 Corruption of the /Windows/Installer/ folder

http://support.microsoft.com/kb/971187


My Document folder locations if data disk failed.

source: http://www.windows-commandline.com/2010/08/change-my-documents-location-registry.html

We can change the target location of My Documents folder by editing the registry key. We can use reg.exe utility from command line for this. An example command for changing my documents location is given below.

reg.exe add “HKEY_CURRENT_USER\Software\Microsoft\Windows\CurrentVersion\Explorer\User Shell Folders” /v Personal /t REG_SZ /d “d:\mydocs” /f

The above command will set the target folder for my documents as d:\mydocs.

Instead you can open registry editor by running regedit and manually change the registry value

Personal under the key HKEY_CURRENT_USER\Software\Microsoft\Windows\CurrentVersion\Explorer\User Shell Folders


SATA drives Safely remove hardware

SATA 3 6GB showing up in safely remove hardware?

Internal and External SATA Port Configuration

http://64os.info/tips/troubleshooting-device-and-bsod/


Disappearing DVD-CDrom drive

I brought my Vista machine out of hibernation this morning to discover that the physical DVD-RW drive had disappeared from My Computer.
In fact, the virtual CD-ROM drive provided by Daemon Tools had disappeared, too.
After a typical round of troubleshooting (reboot, check bios, uninstall driver from Device Management and reboot, etc)
followed by a brief googling I discovered the solution below.

The solution comes from this post on The Vista Forums (unofficial) website.
It turns out some kind of strange registry mishap occurs and the Windows CD-ROM (cdrom.sys / cdrom.inf) drivers decide not to load anymore.
When you look at the Device Manager, you’ll see the yellow warning (!) icon in front of the CD/DVD ROM devices; when double
clicking them you’ll be greeted with the error “Windows cannot load the device driver for this hardware.
The driver may be corrupted or missing. (Code 39)”.

Luckily, the solution is painless and simple: just import this registry file to fix the problem (code below):

Windows Registry Editor Version 5.00
;Fixes issues with cdrom drives not working properly

[HKEY_LOCAL_MACHINE\SYSTEM\CurrentControlSet\Control\Class\{4D36E965-E325-11CE-BFC1-08002BE10318}]
“UpperFilters”=-
“LowerFilters”=-

[HKEY_LOCAL_MACHINE\SYSTEM\ControlSet001\Control\Class\{4D36E965-E325-11CE-BFC1-08002BE10318}]
“UpperFilters”=-
“LowerFilters”=-

[HKEY_LOCAL_MACHINE\SYSTEM\ControlSet003\Control\Class\{4D36E965-E325-11CE-BFC1-08002BE10318}]
“UpperFilters”=-
“LowerFilters”=-

Update (2007-11-29):After looking through my Event Viewer today I noticed the following error in the System logs:

“The following boot-start or system-start driver(s) failed to load:
PxHlpa64”

Quick googling took me to Microsfot KB314060, which mentions the above fix for this problem.


SSD Info (Trim VSS Intel Optimizer)

source: forums.anandtech.com

1. System Restore is designed with work with the Volume Shadow Service (i.e. Shadow copy):
Quote:

Beginning with Windows Vista, VSS is also used by the System Protection component which creates and maintains periodic copies of system and user data on the same local volume (similar to the Shadow Copies for Shared Folders feature in Windows Server) but allows it to be locally accessed by System Restore. System Restore allows reverting to an entire previous set of shadow copies called a Restore point. Prior to Windows Vista, System Restore was based on a file-based filter that watched changes for a certain set of file extensions, and then copied files before they were overwritten.[2]

Incidentally this explains the improvements in how System Restore works beginning with Vista re: taltamir’s experiences.

2. Intel’s toolbox works “around” VSS when attempting manual TRIM:
Quote:

“The VSS (Volume Shadow Copy) service is either disabled or not functioning properly. If you run the Intel® SSD Optimizer with the VSS service disabled, previously-created restore points or other shadow copies created by the operating system or third-party applications may become corrupt. If you intentionally disabled the VSS service for performance or other reasons and wish to continue running the Intel SSD Optimizer, click Continue.”

3. More evidence of VSS interfering with TRIM (error message in SSD toolbox):
Quote:

Intel SSD Optimizer could not run due to the presence of Volume Shader Copy Service data. Likely cause is a backup in progress. Please try again when the backup is finished.

4. Direct advice from readme.rtf in the SSD Toolbox documentation:
Quote:

To reduce the amount of time the Intel SSD Optimizer takes to run, reduce the number of System Protection restore points. The amount of time the Intel SSD Optimizer takes to complete is related to the number of System Protection restore points and the number of total files of the system. See Microsoft FAQ on System Protection restore points here:  http://windows.microsoft.com/en-US/w…sked-questions

I think we have pretty good evidence, though not incontrovertible, that System Restore does indeed interfere with TRIM.


SSD tweaks

Cleanup | Cleanup Windows.eDB file | Windows-InstallerFolder-Cleanup |

Tip: – http://www.tweakhound.com/ssd-tweak-guide-sort-of/

Tweaks | http://www.overclock.net/t/1156654/seans-windows-7-install-optimization-guide-for-ssds-hdds

http://www.mydellmini.com/forum/windows-7/2441-windows-7-ultimate-solid-state-drive-speed-tweaks.html

http://www.overclock.net/t/1133897/windows-7-ssd-tweaking-guide

http://forums.mydigitallife.info/threads/36440-Windows-7-8-SSD-Optimization

Verify TRIM is enabled on your SSD

  1. Click start and type in cmd and hit the enter key
  2. Type in fsutil behavior query disabledeletenotify

– DisableDeleteNotify = 1 (Windows TRIM commands are disabled)
– DisableDeleteNotify = 0 (Windows TRIM commands are enabled)

Disable automatic defragmenting

  1. Click the Windows start button and type Disk Defrag and hit Enter.
  2. Click the Configure Schedule Button.
  3. Uncheck the box for Run On a Schedule then click Ok and Close.
  4. Never Defrag a Solid State Drive

Reduce Page File Size

  1. Hit Start and right-click on Computer and select Properties
  2. On the left side of the window, click Advanced System Settings.
  3. Under the Advanced tab, in the Performance section click Settings…
  4. Click the Advanced tab, and under Virtual Memory, Click Change
  5. Uncheck Automatically manage paging file size for all drives.
  6. Highlight your SSD and underneath it, click the Custom Size radio button.
  7. Under Initial size and Maximum size, type in 1024 and then click Set and click OK.
  8. You must reboot for this to take effect

Move your temp files to a Mechanical hard drive. (If Users Folder is being used on the SSD)

  1. Hit Start and right-click on Computer and select Properties
  2. On the left side of the window, click Advanced System Settings.
  3. Under the Advanced tab, in the on the bottom click Environmental Variables…
  4. Click on the variable TEMP then click Edit…
  5. Under the Variable Value: box, enter in the new path you would like for your temp files, ex. D:\Temp Files\TEMP
  6. Click on the variable TMP then click Edit…
  7. Under the Variable Value: box, enter in the new path you would like for your temp files, ex. D:\Temp Files\TMP
  8. Click Ok and you must reboot for this to take effect.

Disable Hibernation

  1. Type cmd in the windows start menu search box, then right click on cmd.exe and choose Run as administrator.
  2. In the command prompt type in “powercfg –h off” and hit enter. You must reboot for this to take effect.

Moving or Disabling Memory Dumps (Especially helpful for us overclockers)

  1. Hit Start and right-click on Computer and select Properties.
  2. On the left side of the window, click Advanced System Settings.
  3. Under the Advanced tab, in the on the Startup and Recovery box, click Settings…
  4. Under the System failure section, you will see Write debugging information and a dropdown box.
    To disable memory dumbs click the dropdown box and select (none)
  5. If you would like to keep memory dumps change the path in the Dump file: box
    for example; D:\Temp Files\Memory Dumps\MEMORY.DMP

Disable Superfetch / Prefetch
(SSDs are Fast enough to disable Superfetch/Prefetch to free up RAM)

  1. In the Windows start menu search box, type regedit and hit enter.
  2. Navigate to: HKEY_LOCAL_MACHINE\SYSTEM\CurrentControlSet\Control\Session Manager\Memory Management\PrefetchParameters
    and you will see a Binary Value called EnablePrefetcher
  3. Double click on EnableSuperfetch and change the value from 3 to 0.
  4. Double click on EnablePrefetcher and change the value from 3 to 0.
  5. You must reboot for this to take effect.

Disable ClearPageFileAtShutdown and LargeSystemCache

Windows is quick to implement things that are no longer necessary.
An SSD operates on flash memory, making it possible to easily overwrite things on the disk. Therefore,
the page file doesn’t need to be erased while the computer’s shutting down.


  1. In the Windows start menu search box, type regedit and hit enter.
  2. Navigate to: HKEY_LOCAL_MACHINE\CurrentControlSet\Control\SessionManager\Memory Management
  3. Double click on “ClearPageFileAtShutdown” and change the value from 1 to 0.
  4. Double click on “LargeSystemCache” and change the value to 1.
    IMO LargeSystemCache should be enabled limiting the writes on the SSD for systemcache.
  5. You must reboot for this to take effect.


Disable Recycling Bin on your SSD

  1. Right click on your Recycling Bin and click Properties.
  2. Under Settings for selected location you will see a radio button called Don’t move files to the Recycling Bin.
  3. Remove files immediately

when deleted. Click this radio button and click OK.

Enable Write Caching on your SSD

A)Open up your Computer. In Computer, right click on the drive that is your SSD and click Properties.
B)Click on the Hardware tab at the top.
C)Double click on the Disk Drive that is your SSD. Now in the new window click the Policies tab.
D)Under the Write-caching policy box, make sure Enable write caching on this device and Turn off Windows write-cache buffer flushing on the device are both checked. Now click OK and exit.

Disable Indexing on your SSD

  1. Open up your Computer. In Computer, right click on the Drive that is your SSD and click Properties.
  2. Click on the General tab at the top.
  3. At the bottom you will see a box called Allow files on this drive to have contents indexed in addition to file properties, uncheck this box and hit Apply.
  4. Make sure the radio button for Apply changes to the drive C:\, subfolders and files is selected and click OK.
  5. You will be prompted with a window that says Error Applying Attributes,
    click Ignore All and it will disable indexing on all files on your SSD, this will take some time.
  6. Click OK to close the window.

Disable Reliability Monitor (If OS in on SSD)

  1. Type cmd in the windows start menu search box, then right click on cmd.exe and choose Run as administrator.
  2. In the command prompt type in: and hit enter.
    schtasks.exe /change /disable /tn \Microsoft\Windows\RAC\RacTask
  3. If you want to enable reliability monitor run the command: and hit enter.
    schtasks.exe /change /enable /tn \Microsoft\Windows\RAC\RacTask
    If a SUCCESS message comes up after the command is entered then it worked.

Disable System Restore (If OS is on SSD)
(Not preferred, autobackup!)

  1. Hit Start and right-click on Computer and select Properties
  2. On the left side of the window, click System Protection.
  3. Highlight the Drive located on your SSD and click Configure.
  4. Click the radio button to Turn Off System Restore, click Ok, and Close

Web Browser Cache Managing for Chrome, Firefox, and Internet Explorer

Firefox Cache

How to Move Disk Cache Location
  1. Open Firefox and in the address bar type about:config and hit enter.
  2. Click I’ll be careful, I promise! Navigate to browser.cache.disk.capacity and then double click to edit the value.
    Enter in the amount of disk cache you would like to use for Firefox in Kilobytes.
    I use 30mb so I enter in 30000 and hit OK.
  3. Right click on the web page and choose New then String.
    In the Preference name box add browser.cache.disk.parent_directory and hit OK. Under the browser.cache.disk.parent_directory box,
    enter in where your Firefox Cache location will be.
    I have mine set to S:\Temp Files\Firefox Cache.
How to Disable Disk Cache and Use Ram Cache
  1. Open Firefox and in the address bar type about:config and hit enter.
  2. Click I’ll be careful, I promise! Navigate to browser.cache.disk.enable and then double click to so that it is set to false.
  3. Right click on the web page and choose New then String. In the Preference name box add cache.memory.capacity and hit OK.
    Under cache.memory.capacity, enter in the amount of RAM you would like to use in kilobytes.
    I use 30mb so you would enter 30000 in the box for that.

Chrome Cache

How to Move Disk Cache Location
  1. Right click on the desired chrome shortcut and click Properties.
  2. Next to the Target: you will see the path for the chrome.exe location; after chrome.exe
    type in –disk-cache-dir=”S:\TempFiles\Chrome Cache”
    *NOTE: S:\TempFiles\Chrome Cache is an example, you would enter in where you want the chrome cache to be stored on your computer.
How Change Disk Cache Size
  1. Right click on the desired chrome shortcut and click Properties.
  2. Next to the Target: you will see the path for the chrome.exe location; after chrome.ex
    type in –disk-cache-size=1 –media-cache-size=1″. This will change the maximum cache to 25mb.
    *NOTE: If you want to edit Chrome to change the directory and cache size,
    it would look like this: –disk-cache-dir=”S:\TempFiles\Chrome Cache –disk-cache-size=1 –media-cache-size=1″

Extra

I also made a guide to move users off of your OS drive to a different partition/drive For more SSD Tweaks to help reduce useless SSD writes, improve performance, and save more space Here

WINDOWS 7 AND VISTA USER AND PROGRAM DATA REDIRECTION GUIDE

This guide is helpful for people trying to reduce writes to their SSD’s and save some space for software and other data. It is especially helpful for people without TRIM, the anal retentive enthusiasts, and people in the technical field who can use this information in many different scenarios. This is the proper way to move the Users and Program Data Folders to a different Drive or Partition.

Windows 7/Vista Installation

  1. Boot to appropriate Windows 7 or Vista media
  2. When you get to the installation screen, do not partition the drive. Use the whole drive and windows will create a separate partition by itself. You do not need to partition the hard drive yet.
  3. Once the installation is complete after a few reboots, you will be asked for a username and PC name. STOP HERE

Audit Mode

  1. Once Windows is waiting for a username and password, press CTRL+SHIFT+F3. This will cause Windows to reboot and then it will load up without drivers in audit mode.
  2. You are currently logged in as a temporary administrator. Any user changes you make will not save. Ignore the Sysprep.exe box for now
  3. Open up Disk Management
  4. Format the appropriate new drive or partition with the appropriate drive letter which will be the drive you will be using to store Program Data and Users folders.

Info on how to do this

  1. Now you will create the .xml file to relocate the Users and Program Data folders to your new drives.
  2. Open up notepad and Copy this text to it and save it as usermove.xml and save it to the root a flash drive or any other removable media.

    D:\Users
    D:\ProgramData

    -Note: Where it says Windows 7 Professional, you would edit it to whichever version of Windows you installed.
    -Note:The Drive letter in these lines is the drive letter that you assigned to the Drive or Partition that you are moving the ProgramData and User Data folders to.

    D:\Users
    D:\ProgramData

    -Note: On the line “wim:E:/sources/install.wim#Windows 7 PROFESSIONAL” — E: is the drive letter assigned to your removable media where the xml file is stored.

  3. Open a command prompt and type: cd c:\windows\system32\sysprep
  4. In command prompt, type: sysprep.exe /audit /reboot /unattend:E:\usermove.xml
    (E: is whatever the assigned drive letter of your flash drive or removable media is)Your computer will now reboot and come back into audit mode.
  5. Once Windows boots back up, you will be prompted with a Sysprep.exe box again.
  6. In the first drop down of the Sysprep.exe box, choose OOBE and only check the Generalize box if the computer is being used for a base image, otherwise, leave it unchecked.
  7. Now click Reboot and the regular windows installation will continue on with the User and Program Data folders on a separate drive/partition.

Using this method to move the users folder will also help prevent the corrupted user profiles that can happen when moving them after already creating users in Windows.


Windows Location awareness how does it !work

http://www.google.com/search?q=windows+7+no+internet+access+with+yellow+warning+icon

Windows 7 Network Awareness: How Windows knows it has an internet connection

Appendix K: Network Connectivity Status Indicator and Resulting Internet Communication

http://blog.tiensivu.com/aaron/archives/1509-Why-www.msftncsi.com-keeps-showing-up-in-firewall-logs-with-Vista-and-why-it-can-cause-problems-with-internet-captive-portals-and-WiFi-hot-spots.html

Disabled required password on wakeup

http://www.sevenforums.com/tutorials/10024-password-require-wakeup.html
http://blogs.technet.com/b/richardsmith/archive/2007/11/29/powercfg-useful-if-you-know-the-guids.aspx

powercfg -L
powercfg -SETACVALUEINDEX <profile> SUB_NONE CONSOLELOCK 0
powercfg -SETDCVALUEINDEX <profile> SUB_NONE CONSOLELOCK 0

Disable the libraries feature

http://www.howtogeek.com/howto/21462/how-to-enable-or-disable-the-libraries-feature-in-windows-7/

http://www.mydigitallife.info/how-to-disable-and-remove-libraries-from-windows-7-explorer/

Recently I found a fix to a problem a hand full of people were having.
After searching for hours I found no solution. The problem was that
when creating a new VPN network connection in Windows XP using the new
connection wizard, it would only create a dialup connection regardless
if you chose the connection to be a dial-up connection or a virtual
private connection.

The solution involved reinstalling the WAN Miniport (PPTP) driver.
Here’s how I did it:

1. Go to device manager and select “Show Hidden Devices” under the
View menu.

2. Expand Network adapters. You should see the WAN Miniport (PPTP)

3. Try right clicking on it and uninstalling it. More than likely it
won’t allow you to. To get around this update the driver to something
“uninstallable” like the MAC Bridge. To do this right click on it and
select update driver. Choose no to look on windows update. Then choose
to specify a location. Next choose dont search. Next unselect show
compatible hardware and find the MAC Bridge under Microsoft. Force it
to install it. After thats done you should be able to uninstall your
new ‘MAC Bridge Miniport.”

4. Now that it’s gone, lets reinstall it. Go fetch the devcon.exe
package from Microsoft (Search for devcon.exe on google) and extract
it somewhere.

5. Go to the command prompt / console (cmd.exe) and get to the folder
with devcon.exe in it.

6. Run this command: devcon.exe install c:\windows\inf\netrasa.inf
MS_PptpMiniport

7. Go back to the device manager. You should see the WAN Miniport
(PPTP) back.

8. Try making yourself a fresh VPN connection now.


Keyboard fails windows cannot start device hardware registry error code 19

source: http://answers.microsoft.com/…

Windows Registry Editor Version 5.00
[HKEY_LOCAL_MACHINE\SYSTEM\CurrentControlSet\Control\Class\{4d36e96b-e325-11ce-bfc1-08002be10318}]
"UpperFilters"=hex(7):6b,00,62,00,64,00,63,00,6c,00,61,00,73,00,73,00,00,00,00,00


W32 old Help files support

http://www.microsoft.com/nl-nl/download/details.aspx?id=91


Retrieve BIOS Serial number – servicetag

Obtain Service Tag locally with command line
In the command prompt type the following and press Enter/Return.

wmic csproduct get vendor,name,identifyingnumber

Obtain Service Tag remotely with command line
If VNC or remote desktop connection to the remote-host is not available,
execute the following from the local-host to get the service tag of the remote-host.

wmic /user:administrator /node:remote-host bios get serialnumber

You will be prompted for the password for account administrator.

NOTE :: type the command exactly like it appears above only replacing the remote-host
part with the workstations name or IP address you’re querying.
If you want to use a user account other than administrator, replace ‘administrator’ with the account you wish to use.


Mallware

Locked by Police Cybercrime Investigation


User profile(s)

The User Profile Service failed the logon


Windows Features XP

Posted on 2012/06/19 by arno Posted in Features, Windows

[ Features | Office | IE | ]
[ Windows | XP | 7 (seven) | 8 | 10 | ] - [ Server | 2003SBS | 2008SBS | 2011SBS | 2016 | WSUS ]


User profile stuck in “Backup” status.

How to copy data from a corrupted user profile to a new profile in Windows XP.
User Profile Hive Cleanup Service

I deleted the temp-newly created profile and renamed the profile key in the registry (there was one with a “.bak” behind it).
“HKEY_LOCAL_MACHINE\SOFTWARE\Microsoft\WindowsNT\Cu rrentVersion\ProfileList\<SID>”

Microsoft Software Updates

Posted on 2012/05/30 by arno Posted in Features Leave a comment

2019-05 | G-Hacks

20120412 – kb2553248 causes outlook to ask for smart card

KB2849973 – Outlook 2010 hotfix Outlook-Calendar property missing

Outlook 2010 Features

Posted on 2012/05/10 by arno Posted in Features, Office

Links

Inleiding tot Outlook-gegevensbestanden

kb2553248 causes outlook to ask for smartcard

http://www.sevenforums.com/tutorials/129318-outlook-2010-always-send-default-account.html

To force all new messages to use the default account, browse to the following registry subkey:
HKEY_CURRENT_USER\Software\Microsoft\Office\14.0\Outlook\Options\Mail
Create a new DWORD value named NewItemsUseDefaultSendingAccount
Value: 1

Outlook, Multiple Accounts and the Default Account

Creating a Simple Time-Reporting Tool Based on the Outlook 2010 Calendar

Proofing  Custom dictionary | Autocorrect (C:\Users\<username>\AppData\Roaming\Microsoft\Office\*.acl)

Outlook PST/OST limits |  The file size limits of .pst and .ost files (2010/2013) | configure limits

Dutch function-names has changed

http://support.microsoft.com/kb/2551525/nl

Nederlands
De volgende tabel bevat de Nederlandse werkbladfuncties die zijn gewijzigd in Service Pack 1:

Engelse functie 2010 Excel 2010 Excel 2010 SP1
CHOOSE KIES KIEZEN
CLEAN SCHOON WISSEN.CONTROL
DAVERAGE DGEMIDDELDE DBGEMIDDELDE
DAYS360 D360 DAGEN360
DCOUNT DAANTAL DBAANTAL
DGET DHAAL DBLEZEN
DOLLAR VALUTA EURO
DSTDEV DSTDEV DBSTDEV
DSUM DSOM DBSOM
FIND VINDEN.ALLES VIND.ALLES
LOOKUP OPZOEKEN ZOEKEN
LOWER KLEINELETT KLEINE.LETTERS
MID MIDDEN DEEL
NPV HNW NHW
PMT AFLOSSING BET
PROPER BEGINKAP BEGINLETTERS
REPLACE VERVANG VERVANGEN
ROUND AFRONDING AFRONDEN
SLN RAA LIN.AFSCHR
SQRT VWORTEL WORTEL
UPPER HOOFDLETT HOOFDLETTERS
VALUE GETAL WAARDE
VDB VAP VDB

De volgende tabel bevat de Nederlandse werkbladfunctiemacro’s die zijn gewijzigd in Service Pack 1:

Engelse functie 2010 Excel 2010 Excel 2010 SP1
BREAK EINDE ONDERBREKEN
FOR VOOR VAN
GOTO GANAAR GA.NAAR
GROUP GROEP GROEPEREN
NOTE OPMERKING NOTITIE
RESTART OPNIEUW OPNIEUW.STARTEN

Features

Printer tray not changing (document settings overrule printer settings)

The printer settings are ignored when you print a Word document

Application Settings Take Precedence over Printer Driver Settings for Tray Selection and Other Paper Setup Settings

Silverlight Features

Posted on 2012/04/26 by arno Posted in Features

Silverlight cannot be updated or removed from software

In the Control Panel, open the Add/Remove Programs applet (Programs on Vista) and
uninstall Microsoft Silverlight if it is shown as installed by clicking on it and then clicking Uninstall or Remove.
If you get an error on this step (for example a dialog saying that the .msi file cannot be found), just continue on to the next step
Note :Be careful that you only delete what I say to delete below.

If you delete too much by accident it is quite likely that you will break something and there is no way to undo accidental changes

ClickStart, and then click on Run.
Type regedit in the Run box and click on OK.
In Registry Editor navigate to
\HKEY_CLASSES_ROOT\Installer\Products\
(export and) Delete {D7314F9862C648A4DB8BE2A5B47BE100}

Using regedit, navigate to HKLM\Software\Microsoft\Silverlight and delete the key

Using Windows Explorer, delete the “Microsoft Silverlight” directory from under Program Files.
From an administrator command shell on anx86 you can do this by running:
rmdir /s /q “%ProgramFiles%\Microsoft Silverlight
If you are on a 64-bit version of Windows, substitute ProgramFiles(x86):
rmdir /s /q “%ProgramFiles(x86)%\Microsoft Silverlight

Try updating or installing Silverlighthttp://www.microsoft.com/getsilverlight

If the issue is related to playing Media Streaming using third party players from any website then try resetting the Internet Explorer to defaults

Windows User/System Tweaks

Posted on 2012/04/05 by arno Posted in Features, Microsoft, Tweaks

Windows Installer folder \Windows\Installer

  • move the folder C:\Windows\Installer to another [new-installer-path]
  • get the junction.exe program (Systems Internals – http://www.sysinternals.com)
  • Create a new junction (command promt as administrator)
  • junction -s [new-installer-path] C:\Windows\Installer
  • junction -s D:\Users\Temp\Windows-Installer

Profiles folders \Users\*

source: Profile relocator ( http://software.bootblock.co.uk/?id=profilerelocator )

Moved the users folders to D:\Users\

Temp folders *\Temp

%USERPROFILE%\Local\Temp\ – moved it to – D:\Users\Temp\[Usersname]\

C:\Windows\Temp\ – moved it to – D:\Users\Temp\Windows\


Server 2011 SBS Features

Posted on 2011/10/31 by arno Posted in Features

[ Features | Office | IE | ]
[ Windows | XP | 7 (seven) | 8 | 10 | ] - [ Server | 2003SBS | 2008SBS | 2011SBS | 2016 | WSUS ]


SBS 2011

SBS 2008 / SBS 2011 to virtualize or not to virtualize

Tools

Report Viewer 2008 SP1 Redistributable

SBS2008 | Windows Small Business Server (SBS) 2008 Best Practices Analyzer (BPA) (SBS2008)

SBS2008r2, SBS2011 | Windows Server Solutions Best Practices Analyzer 1.0


Servicepacks

Exchange 2010 sp3 | Description | Download | Exchange Team Blog


Hot & Fixes

Repair Windows Server Update Services
How to configure an authoritative time server in Windows Server
| Configuring-Windows-Time-Service | 2008 R2 sync time external source | Registry entries | w32tm /resync /rediscover
How to recreate SBSmonitoring database | other technet post | Script to run renames current database and creates a new one.
Disable SSL v3 | ServerFault | KB Plesk |


External sites

SBS 2011 – IV. Tweaking the Server

SBS 2011 Setup Guide v1.13.0


Windows 10

In a Server 2008 Network


Other links

Micrsoft Technet SBS Blog

http://blog.mpecsinc.ca/2010/12/sbs-2011-setup-guide-v100.html (recommended)

sbs 2003 to sbs 2011 migration

How to enable javascript in internet explorer


Getting Outlook to Autodiscover Office 365

While editing the Service Connection Point in Active Directory Sites and Services does work, it’s probably not the “approved” way to do things.

The support manager recommended that I instead use the Exchange Management Shell to entirely remove the Autodiscover Virtual Directory using Remove-AutodiscoverVirtualDirectory. Here’s how I did that:

1. Open an elevated command prompt and back up the IIS configuration (explained here):

%windir%\system32\inetsrv\appcmd.exe add backup "Before Removing Autodiscover"

2. Open an elevated Exchange Management Shell and retrieve the current autodiscover virtual directory:

>Get-AutodiscoverVirtualDirectory | fl Name, Server, InternalUrl, Identity

Copy the Identity value to the clipboard.

3. In the Exchange Management Shell, remove the autodiscover virtual directory:

Remove-AutodiscoverVirtualDirectory –Identity <identity value retrieved above>

Update December 4, 2014 Per a couple of comments, the identity string should be enclosed in quotation marks:

Remove-AutodiscoverVirtualDirectory –Identity "<identity value retrieved above>"

You will have to confirm by typing a “Y”.

4. Check that the autodiscover virtual directory is gone:

Get-AutodiscoverVirtualDirectory | fl Name, Server, InternalUrl, Identity

This should now return nothing.

5. Now, with Outlook running on a desktop, hold the Ctrl button, right-click on the Outlook icon in the system tray, and select Test E-mail AutoConfiguration. Enter your email address and password and click the Test button. The results should come from the Office 365 server.


Profilewizard

SBS and ProfWiz

http://www.forensit.com/comparison.html


SBS Exchange

Exchange Server Updates: build numbers and release dates

Enable relaying for local machines
How to forward mail to publicfolder
Understanding Transport Pipeline

Understanding Exchange Server Intelligent Message Filter

Exchange 2013 Storage Configuration Options

SBS 2011 Store.exe allocating too much memory despite cache adjustment
Limiting Exchange 2010 Cache Size

A Question of Quotas


SBS2011 Updates and WSUS

Update Services in SBS 2008 | Petri.co.il – BS 2011, updates, SBS console or WSUS? | Manage WSUS 3.0 SP2 Storage

SBS 2008 to “fix” managing WSUS after you have manually upset it

SBS 2011, updates, SBS console or WSUS?

Petri.co.il – SBS 2011 Updates, Console or WSUS? | Configuring WSUS Using the Windows SBS Console

SBS 2011 WSUS uninstall error 0x80070643

Microsoft social Windows Server | SBS2008 How To Manually Uninstall & Reinstall WSUS 3.0 |


Domain Functional level

What is the Impact of Upgrading the Domain or Forest Functional Level?

Understanding Active Directory Domain Services (AD DS) Functional Levels


SQL Databases Memory usage unlimited!?

http://blog.switchsystems.co.uk/2014/01/reducing-memory-usage-on-sbs-servers/

http://www.itquibbles.com/sql-sbsmonitoring-high-disk-usage/

http://www.bursky.net/index.php/2013/03/managing-iis-server-memory-usage/

http://www.tachytelic.net/2014/05/hige-memory-usage-sbs-2011-caused-sql-server-databases-datacollectorsvc-exe/

http://koppihle3.blogspot.nl/2012/08/sbs2011-limiting-sql-memory-for-wsus.html


Discovered features

Outlook unexpectedly prompts for smart card authentication

source: http://support.microsoft.com/kb/2704959

NOTE: The following steps are for IIS 7. The steps for earlier versions of IIS are very similar.

  1. In Internet Information Services (IIS) Manager on your Microsoft Exchange Server, select the Autodiscover virtual directory.
  2. In the middle panel, double-click SSL Settings.
  3. Enable the Require SSLcheck box.
  4. Under Client certificates, select Ignore.
  5. In the Actions pane, click Apply.
  6. Repeat steps 1 through 5 for the EWS virtual directory.

…

Issues

Dcom errors

http://support.microsoft.com/kb/899965

http://technet.microsoft.com/en-us/library/cc726313(v=ws.10).aspx

http://answers.microsoft.com/en-us/windows/forum/windows_vista-security/dcom-error-10016-cannot-change-permissions-in/dfdb4fa6-c867-4af1-b650-3a188d26d36b

http://www.wictorwilen.se/Post/Fix-the-SharePoint-DCOM-10016-error-on-Windows-Server-2008-R2.aspx

http://ct-miramar.com/blog/2011/08/01/do-not-grant-local-activation-permission-for-the-com-server-application-with-clsid-90dcab7f-347c-4bfc-b543-540326305fbe/

Volume shadow copy and backup system stops working

Potential issues after installing SharePoint Foundation 2010 SP1

Windows SBS 2011 – Known Post Installation Event Log Errors and Warnings

* Run – Sharepoint 2010 Products Configuration Wizard
* Review the “issues after installing SharePoint Foundation 2010 SP1”

You Must Manually Run PSCONFIG after Installing SharePoint 2010 Patches

Volume Shadow Copy Service error: Failed resolving account spsearch with status 1376.

Event ID: 8230 Source: VSS
– Problem was resolved by reconfiguring Sharepoint 2010. Go to start, Sharepoint 2010 and launch the Sharepoint 2010 Products Configuration. Follow the steps and all works fine again.
– Navigate to the registry key  HKEY_LOCAL_MACHINE\SYSTEM\CurrentControlSet\Services\VSS\VssAccessControl export the file just in case
then remove the offending account domainname\username. Just leave the NT Authority\Network Service account.

Petri.co.il – SBS2011 VSS warning 8230 spsearch error. No backup!

–

SBS 2011 : Installation Issues

How do i resolve Event ID: 8230 Source VSS with SBS 2011?

VSS writer warnings

Database could not be accessed – Event 3760 (SharePoint 2010 Products)

Event ID Errors: 6398, 6482, and 6641 for Share Point

Small Business Server 2011 Sharepoint Foundation Event ID 70

SBS 2011 – SharePoint Foundation Event ID 6398 – Access Denied Every 30 Minutes

Backup Failing Small Business Server 2011

Shutdown Event Manager

Sharepoint KB2580174 alerts

Event ID 10016, DistributedCOM: The application-specific permission settings do not grant Local Activation permission for the COM Server application (2)

Google Searches

* https://www.google.com/search?q=sharepoint+foundation+3760+error
* https://www.google.com/search?q=vss+errpr+8230
* https://www.google.com/search?q=sharepoint+foundation+search+error+70
* https://www.google.com/search?q=vss+errpr+8230+spfarm+status+1376
* https://www.google.com/search?q=The+application-specific+permission+settings+do+not+grant+Local+Activation+permission+for+the+COM+Server+application+spfarm

WDS Service

ProxyDHCP error 4011 – http://trycatch.be/blogs/roggenk/archive/2010/06/28/proxydhcp-no-reply-to-request-on-port-4011-in-wds-windows-deployment-services.aspx
clear last PXE advertisement – http://www.windows-noob.com/forums/index.php?/topic/669-how-to-get-rid-of-abortpxe-com/
http://www.nedersoft.nl/index.php/tips-a-trucks/13-pxe/25-proxydhcp-no-reply-to-request-on-port-4011

SBS not showing users in the SBS Console or POP3 Connector

http://tc-itservices.com/microsoft/sbs-not-showing-users-in-the-sbs-console-or-pop3-connector/

1. Open Active Directory, Click View and then Advanced Features
3. Open up the user and go to the Attribute Editor tab, 4. Find msSBSCreationState and change the value to Created


GPO Tweaks

How to enable Group Policy Preferences support for IE9

Disable Power Option restrictions

GPO – Computer-configuration – Policies – Admin Templates – System – Power Management – Sleep settings > Specify the System Sleep Timeout [Disabled]


Usefull setup information

POP3connector

Understanding the POP3 Connector
Bugging 10mb pop3 recieve limit

“you have to increase the message size also on FAX receive connector.”

Get-TransportConfig | ft MaxSendSize, MaxReceiveSize
Get-ReceiveConnector | ft name, MaxMessageSize
Get-SendConnector | ft name, MaxMessageSize
Get-mailbox | ft Name, MaxSendSize, MaxReceiveSize

Set-TransportConfig –MaxSendSize 20MB –MaxReceiveSize 20MB
Set-ReceiveConnector “Windows SBS Internet Receive Servername” –MaxMessageSize 20MB
Set-SendConnector “Windows SBS Internet Send Servername” –MaxMessageSize 20MB
Set-Mailbox “test” –MaxSendSize 10MB –MaxReceiveSize 10MB

SBS 2008: Introducing the POP3 Connector
How Do I Change Message Size Limits in SBS 2008/2011 Standard?
Changing Pop3 Connector message size in Small Business Server 2008


Bump

Read Receipt to distribution list – does not work

User cannot access the \\Contoso\Users … folder due to acces rights, \\192.168.1.1\Users … is accessable.
Delete the local/roaming user profile and relogon the user.


SSD Harddrives

http://technet.microsoft.com/en-us/library/ee832792.aspx
http://www.anandtech.com/show/3690/the-impact-of-spare-area-on-sandforce-more-capacity-at-no-performance-loss
https://wiki.archlinux.org/index.php/Solid_State_Drives
https://wiki.archlinux.org/index.php/SSD_Benchmarking

Changing Pop3 Connector message size in Small Business Server 2008


SSL Certificates

Technet – Managing Certificates

Managing Certificates

Installing a GoDaddy Standard SSL Certificate on SBS 2008

Active Directory Certificate Services Step-by-Step Guide

Create your own Self-signed SSL Certs Exchange 2007/2010

SBS 2011 Renew cert from commandline


Personal folders

Do not name the personal folder as an email address it will be added ta an automatic addressbook and it mixup the folder-emailaddress/personal foldername.


L2TP nat traversal

source: microsoft KB926179 | http://forums.anandtech.com/showthread.php?t=2086128

Ran in to this setting one of these up for a client. The reasoning behind why this solution is necessary sucks, but the solution is relatively easy.

Microsoft decided that after Windows XP SP2 (that includes Vista and 7), they were going to require VPN servers to be public-facing. Basically, they turned off the native NAT-T (NAT traversal) that had existed in these versions of Windows’ VPN software. Their justification is that VPNs should be perimiter-based. The justification is sound, but removing the capability to easily set it up otherwise is kind of shitty.

Anyway, there’s a registry key you need to create. It’s in a different place in Windows XP than in Windows Vista and 7. Here’s both locations:

In Windows XP:
HKLM\System\CurrentControlSet\services\IPSec
Create DWORD named AssumeUDPEncapsulationContextOnSendRule and set value to 2
Reboot system.

In Windows Vista/7:
HKLM\System\CurrentControlSet\services\PolicyAgent
Create DWORD named AssumeUDPEncapsulationContextOnSendRule and set value to 2
Reboot system

You’ll need to do this on every client you want to connect to this VPN.

Note: This is only the case for L2TP IPSec VPNs. The HTTPS VPNs and PPTP VPNs do not have this requirement.


Services

Eventlog error messages

Event 10016 may be logged in the System log on a computer that is running Windows XP Professional x64 Edition

PDFCreator as a Service

 source: http://outputredirection.blogspot.nl/p/running-pdfcreator-as-service-on-server.html

PDFCreator is a great tool for users you just need to quickly convert a document into pdf format.
Getting it to run properly as a service on Windows Server 2008 proves to be a bit of trouble.

Install PDFCreator in ‘Server installation’ mode.  With version 0.98 I found that if data execution prevention is enabled,
PDFCreator needs to be added to the exception list (DEP hides a little bit under Control Panel – System – Advanced system settings – Advanced – Data Execution Prevention).
However, with version 1.0 and moving forward, I have found that this is not true which makes our setup easier!

Next we need to get srvany.exe from the Windows Server 2003 Resource Kit.  I decided to put it in \Program Files\oldResourceKitTools.
This article explains how to use instsrv.exe to setup a custom service that uses srvany.exe to run what we want.
Trouble is “instsrv.exe” doesn’t work very well on Server 2008.  Thankfully we can use “sc.exe” to create the service in a similar way.

However, before we create the service we have to decide what credentials to have the service run as.
Depending on your environment running as the local system (the default) may be sufficient.
If PDFCreator will need to save files anywhere other than the local system we’ll  need to
choose either Network Service, or create a domain user for the service.
As I like to be able to control specific permissions I created a new domain user: “svc-pdfcreator”, with a strong password.

Armed with that information we can now create the service with the sc command:

C:\> sc create pdfcreator start= auto binPath= "C:\Program Files\oldResourceKitTools\srvany.exe" DisplayName= "PDFCreator" obj= DOMAIN\User password= password

We can double check that the service was created successfully by using sc query:

C:\>sc query pdfcreator
SERVICE_NAME: pdfcreator
TYPE               : 10  WIN32_OWN_PROCESS
STATE              : 1  STOPPED
WIN32_EXIT_CODE    : 0  (0x0)
SERVICE_EXIT_CODE  : 0  (0x0)
CHECKPOINT         : 0x0
WAIT_HINT          : 0x0

Now we need to follow the registry editing instructions from KB137890 :

  1. Run Registry Editor (Regedt32.exe) and locate the following
    subkey: “HKEY_LOCAL_MACHINE\SYSTEM\CurrentControlSet\Services\<My Service>”
  2. From the Edit menu, click Add Key.
    Type the following and click OK:Key Name: Parameters
    Class :<leave blank>
  3. Select the Parameters key.
  4. From the Edit menu, click Add Value.
    Type the following and click OK:Value Name: Application
    Data Type : REG_SZ
    String : “<path>\<application.ext>where <path>\<application.ext>”
    is the drive and full path to the application executable including the extension (i.e., C:\WinNT\Notepad.exe)
  5. Close Registry Editor.

Almost done setting up the service.  With version 0.98 I found that it was necessary to run PDFCreator.exe and PDFSpool.exe in “Server 2003 SP1” compatibility mode.
Once again, this appears to have been resolved with version 1.0+, so we don’t have to worry about compatibility settings!
But if you’re using a version prior to 1.0, go to the compatibility tab on the properties of each executable and
check “Run this program in compatibility mode for:” and select “Windows Server 2003 (Service Pack 1)”.

That’s it!  Test the service either by running “net start pdfcreator” or from the services mmc snap-in.  If all goes well it should start successfully.

This setup works well for the auto-save in PDFCreator, as we can setup the auto-save directory to be:
\\domain\staff\<REDMON_USER>\Documents\PDFCreator\

You may have to get creative with the auto-save path if your userdata paths aren’t uniform across the users that have access to the PDFCreator printer.
We could probably solve the issue by setting up a shared folder like:
\\server\PDFCreatorAutoSave\<REDMON_USER>

Wherever you decide to have PDFCreator save its output, make sure that the account the service runs as
has permissions to create and modify files and your users have at least read access.


Renew a self-signed SSL Certificate in SBS 2008 or SBS2011

sbs200x-renew-certificate-1

If you have an expired SSL Certificate, you would want to renew it.

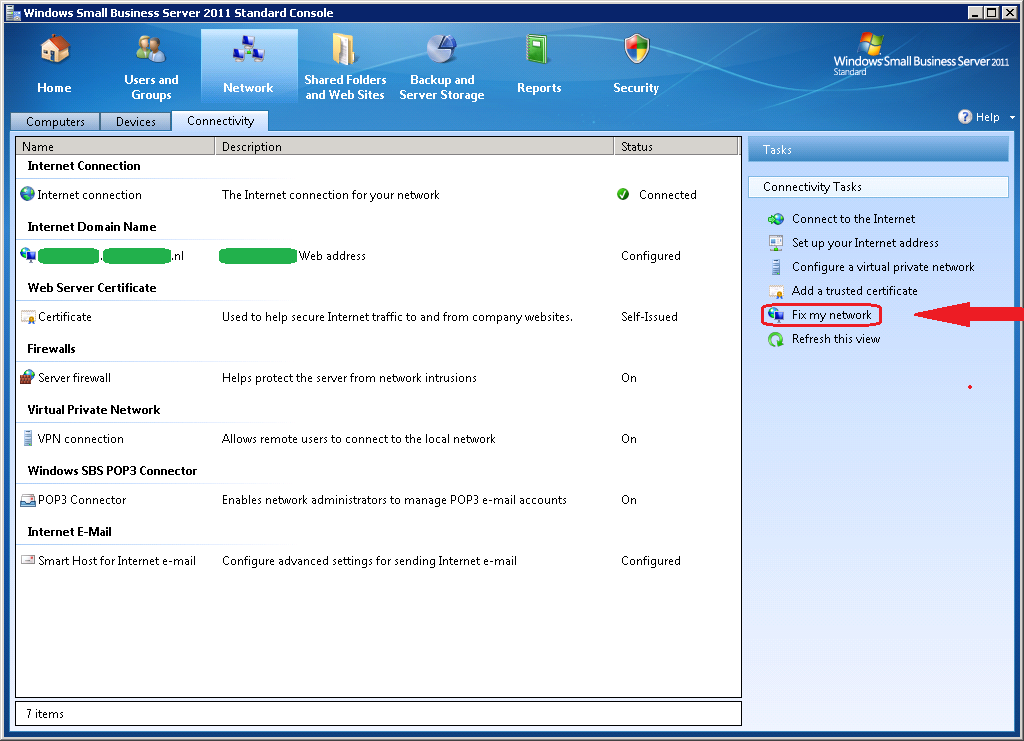
This is done in the “SBS Console” with the “Fix My Network Wizard (FNCW)”.

Running it will bring up potential network issues.

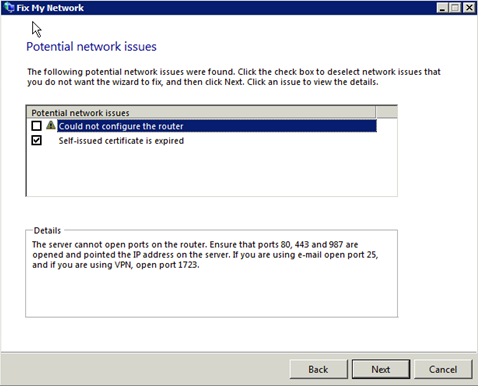
Note that it will always find some but you need to ignore them
and take care of the certificate only.

When the wizard displays it results. Select only “Self-issued certificate is expired”, de-select the other issues.

sbs200x-renew-certificate-2

http://blog.the-it-blog.co.uk/2013/01/25/re-issuing-a-self-signed-certificate-for-exchange-sbs/

OWA Cert

To get the certificate in the SBS console to match the OWA certificate > I ran the Add a trusted certificate wizard > select I want to use a certificate that is already installed on the server > selected the newly created self-issued certificate.  Now if I View Certificate Properties in the SBS console it matches the OWA certificate.

Create cert package from webpage

To update the install package SBSCertificate.cer file > on non-domain joined system > run IE as administrator > open OWA site > import cert into IE > in IE options > content tab > certificates > find certificate and export as SBSCertificate.cer > save into Certificate Distribution Package folder after renaming the old cer file.


Hotfixes

Mapped Drive Connection to Network Share May Be Lost | net config server /autodisconnect:-1


Back-up

wbadmin start backup -backupTarget:\\backuplocation\backupdirectory -allCritical -quiet -vssFull -systemState


Virtualisation

VMware option: (Edit settings, Options, General, Contiguration Parameters) SMBIOS.reflectHost=TRUE


HP ILO Reset admin password

HP Proliant ILO configuration and password recovery

LDAP Addresbook

http://social.technet.microsoft.com/Forums/en-US/0ee97f40-abe3-49ff-9598-134f2de19a71/allow-copier-to-pull-address-book-thru-ldap-sbs2011

EOF

Exchange Microsoft

Server 2003 SBS Features

Posted on 2011/07/12 by arno Posted in Features

[ Features | Office | IE | ]
[ Windows | XP | 7 (seven) | 8 | 10 | ] - [ Server | 2003SBS | 2008SBS | 2011SBS | 2016 | WSUS ]


End of Support

http://msmvps.com/blogs/steveb/archive/2010/01/11/microsoft-product-support-lifecycle-for-sbs-2003.aspx

Tweaks

Manual set the mailbox limits per user using adsiedit

Server 2003 SBS Certificates change or renew

http://technet.microsoft.com/en-us/library/cc949119%28WS.10%29.aspx

http://davidschrag.com/schlog/326/replacing-an-sbss-expired-ssl-certificate-with-a-brand-new-one-for-the-same-host-name
http://blogs.technet.com/b/sbs/archive/2007/08/21/how-to-install-a-public-3rd-party-ssl-certificate-on-iis-on-sbs-2003.aspx
http://davidschrag.com/schlog/407/renewing-a-self-signed-certificate-in-sbs-2003

http://www.netometer.com/video/tutorials/exchange-2007-renew-Self-Signed-ssl-certificate/
http://www.petri.co.il/forums/showthread.php?t=2054
http://www.petri.co.il/windows_2003_domain_rename.htm
http://www.sslshopper.com/article-how-to-create-a-self-signed-certificate.html
http://www.msexchange.org/tutorials/SSL_Enabling_OWA_2003.html

Server 2003 Windows 7 Administrative templates (GPO)

http://www.petri.co.il/forums/showthread.php?t=41220

http://technet.microsoft.com/en-us/library/cc719863(WS.10).aspx

http://certcollection.org/forum/topic/15531-how-to-deploy-windows-7-in-your-sbs-2003-network/

http://support.microsoft.com/kb/816662

http://technet.microsoft.com/en-us/library/cc719863(WS.10).aspx

http://smallbusiness.support.microsoft.com/en-us/kb/926505

Outlook https-over-rpc

http://social.technet.microsoft.com/Forums/en-US/exchangesvrgeneral/thread/73456d6f-2d68-4dc1-834f-a94606553fe3
http://support.microsoft.com/kb/833401
http://www.sonoracomm.com/support/18-support/153-outlook-http

The security certificate is not from a trusted certifying authority

Exchange Microsoft

Outlook command line switches

Posted on 2011/02/12 by arno Posted in Features, Microsoft, Office

Send mail from commandline

soruce: http://support.microsoft.com/kb/287573

Commandline switches

source: http://office.microsoft.com/en-us/outlook-help/command-line-switches-HP001003110.aspx?redir=0

/c messageclass

Creates a new item of the specified message class (Outlook forms or any other valid MAPI form).

Examples:

  • /c ipm.activity creates a Journal entry
  • /c ipm.appointment creates an appointment
  • /c ipm.contact creates a contact
  • /c ipm.note creates an e-mail message
  • /c ipm.stickynote creates a note
  • /c ipm.task creates a task

source: http://www.howto-outlook.com/howto/commandlineswitches.htm

Switch Description Works in
/a path:\<filename> Creates an item with the specified file as an attachment. Example:
"C:\Program Files\Microsoft Office\Office12\Outlook.exe" /a "C:\My Documents\labels.doc"
If no item type is specified, IPM.Note is assumed. Cannot be used with message classes that aren’t based on Outlook.
2000, 2002/XP, 2003, 2007, 2010
/altvba <otmfilename> Opens the VBA program specified in otmfilename, rather than %appdata%\Microsoft\Outlook\VbaProject.OTM. 2003, 2007, 2010
/autorun macroname Opens Outlook and immediately runs the macro specified in macroname.
(no longer supported after Outlook 2003 SP2)
2003
/c <messageclass>
Creates a new item of the specified message class (Outlook forms or any other valid MAPI form).Examples:
  • /c ipm.activity creates a Journal entry
  • /c ipm.appointment creates an appointment
  • /c ipm.contact creates a contact
  • /c ipm.note creates an e-mail message
  • /c ipm.stickynote creates a note
  • /c ipm.task creates a task
2002/XP, 2003, 2007, 2010
/checkclient Prompts for the default manager of e-mail, news, and contacts. 2000, 2002/XP, 2003, 2007, 2010
/cleanautocompletecache Removes all names and e-mail addresses from the AutoComplete list. 2010
/cleancategories Deletes any custom category names that you have created. Restores categories to the default names. 2007, 2010
/cleanclientrules Starts Outlook and deletes client-based rules. 2003, 2007, 2010
/cleanconvongoingactions Deletes the Conversations Actions Table (CAT). CAT entries for a conversation thread usually expire 30 days after no activity. The command-line switch clears all conversation tagging, ignore, and moving rules immediately stopping any additional actions. 2010
/cleandmrecords Deletes the logging records saved when a manager or a delegate declines a meeting. 2003, 2007, 2010
/cleanfinders Removes Search Folders from the Microsoft Exchange server store. 2000, 2002/XP, 2003, 2007, 2010
/cleanfreebusy Clears and regenerates free/busy information. This switch can only be used when you are able to connect to your Microsoft Exchange server. 2000, 2002/XP, 2003, 2007, 2010
/cleanfromaddress Removes all manually added From entries from the profile. 2010
/cleanips Restores receival of new messages in Exchange Cached mode (KB968773) 2007, 2010
/cleanprofile Removes invalid profile keys and recreates default registry keys where applicable. 2003, 2007
/cleanpst Launches Outlook with a clean Personal Folders file (.pst) 2003
/cleanreminders Clears and regenerates reminders. 2000, 2002/XP, 2003, 2007, 2010
/cleanroamedprefs All previous roamed preferences are deleted and copied again from the local settings on the computer where this switch is used. This includes the roaming settings for reminders, free/busy grid, working hours, calendar publishing, and RSS rules. 2007, 2010
/cleanrules Starts Outlook and deletes client- and server-based rules. 2003, 2007, 2010
/cleanschedplus Deletes all Schedule+ data (free/busy, permissions, and .cal file) from the server and enables the free/busy information from the Outlook Calendar to be used and viewed by all Schedule+ 1.0 users. 2000, 2002/XP, 2003
/cleanserverrules Starts Outlook and deletes server-based rules. 2003, 2007, 2010
/cleansharing Removes all RSS, Internet Calendar, and SharePoint subscriptions from Account Settings, but leaves all the previously downloaded content on your computer. This is useful if you cannot delete one of these subscriptions within Outlook 2010. 2010
/cleansniff Deletes duplicate reminder messages. 2003, 2007, 2010
/cleansubscriptions Deletes the subscription messages and properties for subscription features. 2003, 2007, 2010
/cleanviews Restores default views. All custom views you created are lost. 2000, 2002/XP, 2003, 2007, 2010
/designer Starts Outlook without figuring out if Outlook should be the default client in the first run. 2003
/embedding <msgfilename> Opens the specified message file (.msg) as an OLE embedding. Also used without command-line parameters for standard OLE co-create. 2002/XP, 2003, 2007, 2010
/explorer Opens the new window in “explorer” mode (link bar on). 2000, 2002/XP, 2003, 2007, 2010
/f <msgfilename> Opens the specified message file (.msg) or Microsoft Office saved search (.oss).
(Support for oss-files has been dropped since Outlook 2003 SP2 due to security restrictions)
2002/XP, 2003, 2007, 2010
/finder Opens the Advanced Find dialog box. 2007, 2010
/firstrun Starts Outlook as if it were run for the first time. 2003, 2007
/folder Opens a new window in “folder” mode (Navigation Pane off). 2000, 2002/XP, 2003, 2007, 2010
/hol <holfilename.hol> Opens the specified .hol file. 2003, 2007, 2010
/ical <icsfilename> Opens the specified .ics file. 2003, 2007, 2010
/importprf path:\<filename.prf> Launches Outlook and opens/imports the defined MAPI profile (*.prf). If Outlook is already open, queues the profile to be imported on the next clean launch. 2002/XP, 2003, 2007, 2010
/l <olkfilename> Opens the specified .olk file. 2003
/launchtraininghelp assetid Opens a Help window with the Help topic specified in assetid. 2003, 2007, 2010
/m emailname Provides a way for the user to add an e-mail name to the item. Only works in conjunction with the /c command-line parameter.
Example:
Outlook.exe /c ipm.note /m emailname
2003, 2007, 2010
/nocustomize Starts Outlook without loading outcmd.dat (customized toolbars) and *.fav file. 2003, 2007
/noextensions Starts Outlook with extensions turned off, but listed in the Add-In Manager. 2003, 2007
/nopollmail Starts Outlook without checking mail at startup. 2003
/nopreview Starts Outlook with the Reading Pane off and removes the option from the View menu. 2000, 2002/XP, 2003, 2007, 2010
/p <msgfilename> Prints the specified message (.msg).
Prior to Outlook 2007, this does not work with HTML messages.
2002/XP, 2003, 2007, 2010
/profile <profilename> Loads the specified profile. If your profile name contains a space, enclose the profile name in quotation marks (“). 2002/XP, 2003, 2007, 2010
/profiles Opens the Choose Profile dialog box regardless of the Options setting on the Tools menu. 2002/XP, 2003, 2007, 2010
/recycle Starts Outlook using an existing Outlook window, if one exists. Used in combination with /explorer or /folder. 2000, 2002/XP, 2003, 2007, 2010
/regserver Rewrites all Outlook specific registry keys and re-associates file extensions without having to reinstall Outlook or run setup with the /y switch. The settings are stored in the Outlook.srg file located in the same folder as the Outlook program. 2000, 2002/XP
/remigratecategories Starts Outlook and and initiates the following commands on the default mailbox:

  • Upgrades colored For Follow Up flags to Office Outlook 2007 color categories.
  • Upgrades calendar labels to Office Outlook 2007 color categories.
  • Adds all categories used on non-mail items into the Master Category List.

Note: This is the same command as Upgrade to Color Categories in each Outlook mailbox properties dialog box.

2007, 2010
/remigrateconversations 2010
/resetfoldernames Resets default folder names (such as Inbox or Sent Items) to default names in the current Office user interface language.For example, if you first connect to your mailbox Outlook using a Russian user interface, the Russian default folder names cannot be renamed. To change the default folder names to another language such as Japanese or English, you can use this switch to reset the default folder names after changing the user interface language or installing a different language version of Outlook. 2002/XP, 2003, 2007, 2010
/resetfolders Restores missing folders for the default delivery location. 2000, 2002/XP, 2003, 2007, 2010
/resetformregions Empties the form regions cache and reloads the form region definitions from the Windows registry. 2007, 2010
/resetoutlookbar Rebuilds the Outlook Bar. 2000, 2002/XP
/resetnavpane Clears and regenerates the Navigation Pane for the current profile. 2003, 2007, 2010
/resetquicksteps Restores the default Quick Steps. All user-created Quick Steps are deleted. 2010
/resetsearchcriteria Resets all Instant Search criteria so that the default set of criteria is shown in each module. 2007, 2010
/resetsharedfolders Removes all shared folders from the Navigation Pane. 2007, 2010
/resettodobar Clears and regenerates the To-Do Bar task list for the current profile. The To-Do Bar search folder is deleted and re-created. 2007, 2010
/restore Attempts to open the same profile and folders that were open prior to an abnormal Outlook shutdown. 2010
/rpcdiag Opens Outlook and displays the remote procedure call (RPC) connection status dialog. 2003, 2007, 2010
/s <filename> Loads the specified shortcuts file (.fav). 2002/XP, 2003
/safe Starts Outlook without extensions, Reading Pane, or toolbar customization. 2000, 2002/XP, 2003, 2007, 2010
/safe:1 Starts Outlook with the Reading Pane off. 2003, 2007, 2010
/safe:2 Starts Outlook without checking mail at startup. 2003
/safe:3 Starts Outlook with extensions turned off, but listed in the Add-In Manager. 2003, 2007, 2010
/safe:4 Starts Outlook without loading Outcmd.dat (customized toolbars) and *.fav file. 2003, 2007
/select foldername Starts Outlook and opens the specified folder in a new window.
For example, to open Outlook and display the default calendar use:
"C:\Program Files\Microsoft Office\Office12\Outlook.exe"
/select outlook:[calendar|inbox|tasks|contacts]
or /select "outlook:inbox\Old Messages"
2002/XP, 2003, 2007, 2010
/share feed://URL/filename
/share stssync://URL
/
share web://URL/filename
Specifies a sharing URL to connect to Outlook. For example, use stssync://URL to connect a Microsoft Windows SharePoint Services 3.0 list to Outlook. 2007, 2010
/sniff Starts Outlook and forces a detection of new meeting requests in the Inbox, and then adds them to the calendar. 2003, 2007, 2010
/t <oftfilename> Opens the specified .oft file. 2003, 2007, 2010
/unregserver Deletes all registry keys and file associations for Outlook. Its actions are based on the Outlook.srg file located in the same folder as the Outlook application. Use the /regserver switch to rewrite the registry keys and file associations after using this switch. 2000, 2002/XP
/v <vcffilename> Opens the specified .vcf file. 2003, 2007, 2010
/vcal <vcsfilename> Opens the specified .vcs file. 2003, 2007, 2010
/x <xnkfilename> Opens the specified .xnk file. 2003, 2007
Switch Description Works in
/a path:\<filename> Creates an item with the specified file as an attachment. Example:
"C:\Program Files\Microsoft Office\Office12\Outlook.exe" /a "C:\My Documents\labels.doc"
If no item type is specified, IPM.Note is assumed. Cannot be used with message classes that aren’t based on Outlook.
2000, 2002/XP, 2003, 2007, 2010
/altvba <otmfilename> Opens the VBA program specified in otmfilename, rather than %appdata%\Microsoft\Outlook\VbaProject.OTM. 2003, 2007, 2010
/autorun macroname Opens Outlook and immediately runs the macro specified in macroname.
(no longer supported after Outlook 2003 SP2)
2003
/c <messageclass>
Creates a new item of the specified message class (Outlook forms or any other valid MAPI form).Examples:
  • /c ipm.activity creates a Journal entry
  • /c ipm.appointment creates an appointment
  • /c ipm.contact creates a contact
  • /c ipm.note creates an e-mail message
  • /c ipm.stickynote creates a note
  • /c ipm.task creates a task
2002/XP, 2003, 2007, 2010
/checkclient Prompts for the default manager of e-mail, news, and contacts. 2000, 2002/XP, 2003, 2007, 2010
/cleanautocompletecache Removes all names and e-mail addresses from the AutoComplete list. 2010
/cleancategories Deletes any custom category names that you have created. Restores categories to the default names. 2007, 2010
/cleanclientrules Starts Outlook and deletes client-based rules. 2003, 2007, 2010
/cleanconvongoingactions Deletes the Conversations Actions Table (CAT). CAT entries for a conversation thread usually expire 30 days after no activity. The command-line switch clears all conversation tagging, ignore, and moving rules immediately stopping any additional actions. 2010
/cleandmrecords Deletes the logging records saved when a manager or a delegate declines a meeting. 2003, 2007, 2010
/cleanfinders Removes Search Folders from the Microsoft Exchange server store. 2000, 2002/XP, 2003, 2007, 2010
/cleanfreebusy Clears and regenerates free/busy information. This switch can only be used when you are able to connect to your Microsoft Exchange server. 2000, 2002/XP, 2003, 2007, 2010
/cleanfromaddress Removes all manually added From entries from the profile. 2010
/cleanips Restores receival of new messages in Exchange Cached mode (KB968773) 2007, 2010
/cleanprofile Removes invalid profile keys and recreates default registry keys where applicable. 2003, 2007
/cleanpst Launches Outlook with a clean Personal Folders file (.pst) 2003
/cleanreminders Clears and regenerates reminders. 2000, 2002/XP, 2003, 2007, 2010
/cleanroamedprefs All previous roamed preferences are deleted and copied again from the local settings on the computer where this switch is used. This includes the roaming settings for reminders, free/busy grid, working hours, calendar publishing, and RSS rules. 2007, 2010
/cleanrules Starts Outlook and deletes client- and server-based rules. 2003, 2007, 2010
/cleanschedplus Deletes all Schedule+ data (free/busy, permissions, and .cal file) from the server and enables the free/busy information from the Outlook Calendar to be used and viewed by all Schedule+ 1.0 users. 2000, 2002/XP, 2003
/cleanserverrules Starts Outlook and deletes server-based rules. 2003, 2007, 2010
/cleansharing Removes all RSS, Internet Calendar, and SharePoint subscriptions from Account Settings, but leaves all the previously downloaded content on your computer. This is useful if you cannot delete one of these subscriptions within Outlook 2010. 2010
/cleansniff Deletes duplicate reminder messages. 2003, 2007, 2010
/cleansubscriptions Deletes the subscription messages and properties for subscription features. 2003, 2007, 2010
/cleanviews Restores default views. All custom views you created are lost. 2000, 2002/XP, 2003, 2007, 2010
/designer Starts Outlook without figuring out if Outlook should be the default client in the first run. 2003
/embedding <msgfilename> Opens the specified message file (.msg) as an OLE embedding. Also used without command-line parameters for standard OLE co-create. 2002/XP, 2003, 2007, 2010
/explorer Opens the new window in “explorer” mode (link bar on). 2000, 2002/XP, 2003, 2007, 2010
/f <msgfilename> Opens the specified message file (.msg) or Microsoft Office saved search (.oss).
(Support for oss-files has been dropped since Outlook 2003 SP2 due to security restrictions)
2002/XP, 2003, 2007, 2010
/finder Opens the Advanced Find dialog box. 2007, 2010
/firstrun Starts Outlook as if it were run for the first time. 2003, 2007
/folder Opens a new window in “folder” mode (Navigation Pane off). 2000, 2002/XP, 2003, 2007, 2010
/hol <holfilename.hol> Opens the specified .hol file. 2003, 2007, 2010
/ical <icsfilename> Opens the specified .ics file. 2003, 2007, 2010
/importprf path:\<filename.prf> Launches Outlook and opens/imports the defined MAPI profile (*.prf). If Outlook is already open, queues the profile to be imported on the next clean launch. 2002/XP, 2003, 2007, 2010
/l <olkfilename> Opens the specified .olk file. 2003
/launchtraininghelp assetid Opens a Help window with the Help topic specified in assetid. 2003, 2007, 2010
/m emailname Provides a way for the user to add an e-mail name to the item. Only works in conjunction with the /c command-line parameter.
Example:
Outlook.exe /c ipm.note /m emailname
2003, 2007, 2010
/nocustomize Starts Outlook without loading outcmd.dat (customized toolbars) and *.fav file. 2003, 2007
/noextensions Starts Outlook with extensions turned off, but listed in the Add-In Manager. 2003, 2007
/nopollmail Starts Outlook without checking mail at startup. 2003
/nopreview Starts Outlook with the Reading Pane off and removes the option from the View menu. 2000, 2002/XP, 2003, 2007, 2010
/p <msgfilename> Prints the specified message (.msg).
Prior to Outlook 2007, this does not work with HTML messages.
2002/XP, 2003, 2007, 2010
/profile <profilename> Loads the specified profile. If your profile name contains a space, enclose the profile name in quotation marks (“). 2002/XP, 2003, 2007, 2010
/profiles Opens the Choose Profile dialog box regardless of the Options setting on the Tools menu. 2002/XP, 2003, 2007, 2010
/recycle Starts Outlook using an existing Outlook window, if one exists. Used in combination with /explorer or /folder. 2000, 2002/XP, 2003, 2007, 2010
/regserver Rewrites all Outlook specific registry keys and re-associates file extensions without having to reinstall Outlook or run setup with the /y switch. The settings are stored in the Outlook.srg file located in the same folder as the Outlook program. 2000, 2002/XP
/remigratecategories Starts Outlook and and initiates the following commands on the default mailbox:

  • Upgrades colored For Follow Up flags to Office Outlook 2007 color categories.
  • Upgrades calendar labels to Office Outlook 2007 color categories.
  • Adds all categories used on non-mail items into the Master Category List.

Note: This is the same command as Upgrade to Color Categories in each Outlook mailbox properties dialog box.

2007, 2010
/remigrateconversations 2010
/resetfoldernames Resets default folder names (such as Inbox or Sent Items) to default names in the current Office user interface language.For example, if you first connect to your mailbox Outlook using a Russian user interface, the Russian default folder names cannot be renamed. To change the default folder names to another language such as Japanese or English, you can use this switch to reset the default folder names after changing the user interface language or installing a different language version of Outlook. 2002/XP, 2003, 2007, 2010
/resetfolders Restores missing folders for the default delivery location. 2000, 2002/XP, 2003, 2007, 2010
/resetformregions Empties the form regions cache and reloads the form region definitions from the Windows registry. 2007, 2010
/resetoutlookbar Rebuilds the Outlook Bar. 2000, 2002/XP
/resetnavpane Clears and regenerates the Navigation Pane for the current profile. 2003, 2007, 2010
/resetquicksteps Restores the default Quick Steps. All user-created Quick Steps are deleted. 2010
/resetsearchcriteria Resets all Instant Search criteria so that the default set of criteria is shown in each module. 2007, 2010
/resetsharedfolders Removes all shared folders from the Navigation Pane. 2007, 2010
/resettodobar Clears and regenerates the To-Do Bar task list for the current profile. The To-Do Bar search folder is deleted and re-created. 2007, 2010
/restore Attempts to open the same profile and folders that were open prior to an abnormal Outlook shutdown. 2010
/rpcdiag Opens Outlook and displays the remote procedure call (RPC) connection status dialog. 2003, 2007, 2010
/s <filename> Loads the specified shortcuts file (.fav). 2002/XP, 2003
/safe Starts Outlook without extensions, Reading Pane, or toolbar customization. 2000, 2002/XP, 2003, 2007, 2010
/safe:1 Starts Outlook with the Reading Pane off. 2003, 2007, 2010
/safe:2 Starts Outlook without checking mail at startup. 2003
/safe:3 Starts Outlook with extensions turned off, but listed in the Add-In Manager. 2003, 2007, 2010
/safe:4 Starts Outlook without loading Outcmd.dat (customized toolbars) and *.fav file. 2003, 2007
/select foldername Starts Outlook and opens the specified folder in a new window. For example, to open Outlook and display the default calendar use:
"C:\Program Files\Microsoft Office\Office12\Outlook.exe" /select outlook:calendar
2002/XP, 2003, 2007, 2010
/share feed://URL/filename
/share stssync://URL
/
share web://URL/filename
Specifies a sharing URL to connect to Outlook. For example, use stssync://URL to connect a Microsoft Windows SharePoint Services 3.0 list to Outlook. 2007, 2010
/sniff Starts Outlook and forces a detection of new meeting requests in the Inbox, and then adds them to the calendar. 2003, 2007, 2010
/t <oftfilename> Opens the specified .oft file. 2003, 2007, 2010
/unregserver Deletes all registry keys and file associations for Outlook. Its actions are based on the Outlook.srg file located in the same folder as the Outlook application. Use the /regserver switch to rewrite the registry keys and file associations after using this switch. 2000, 2002/XP
/v <vcffilename> Opens the specified .vcf file. 2003, 2007, 2010
/vcal <vcsfilename> Opens the specified .vcs file. 2003, 2007, 2010
/x <xnkfilename> Opens the specified .xnk file. 2003, 2007
Microsoft Office

Server 2008 SBS Features

Posted on 2011/02/01 by arno Posted in Features

[ Features | Office | IE | ]
[ Windows | XP | 7 (seven) | 8 | 10 | ] - [ Server | 2003SBS | 2008SBS | 2011SBS | 2016 | WSUS ]


Server 2008 SBS DHCP Server

source: http://thedailyreviewer.com/server/view/sbs2008-dhcp-snapin-denied-me-as-the-administrator-of-the-sbs-server-104433939 (sbs 2008 dhcp server manager)

DHCP snap in there is a red circle with a minus sign on it. DHCP Server is running but not manageable.

In DHCP Manager -> add computer -> localhost

Server 2008 Backup to a network share scheduled

sources:
http://social.technet.microsoft.com/Forums/en/windowsbackup/thread/e58623bb-6f97-4a06-8f3d-e3c64fd27ea6
http://www.bitwizwebdesign.com/Blogs/Bryan-Soltis/September-2008/Windows-Server-2008-Backup-to-a-network-share

commandline-help: http://technet.microsoft.com/en-us/library/cc754015%28WS.10%29.aspx

wbadmin.exe start systemstatebackup -backupTarget:[Drive:]

wbadmin.exe start backup -backupTarget:\\[Server]\[Share name] -include:c:,d: -vssFull

commandline-help: http://msdn.microsoft.com/en-us/library/bb736357%28v=vs.85%29.aspx

schtasks /Create /SC Weekly /TN Backup-systemstate /TR “wbadmin.exe start systemstatebackup -backupTarget:[Drive:] -quiet” /ST 22:05 /D SUN /RL Highest

schtasks.exe /Create /SC Weekly /TN Backup-weekly /TR “wbadmin start backup -backupTarget:\\[Server]\[Share name] -include:c:,d: -vssFull -quiet” /ST 22:30 /D SUN /RL Highest

Server 2008 SBS Monitoring database size

The SBSMonitoring database is nearing maximum size on SBS 2008

https://msmvps.com/blogs/bradley/archive/2006/05/25/97044.aspx

Server 2008 Terminal services

http://www.bunkerhollow.com/blogs/matt/archive/2008/10/24/remoteapp-disconnected-because-of-an-error-in-the-licensing-protocol.aspx

Server 2008 Exchange 2007 Certificates

http://www.msexchange.org/articles-tutorials/exchange-server-2007/management-administration/managing-exchange-certificates.html


Server 2008 inbound ports

source: http://www.sbsfaq.com/?p=1139

Small Business Server 2008 (SBS 2008) requires a number of ports open on your firewall to allow inbound traffic from the Internet in to your network.
SBS 2008 needs a lower number of ports open than SBS 2003 did.
You will only need to open the ports below to enable all SBS 2008 functionality if you are using all facilities.
If you do not need a specific function open then there is no need to allow that port to be open inbound to the server.

Port 25

This is required for inbound mail using the SMTP protocol – this will be needed on MOST SBS 2008 servers. If you are using an external third party mail filtering service such as Trend Micro Internet Messaging Security then you will want to restrict this port to be open ONLY to their servers. Closing this port to all traffic will prevent ANY inbound mail to your SBS 2008 server.

Port 80

This port is used to redirect requests to the Remote Web Workplace for http://remote.mycompany.com through to the secured site on port 443. You do not need to have this port open for SBS 2008 to work, but if you close it then you must get your users to use https://remote.mycompany.com to get to their Remote Web Workplace. Closing this port will result in errors when users try to access Remote Web Workplace via http://remote.mycompany.com

Port 443

This is the secured sockets layer (SSL) access to the Remote Web Workplace. All traffic over this port is encrypted for security. This port needs to be open in order for Remote Web Workplace to work. Closing this port will result in the Remote Web Workplace not being accessible outside of the office from the Internet.

Port 987

This is another secured sockets layer (SSL) port that is used to allow access to the Companyweb from the Internet. It uses the same digital certificate as that on port 443. Closing this port will result in the Companyweb not being accessible outside of the office from the Internet.

Port 1723

PPTP is no longer considered a secure VPN technology because it relies upon MS-CHAPv2 which has been compromised. If you continue to use PPTP be aware that intercepted traffic can be decrypted by a third party, so it should be considered unencrypted. We advise migrating to another VPN type such as OpenVPN or IPsec.
This port is used for the PPTP VPN in SBS 2008. It only needs to be enabled if you have already configured the SBS 2008 server to be used as a VPN server. You can do this via the SBS 2008 console on the Network Tab using the Enable VPN wizard. Closing this port will result in the VPN not being accessible from the Internet.

SBS 2008 does NOT require the following ports to be opened BY DEFAULT.

Port 21

This port is used for FTP access from the Internet to the SBS 2008 server. The SBS 2008 server is NOT configured as an FTP server by default. It is NOT recommended that you configure your SBS 2008 server as an FTP server as by default any password used to access it will go over the Internet in clear or plain text. This means that someone else can easily read your password and potentially compromise your network security.

Port 3389

This port is used for DIRECT access to the SBS 2008 servers console via the RDP protocol of the Remote Desktop Connection software. Allowing this port to be open to the Internet WILL increase the potential of your server being compromised via a password brute force attack. If you MUST have this port open to the Internet, it is recommended that you implement a two factor authentication solution called AuthAnvil from Scorpion Software

Freezes while bsod / reboot

http://msmvps.com/blogs/bradley/archive/2010/11/08/throttling-the-memory-in-sbs-2008.aspx

http://mostlyexchange.blogspot.in/2007/08/restricting-ram-usage-in-exchange-2007.html

LINKS

http://johnrpattison.com/2008/08/25/windows-small-business-server-2008-remote-access-and-computer-management/

  • Login
  • Mother of all Portals
  • .Handy .Handig
  • Links – wikis – wikies

Archives

  • June 2022
  • October 2021
  • June 2021
  • September 2016
  • April 2016
  • March 2016
  • November 2014
  • September 2014
  • August 2014
  • July 2014
  • April 2014
  • March 2014
  • November 2013
  • October 2013
  • August 2013
  • July 2013
  • June 2013
  • May 2013
  • April 2013
  • February 2013
  • December 2012
  • September 2012
  • August 2012
  • July 2012
  • June 2012
  • May 2012
  • April 2012
  • March 2012
  • January 2012
  • December 2011
  • November 2011
  • October 2011
  • September 2011
  • August 2011
  • July 2011
  • June 2011
  • May 2011
  • April 2011
  • February 2011
  • January 2011
  • December 2010
  • November 2010
  • October 2010
  • September 2010
  • August 2010
  • July 2010
  • June 2010
  • May 2010
  • April 2010
  • March 2010
  • February 2010
  • January 2010
CyberChimps ©2025