Remote Desktop Services, formerly known as Terminal Services
Troubleshooting Remote Desktop Licensing Issues
Ease of Access keyboard shortcuts
General keyboard shortcuts
Dialog box keyboard shortcuts
Windows logo key keyboard shortcuts
Windows Explorer keyboard shortcuts
Taskbar keyboard shortcuts
Magnifier keyboard shortcuts
Remote Desktop Connection keyboard shortcuts
Paint keyboard shortcuts
WordPad keyboard shortcuts
Calculator keyboard shortcuts
Windows Journal keyboard shortcuts
Windows Help viewer keyboard shortcuts
SBS 2008 / SBS 2011 to virtualize or not to virtualize
Report Viewer 2008 SP1 Redistributable
SBS2008 | Windows Small Business Server (SBS) 2008 Best Practices Analyzer (BPA) (SBS2008)
SBS2008r2, SBS2011 | Windows Server Solutions Best Practices Analyzer 1.0
Exchange 2010 sp3 | Description | Download | Exchange Team Blog
Repair Windows Server Update Services
How to configure an authoritative time server in Windows Server | Configuring-Windows-Time-Service | 2008 R2 sync time external source | Registry entries | w32tm /resync /rediscover
How to recreate SBSmonitoring database | other technet post | Script to run renames current database and creates a new one.
Disable SSL v3 | ServerFault | KB Plesk |
SBS 2011 – IV. Tweaking the Server
http://blog.mpecsinc.ca/2010/12/sbs-2011-setup-guide-v100.html (recommended)
sbs 2003 to sbs 2011 migration
How to enable javascript in internet explorer
While editing the Service Connection Point in Active Directory Sites and Services does work, it’s probably not the “approved” way to do things.
The support manager recommended that I instead use the Exchange Management Shell to entirely remove the Autodiscover Virtual Directory using Remove-AutodiscoverVirtualDirectory. Here’s how I did that:
1. Open an elevated command prompt and back up the IIS configuration (explained here):
%windir%\system32\inetsrv\appcmd.exe add backup "Before Removing Autodiscover"
2. Open an elevated Exchange Management Shell and retrieve the current autodiscover virtual directory:
>Get-AutodiscoverVirtualDirectory | fl Name, Server, InternalUrl, Identity
Copy the Identity value to the clipboard.
3. In the Exchange Management Shell, remove the autodiscover virtual directory:
Remove-AutodiscoverVirtualDirectory –Identity <identity value retrieved above>
Update December 4, 2014 Per a couple of comments, the identity string should be enclosed in quotation marks:
Remove-AutodiscoverVirtualDirectory –Identity "<identity value retrieved above>"
You will have to confirm by typing a “Y”.
4. Check that the autodiscover virtual directory is gone:
Get-AutodiscoverVirtualDirectory | fl Name, Server, InternalUrl, Identity
This should now return nothing.
5. Now, with Outlook running on a desktop, hold the Ctrl button, right-click on the Outlook icon in the system tray, and select Test E-mail AutoConfiguration. Enter your email address and password and click the Test button. The results should come from the Office 365 server.
http://www.forensit.com/comparison.html
Exchange Server Updates: build numbers and release dates
Enable relaying for local machines
How to forward mail to publicfolder
Understanding Transport Pipeline
Understanding Exchange Server Intelligent Message Filter
Exchange 2013 Storage Configuration Options
SBS 2011 Store.exe allocating too much memory despite cache adjustment
Limiting Exchange 2010 Cache Size
Update Services in SBS 2008 | Petri.co.il – BS 2011, updates, SBS console or WSUS? | Manage WSUS 3.0 SP2 Storage
SBS 2008 to “fix” managing WSUS after you have manually upset it
Petri.co.il – SBS 2011 Updates, Console or WSUS? | Configuring WSUS Using the Windows SBS Console
Microsoft social Windows Server | SBS2008 How To Manually Uninstall & Reinstall WSUS 3.0 |
What is the Impact of Upgrading the Domain or Forest Functional Level?
Understanding Active Directory Domain Services (AD DS) Functional Levels
http://blog.switchsystems.co.uk/2014/01/reducing-memory-usage-on-sbs-servers/
http://www.itquibbles.com/sql-sbsmonitoring-high-disk-usage/
http://www.bursky.net/index.php/2013/03/managing-iis-server-memory-usage/
http://koppihle3.blogspot.nl/2012/08/sbs2011-limiting-sql-memory-for-wsus.html
source: http://support.microsoft.com/kb/2704959
NOTE: The following steps are for IIS 7. The steps for earlier versions of IIS are very similar.
http://support.microsoft.com/kb/899965
http://technet.microsoft.com/en-us/library/cc726313(v=ws.10).aspx
http://www.wictorwilen.se/Post/Fix-the-SharePoint-DCOM-10016-error-on-Windows-Server-2008-R2.aspx
Potential issues after installing SharePoint Foundation 2010 SP1
Windows SBS 2011 – Known Post Installation Event Log Errors and Warnings
* Run – Sharepoint 2010 Products Configuration Wizard
* Review the “issues after installing SharePoint Foundation 2010 SP1”
You Must Manually Run PSCONFIG after Installing SharePoint 2010 Patches
Volume Shadow Copy Service error: Failed resolving account spsearch with status 1376.
Event ID: 8230 Source: VSS
– Problem was resolved by reconfiguring Sharepoint 2010. Go to start, Sharepoint 2010 and launch the Sharepoint 2010 Products Configuration. Follow the steps and all works fine again.
– Navigate to the registry key HKEY_LOCAL_MACHINE\SYSTEM\CurrentControlSet\Services\VSS\VssAccessControl export the file just in case
then remove the offending account domainname\username. Just leave the NT Authority\Network Service account.
Petri.co.il – SBS2011 VSS warning 8230 spsearch error. No backup!
–
SBS 2011 : Installation Issues
How do i resolve Event ID: 8230 Source VSS with SBS 2011?
Database could not be accessed – Event 3760 (SharePoint 2010 Products)
Event ID Errors: 6398, 6482, and 6641 for Share Point
Small Business Server 2011 Sharepoint Foundation Event ID 70
SBS 2011 – SharePoint Foundation Event ID 6398 – Access Denied Every 30 Minutes
Backup Failing Small Business Server 2011
* https://www.google.com/search?q=sharepoint+foundation+3760+error
* https://www.google.com/search?q=vss+errpr+8230
* https://www.google.com/search?q=sharepoint+foundation+search+error+70
* https://www.google.com/search?q=vss+errpr+8230+spfarm+status+1376
* https://www.google.com/search?q=The+application-specific+permission+settings+do+not+grant+Local+Activation+permission+for+the+COM+Server+application+spfarm
ProxyDHCP error 4011 – http://trycatch.be/blogs/roggenk/archive/2010/06/28/proxydhcp-no-reply-to-request-on-port-4011-in-wds-windows-deployment-services.aspx
clear last PXE advertisement – http://www.windows-noob.com/forums/index.php?/topic/669-how-to-get-rid-of-abortpxe-com/
http://www.nedersoft.nl/index.php/tips-a-trucks/13-pxe/25-proxydhcp-no-reply-to-request-on-port-4011
http://tc-itservices.com/microsoft/sbs-not-showing-users-in-the-sbs-console-or-pop3-connector/
1. Open Active Directory, Click View and then Advanced Features
3. Open up the user and go to the Attribute Editor tab, 4. Find msSBSCreationState and change the value to Created
GPO – Computer-configuration – Policies – Admin Templates – System – Power Management – Sleep settings > Specify the System Sleep Timeout [Disabled]
Understanding the POP3 Connector
Bugging 10mb pop3 recieve limit
“you have to increase the message size also on FAX receive connector.”
Get-TransportConfig | ft MaxSendSize, MaxReceiveSize
Get-ReceiveConnector | ft name, MaxMessageSize
Get-SendConnector | ft name, MaxMessageSize
Get-mailbox | ft Name, MaxSendSize, MaxReceiveSize

Set-TransportConfig –MaxSendSize 20MB –MaxReceiveSize 20MB
Set-ReceiveConnector “Windows SBS Internet Receive Servername” –MaxMessageSize 20MB
Set-SendConnector “Windows SBS Internet Send Servername” –MaxMessageSize 20MB
Set-Mailbox “test” –MaxSendSize 10MB –MaxReceiveSize 10MB
SBS 2008: Introducing the POP3 Connector
How Do I Change Message Size Limits in SBS 2008/2011 Standard?
Changing Pop3 Connector message size in Small Business Server 2008
Read Receipt to distribution list – does not work
User cannot access the \\Contoso\Users … folder due to acces rights, \\192.168.1.1\Users … is accessable.
Delete the local/roaming user profile and relogon the user.
http://technet.microsoft.com/en-us/library/ee832792.aspx
http://www.anandtech.com/show/3690/the-impact-of-spare-area-on-sandforce-more-capacity-at-no-performance-loss
https://wiki.archlinux.org/index.php/Solid_State_Drives
https://wiki.archlinux.org/index.php/SSD_Benchmarking
Changing Pop3 Connector message size in Small Business Server 2008
Technet – Managing Certificates
Installing a GoDaddy Standard SSL Certificate on SBS 2008
Active Directory Certificate Services Step-by-Step Guide
Create your own Self-signed SSL Certs Exchange 2007/2010
SBS 2011 Renew cert from commandline
Do not name the personal folder as an email address it will be added ta an automatic addressbook and it mixup the folder-emailaddress/personal foldername.
source: microsoft KB926179 | http://forums.anandtech.com/showthread.php?t=2086128
Ran in to this setting one of these up for a client. The reasoning behind why this solution is necessary sucks, but the solution is relatively easy.
Microsoft decided that after Windows XP SP2 (that includes Vista and 7), they were going to require VPN servers to be public-facing. Basically, they turned off the native NAT-T (NAT traversal) that had existed in these versions of Windows’ VPN software. Their justification is that VPNs should be perimiter-based. The justification is sound, but removing the capability to easily set it up otherwise is kind of shitty.
Anyway, there’s a registry key you need to create. It’s in a different place in Windows XP than in Windows Vista and 7. Here’s both locations:
In Windows XP:
HKLM\System\CurrentControlSet\services\IPSec
Create DWORD named AssumeUDPEncapsulationContextOnSendRule and set value to 2
Reboot system.
In Windows Vista/7:
HKLM\System\CurrentControlSet\services\PolicyAgent
Create DWORD named AssumeUDPEncapsulationContextOnSendRule and set value to 2
Reboot system
You’ll need to do this on every client you want to connect to this VPN.
Note: This is only the case for L2TP IPSec VPNs. The HTTPS VPNs and PPTP VPNs do not have this requirement.
PDFCreator is a great tool for users you just need to quickly convert a document into pdf format.
Getting it to run properly as a service on Windows Server 2008 proves to be a bit of trouble.
Install PDFCreator in ‘Server installation’ mode. With version 0.98 I found that if data execution prevention is enabled,
PDFCreator needs to be added to the exception list (DEP hides a little bit under Control Panel – System – Advanced system settings – Advanced – Data Execution Prevention).
However, with version 1.0 and moving forward, I have found that this is not true which makes our setup easier!
Next we need to get srvany.exe from the Windows Server 2003 Resource Kit. I decided to put it in \Program Files\oldResourceKitTools.
This article explains how to use instsrv.exe to setup a custom service that uses srvany.exe to run what we want.
Trouble is “instsrv.exe” doesn’t work very well on Server 2008. Thankfully we can use “sc.exe” to create the service in a similar way.
However, before we create the service we have to decide what credentials to have the service run as.
Depending on your environment running as the local system (the default) may be sufficient.
If PDFCreator will need to save files anywhere other than the local system we’ll need to
choose either Network Service, or create a domain user for the service.
As I like to be able to control specific permissions I created a new domain user: “svc-pdfcreator”, with a strong password.
Armed with that information we can now create the service with the sc command:
C:\> sc create pdfcreator start= auto binPath= "C:\Program Files\oldResourceKitTools\srvany.exe" DisplayName= "PDFCreator" obj= DOMAIN\User password= password
We can double check that the service was created successfully by using sc query:
C:\>sc query pdfcreator
SERVICE_NAME: pdfcreator
TYPE               : 10  WIN32_OWN_PROCESS
STATE              : 1  STOPPED
WIN32_EXIT_CODE    : 0  (0x0)
SERVICE_EXIT_CODE  : 0  (0x0)
CHECKPOINT         : 0x0
WAIT_HINT          : 0x0
Now we need to follow the registry editing instructions from KB137890 :
- Run Registry Editor (Regedt32.exe) and locate the following
subkey: “HKEY_LOCAL_MACHINE\SYSTEM\CurrentControlSet\Services\<My Service>”- From the Edit menu, click Add Key.
Type the following and click OK:Key Name: Parameters
Class :<leave blank>- Select the Parameters key.
- From the Edit menu, click Add Value.
Type the following and click OK:Value Name: Application
Data Type : REG_SZ
String : “<path>\<application.ext>where <path>\<application.ext>”
is the drive and full path to the application executable including the extension (i.e., C:\WinNT\Notepad.exe)- Close Registry Editor.
Almost done setting up the service. With version 0.98 I found that it was necessary to run PDFCreator.exe and PDFSpool.exe in “Server 2003 SP1” compatibility mode.
Once again, this appears to have been resolved with version 1.0+, so we don’t have to worry about compatibility settings!
But if you’re using a version prior to 1.0, go to the compatibility tab on the properties of each executable and
check “Run this program in compatibility mode for:” and select “Windows Server 2003 (Service Pack 1)”.
That’s it! Test the service either by running “net start pdfcreator” or from the services mmc snap-in. If all goes well it should start successfully.
This setup works well for the auto-save in PDFCreator, as we can setup the auto-save directory to be:
\\domain\staff\<REDMON_USER>\Documents\PDFCreator\
You may have to get creative with the auto-save path if your userdata paths aren’t uniform across the users that have access to the PDFCreator printer.
We could probably solve the issue by setting up a shared folder like:
\\server\PDFCreatorAutoSave\<REDMON_USER>
Wherever you decide to have PDFCreator save its output, make sure that the account the service runs as
has permissions to create and modify files and your users have at least read access.
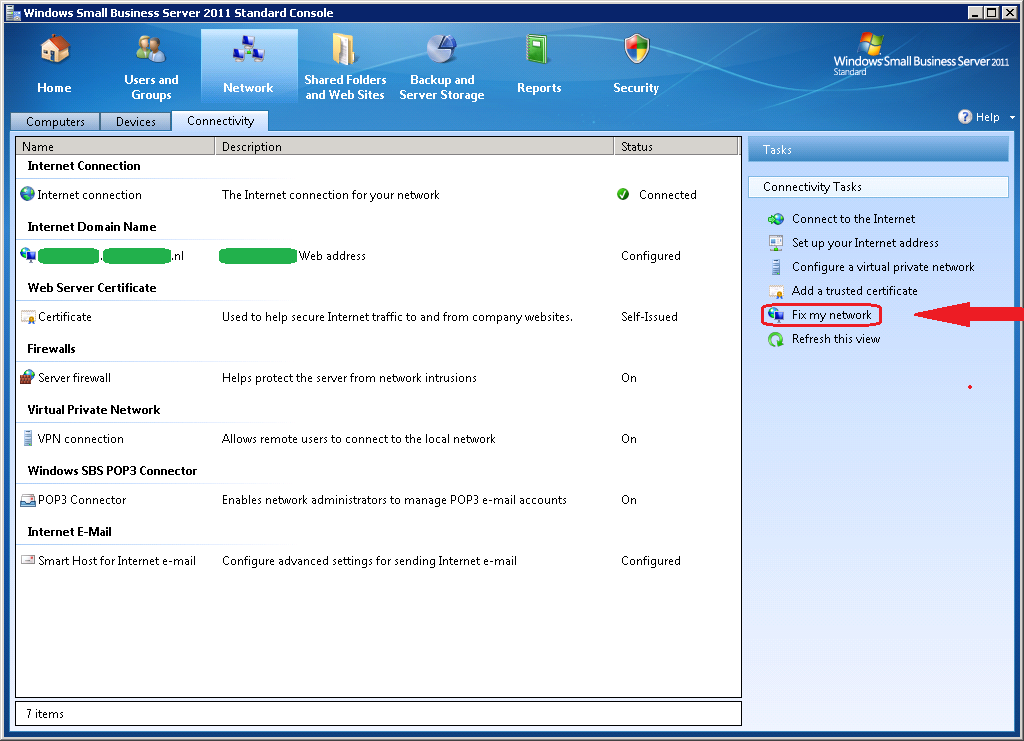
If you have an expired SSL Certificate, you would want to renew it.
This is done in the “SBS Console” with the “Fix My Network Wizard (FNCW)”.
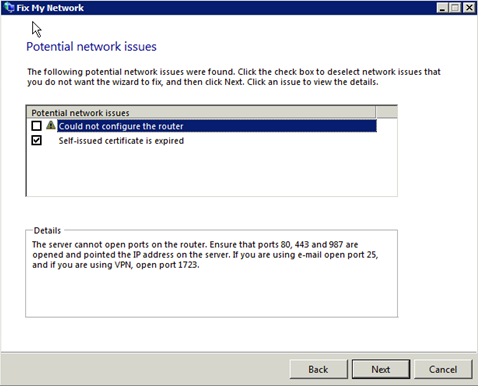
Running it will bring up potential network issues.
Note that it will always find some but you need to ignore them
and take care of the certificate only.
When the wizard displays it results. Select only “Self-issued certificate is expired”, de-select the other issues.
http://blog.the-it-blog.co.uk/2013/01/25/re-issuing-a-self-signed-certificate-for-exchange-sbs/
To get the certificate in the SBS console to match the OWA certificate > I ran the Add a trusted certificate wizard > select I want to use a certificate that is already installed on the server > selected the newly created self-issued certificate. Now if I View Certificate Properties in the SBS console it matches the OWA certificate.
To update the install package SBSCertificate.cer file > on non-domain joined system > run IE as administrator > open OWA site > import cert into IE > in IE options > content tab > certificates > find certificate and export as SBSCertificate.cer > save into Certificate Distribution Package folder after renaming the old cer file.
Mapped Drive Connection to Network Share May Be Lost | net config server /autodisconnect:-1
wbadmin start backup -backupTarget:\\backuplocation\backupdirectory -allCritical -quiet -vssFull -systemState
VMware option: (Edit settings, Options, General, Contiguration Parameters) SMBIOS.reflectHost=TRUE
EOF
Office 2013 Administrative Template files (ADMX/ADML) and Office Customization Tool
Microsoft Office 2011 Uninstall
Microsoft office for Mac
Office 2010 – Downloads, Tools, Trial | TechNet.
Chapter 11: Searching Outlook Data
Professional Outlook 2007 Programming – Page 413 – Google Books
Outlook View Dynamic Date Filter (Filter dates with an offset from today)
Microsoft Support Lifecycle | Server products
http://windows.microsoft.com/en-us/windows/products/lifecycle
End of sales refers to the date when a particular version of Windows is no longer shipped to retailers or Original Equipment Manufacturers (OEMs). Examples of OEMS are Dell and Toshiba—PC manufacturers who often preinstall Windows software. When a version of Windows reaches its end of sales date, it’s a good time to think about upgrading.
This table gives end of sales dates for specific Windows operating systems.
| Desktop operating systems | Date of general availability | Retail software end of sales * | End of sales for PCs with Windows preinstalled |
|---|---|---|---|
| Windows XP | December 31, 2001 | June 30, 2008 | October 22, 2010 |
| Windows Vista | January 30, 2007 | October 22, 2010 | October 22, 2011 |
| Windows 7 | October 22, 2009 | To be determined | To be determined |
End of support refers to the date when Microsoft no longer provides automatic fixes, updates, or online technical assistance. This is the time to make sure you have the latest available service pack installed. Without Microsoft support, you will no longer receive security updates that can help protect your PC from harmful viruses, spyware, and other malicious software that can steal your personal information. For more information go to Microsoft Support Lifecycle.
| Desktop operating systems | Latest service pack | End of mainstream support | End of extended support |
|---|---|---|---|
| Windows XP | Service Pack 3 | April 14, 2009 | April 8, 2014 |
| Windows Vista | Service Pack 2 | April 10, 2012 | April 11, 2017 |
| Windows 7 | Service Pack 1 | To be determined | Not applicable |
Exporting mailboxes can only done via 32-bit management software, sinds the server is 64-bit that would not work (again!)
Identify current running service pack
Exchange Server Build numbers and release dates.
Get-ExchangeServer | fl name,edition,admindisplayversion
Manual set the mailbox limits per user using adsiedit
http://technet.microsoft.com/en-us/library/cc949119%28WS.10%29.aspx
http://davidschrag.com/schlog/326/replacing-an-sbss-expired-ssl-certificate-with-a-brand-new-one-for-the-same-host-name
http://blogs.technet.com/b/sbs/archive/2007/08/21/how-to-install-a-public-3rd-party-ssl-certificate-on-iis-on-sbs-2003.aspx
http://davidschrag.com/schlog/407/renewing-a-self-signed-certificate-in-sbs-2003
http://www.netometer.com/video/tutorials/exchange-2007-renew-Self-Signed-ssl-certificate/
http://www.petri.co.il/forums/showthread.php?t=2054
http://www.petri.co.il/windows_2003_domain_rename.htm
http://www.sslshopper.com/article-how-to-create-a-self-signed-certificate.html
http://www.msexchange.org/tutorials/SSL_Enabling_OWA_2003.html
http://www.petri.co.il/forums/showthread.php?t=41220
http://technet.microsoft.com/en-us/library/cc719863(WS.10).aspx
http://certcollection.org/forum/topic/15531-how-to-deploy-windows-7-in-your-sbs-2003-network/
http://support.microsoft.com/kb/816662
http://technet.microsoft.com/en-us/library/cc719863(WS.10).aspx
http://smallbusiness.support.microsoft.com/en-us/kb/926505
http://social.technet.microsoft.com/Forums/en-US/exchangesvrgeneral/thread/73456d6f-2d68-4dc1-834f-a94606553fe3
http://support.microsoft.com/kb/833401
http://www.sonoracomm.com/support/18-support/153-outlook-http
The security certificate is not from a trusted certifying authority
SATA drives Safely remove hardware
SATA 3 6GB showing up in safely remove hardware?
sources: Microsoft.com – social.technet , MSexchange.org – managing-limits-exchange-2010 , MSexchange.org – managing-inbox-rules-exchange-2010
exchange shell – Set-Mailbox
source : Let wel op, wildcard certificaten worden door Windows Mobile weer niet ondersteund.
Als je Exchange 2007 wil gebruiken heb je een apart certificaat nodig, wat slechts enkele leveranciers nog maar hebben.
Zie knowledgebase artikel 929395 van Microsoft voor meer informatie.
Remove passwords from the password management system in windows
RUN:> control userpasswords2
<control panel> – <user accounts>²ce – [Manage your network passwords] (At the left in Tasks)
source: http://support.microsoft.com/kb/2028992
Print server administrators may want to have the increased stability that is offered by the in-box printer drivers that are included with Windows 7.
The following methods will load a driver that is included with Windows 7 on a Windows Server 2003-based computer. These methods require an account that has administrative credentials.
On a Windows 7 32-bit client computer, follow these steps:
Note From a Windows 7 64-bit client computer, repeat these steps when drivers are needed for Windows Server 2003-based x64 clients. However, in step 8, click to select the check box for “x64” processor architecture.
On a Windows 7 32-bit client computer, follow these steps:
On a Windows Server 2003 32-bit computer, follow these steps:
If drivers are needed for x64 clients, from a Windows 7 64-bit computer, also follow these steps:
source: http://www.mydigitallife.info/full-list-of-internet-explorer-9-keyboard-shortcuts/
One of the ways to improve the speed of interaction with computer applications is by using shortcut keys or keyboard accelerators. Shortcut keys may consist of one or more keys that have been predefined in program to perform event such as copy, cut, edit, open and etc. Those users who like to improve the speed up of browsing in Internet Explorer 9 or browsing without a mouse, can check the below for shortcut keys list.
List of shortcut keys to view and explore webpages:
List of shortcut keys to use when working with tabs:
List of shortcut keys used for zooming:
List of shortcut keys used for searching in address bar includes:
List of shortcut keys used for preview and print webpages:
List of Shortcut keys used on Address bar:
List of shortcut keys used when working with history and favorites:
List of shortcut keys used when editing webpages:
List of shortcut keys used when working with the Notification bar:

Microsoft Outlook 2010 Shortcut Keys
source: Microsoft.com/office help (Sorted by function) / link-2 / Shortcutworld
soruce: http://support.microsoft.com/kb/287573
source: http://office.microsoft.com/en-us/outlook-help/command-line-switches-HP001003110.aspx?redir=0
/c messageclass
Creates a new item of the specified message class (Outlook forms or any other valid MAPI form).
Examples:
source: http://www.howto-outlook.com/howto/commandlineswitches.htm
| Switch | Description | Works in |
|---|---|---|
| /a path:\<filename> | Creates an item with the specified file as an attachment. Example:"C:\Program Files\Microsoft Office\Office12\Outlook.exe" /a "C:\My Documents\labels.doc"If no item type is specified, IPM.Note is assumed. Cannot be used with message classes that aren’t based on Outlook. |
2000, 2002/XP, 2003, 2007, 2010 |
| /altvba <otmfilename> | Opens the VBA program specified in otmfilename, rather than %appdata%\Microsoft\Outlook\VbaProject.OTM. | 2003, 2007, 2010 |
| /autorun macroname | Opens Outlook and immediately runs the macro specified in macroname. (no longer supported after Outlook 2003 SP2) |
2003 |
| /c <messageclass> |
Creates a new item of the specified message class (Outlook forms or any other valid MAPI form).Examples:
|
2002/XP, 2003, 2007, 2010 |
| /checkclient | Prompts for the default manager of e-mail, news, and contacts. | 2000, 2002/XP, 2003, 2007, 2010 |
| /cleanautocompletecache | Removes all names and e-mail addresses from the AutoComplete list. | 2010 |
| /cleancategories | Deletes any custom category names that you have created. Restores categories to the default names. | 2007, 2010 |
| /cleanclientrules | Starts Outlook and deletes client-based rules. | 2003, 2007, 2010 |
| /cleanconvongoingactions | Deletes the Conversations Actions Table (CAT). CAT entries for a conversation thread usually expire 30 days after no activity. The command-line switch clears all conversation tagging, ignore, and moving rules immediately stopping any additional actions. | 2010 |
| /cleandmrecords | Deletes the logging records saved when a manager or a delegate declines a meeting. | 2003, 2007, 2010 |
| /cleanfinders | Removes Search Folders from the Microsoft Exchange server store. | 2000, 2002/XP, 2003, 2007, 2010 |
| /cleanfreebusy | Clears and regenerates free/busy information. This switch can only be used when you are able to connect to your Microsoft Exchange server. | 2000, 2002/XP, 2003, 2007, 2010 |
| /cleanfromaddress | Removes all manually added From entries from the profile. | 2010 |
| /cleanips | Restores receival of new messages in Exchange Cached mode (KB968773) | 2007, 2010 |
| /cleanprofile | Removes invalid profile keys and recreates default registry keys where applicable. | 2003, 2007 |
| /cleanpst | Launches Outlook with a clean Personal Folders file (.pst) | 2003 |
| /cleanreminders | Clears and regenerates reminders. | 2000, 2002/XP, 2003, 2007, 2010 |
| /cleanroamedprefs | All previous roamed preferences are deleted and copied again from the local settings on the computer where this switch is used. This includes the roaming settings for reminders, free/busy grid, working hours, calendar publishing, and RSS rules. | 2007, 2010 |
| /cleanrules | Starts Outlook and deletes client- and server-based rules. | 2003, 2007, 2010 |
| /cleanschedplus | Deletes all Schedule+ data (free/busy, permissions, and .cal file) from the server and enables the free/busy information from the Outlook Calendar to be used and viewed by all Schedule+ 1.0 users. | 2000, 2002/XP, 2003 |
| /cleanserverrules | Starts Outlook and deletes server-based rules. | 2003, 2007, 2010 |
| /cleansharing | Removes all RSS, Internet Calendar, and SharePoint subscriptions from Account Settings, but leaves all the previously downloaded content on your computer. This is useful if you cannot delete one of these subscriptions within Outlook 2010. | 2010 |
| /cleansniff | Deletes duplicate reminder messages. | 2003, 2007, 2010 |
| /cleansubscriptions | Deletes the subscription messages and properties for subscription features. | 2003, 2007, 2010 |
| /cleanviews | Restores default views. All custom views you created are lost. | 2000, 2002/XP, 2003, 2007, 2010 |
| /designer | Starts Outlook without figuring out if Outlook should be the default client in the first run. | 2003 |
| /embedding <msgfilename> | Opens the specified message file (.msg) as an OLE embedding. Also used without command-line parameters for standard OLE co-create. | 2002/XP, 2003, 2007, 2010 |
| /explorer | Opens the new window in “explorer” mode (link bar on). | 2000, 2002/XP, 2003, 2007, 2010 |
| /f <msgfilename> | Opens the specified message file (.msg) or Microsoft Office saved search (.oss). (Support for oss-files has been dropped since Outlook 2003 SP2 due to security restrictions) |
2002/XP, 2003, 2007, 2010 |
| /finder | Opens the Advanced Find dialog box. | 2007, 2010 |
| /firstrun | Starts Outlook as if it were run for the first time. | 2003, 2007 |
| /folder | Opens a new window in “folder” mode (Navigation Pane off). | 2000, 2002/XP, 2003, 2007, 2010 |
| /hol <holfilename.hol> | Opens the specified .hol file. | 2003, 2007, 2010 |
| /ical <icsfilename> | Opens the specified .ics file. | 2003, 2007, 2010 |
| /importprf path:\<filename.prf> | Launches Outlook and opens/imports the defined MAPI profile (*.prf). If Outlook is already open, queues the profile to be imported on the next clean launch. | 2002/XP, 2003, 2007, 2010 |
| /l <olkfilename> | Opens the specified .olk file. | 2003 |
| /launchtraininghelp assetid | Opens a Help window with the Help topic specified in assetid. | 2003, 2007, 2010 |
| /m emailname | Provides a way for the user to add an e-mail name to the item. Only works in conjunction with the /c command-line parameter.Example: Outlook.exe /c ipm.note /m emailname |
2003, 2007, 2010 |
| /nocustomize | Starts Outlook without loading outcmd.dat (customized toolbars) and *.fav file. | 2003, 2007 |
| /noextensions | Starts Outlook with extensions turned off, but listed in the Add-In Manager. | 2003, 2007 |
| /nopollmail | Starts Outlook without checking mail at startup. | 2003 |
| /nopreview | Starts Outlook with the Reading Pane off and removes the option from the View menu. | 2000, 2002/XP, 2003, 2007, 2010 |
| /p <msgfilename> | Prints the specified message (.msg). Prior to Outlook 2007, this does not work with HTML messages. |
2002/XP, 2003, 2007, 2010 |
| /profile <profilename> | Loads the specified profile. If your profile name contains a space, enclose the profile name in quotation marks (“). | 2002/XP, 2003, 2007, 2010 |
| /profiles | Opens the Choose Profile dialog box regardless of the Options setting on the Tools menu. | 2002/XP, 2003, 2007, 2010 |
| /recycle | Starts Outlook using an existing Outlook window, if one exists. Used in combination with /explorer or /folder. | 2000, 2002/XP, 2003, 2007, 2010 |
| /regserver | Rewrites all Outlook specific registry keys and re-associates file extensions without having to reinstall Outlook or run setup with the /y switch. The settings are stored in the Outlook.srg file located in the same folder as the Outlook program. | 2000, 2002/XP |
| /remigratecategories | Starts Outlook and and initiates the following commands on the default mailbox:
Note: This is the same command as Upgrade to Color Categories in each Outlook mailbox properties dialog box. |
2007, 2010 |
| /remigrateconversations | 2010 | |
| /resetfoldernames | Resets default folder names (such as Inbox or Sent Items) to default names in the current Office user interface language.For example, if you first connect to your mailbox Outlook using a Russian user interface, the Russian default folder names cannot be renamed. To change the default folder names to another language such as Japanese or English, you can use this switch to reset the default folder names after changing the user interface language or installing a different language version of Outlook. | 2002/XP, 2003, 2007, 2010 |
| /resetfolders | Restores missing folders for the default delivery location. | 2000, 2002/XP, 2003, 2007, 2010 |
| /resetformregions | Empties the form regions cache and reloads the form region definitions from the Windows registry. | 2007, 2010 |
| /resetoutlookbar | Rebuilds the Outlook Bar. | 2000, 2002/XP |
| /resetnavpane | Clears and regenerates the Navigation Pane for the current profile. | 2003, 2007, 2010 |
| /resetquicksteps | Restores the default Quick Steps. All user-created Quick Steps are deleted. | 2010 |
| /resetsearchcriteria | Resets all Instant Search criteria so that the default set of criteria is shown in each module. | 2007, 2010 |
| /resetsharedfolders | Removes all shared folders from the Navigation Pane. | 2007, 2010 |
| /resettodobar | Clears and regenerates the To-Do Bar task list for the current profile. The To-Do Bar search folder is deleted and re-created. | 2007, 2010 |
| /restore | Attempts to open the same profile and folders that were open prior to an abnormal Outlook shutdown. | 2010 |
| /rpcdiag | Opens Outlook and displays the remote procedure call (RPC) connection status dialog. | 2003, 2007, 2010 |
| /s <filename> | Loads the specified shortcuts file (.fav). | 2002/XP, 2003 |
| /safe | Starts Outlook without extensions, Reading Pane, or toolbar customization. | 2000, 2002/XP, 2003, 2007, 2010 |
| /safe:1 | Starts Outlook with the Reading Pane off. | 2003, 2007, 2010 |
| /safe:2 | Starts Outlook without checking mail at startup. | 2003 |
| /safe:3 | Starts Outlook with extensions turned off, but listed in the Add-In Manager. | 2003, 2007, 2010 |
| /safe:4 | Starts Outlook without loading Outcmd.dat (customized toolbars) and *.fav file. | 2003, 2007 |
| /select foldername | Starts Outlook and opens the specified folder in a new window. For example, to open Outlook and display the default calendar use: "C:\Program Files\Microsoft Office\Office12\Outlook.exe" |
2002/XP, 2003, 2007, 2010 |
| /share feed://URL/filename /share stssync://URL /share web://URL/filename |
Specifies a sharing URL to connect to Outlook. For example, use stssync://URL to connect a Microsoft Windows SharePoint Services 3.0 list to Outlook. | 2007, 2010 |
| /sniff | Starts Outlook and forces a detection of new meeting requests in the Inbox, and then adds them to the calendar. | 2003, 2007, 2010 |
| /t <oftfilename> | Opens the specified .oft file. | 2003, 2007, 2010 |
| /unregserver | Deletes all registry keys and file associations for Outlook. Its actions are based on the Outlook.srg file located in the same folder as the Outlook application. Use the /regserver switch to rewrite the registry keys and file associations after using this switch. | 2000, 2002/XP |
| /v <vcffilename> | Opens the specified .vcf file. | 2003, 2007, 2010 |
| /vcal <vcsfilename> | Opens the specified .vcs file. | 2003, 2007, 2010 |
| /x <xnkfilename> | Opens the specified .xnk file. | 2003, 2007 |
| Switch | Description | Works in |
|---|---|---|
| /a path:\<filename> | Creates an item with the specified file as an attachment. Example:"C:\Program Files\Microsoft Office\Office12\Outlook.exe" /a "C:\My Documents\labels.doc"If no item type is specified, IPM.Note is assumed. Cannot be used with message classes that aren’t based on Outlook. |
2000, 2002/XP, 2003, 2007, 2010 |
| /altvba <otmfilename> | Opens the VBA program specified in otmfilename, rather than %appdata%\Microsoft\Outlook\VbaProject.OTM. | 2003, 2007, 2010 |
| /autorun macroname | Opens Outlook and immediately runs the macro specified in macroname. (no longer supported after Outlook 2003 SP2) |
2003 |
| /c <messageclass> |
Creates a new item of the specified message class (Outlook forms or any other valid MAPI form).Examples:
|
2002/XP, 2003, 2007, 2010 |
| /checkclient | Prompts for the default manager of e-mail, news, and contacts. | 2000, 2002/XP, 2003, 2007, 2010 |
| /cleanautocompletecache | Removes all names and e-mail addresses from the AutoComplete list. | 2010 |
| /cleancategories | Deletes any custom category names that you have created. Restores categories to the default names. | 2007, 2010 |
| /cleanclientrules | Starts Outlook and deletes client-based rules. | 2003, 2007, 2010 |
| /cleanconvongoingactions | Deletes the Conversations Actions Table (CAT). CAT entries for a conversation thread usually expire 30 days after no activity. The command-line switch clears all conversation tagging, ignore, and moving rules immediately stopping any additional actions. | 2010 |
| /cleandmrecords | Deletes the logging records saved when a manager or a delegate declines a meeting. | 2003, 2007, 2010 |
| /cleanfinders | Removes Search Folders from the Microsoft Exchange server store. | 2000, 2002/XP, 2003, 2007, 2010 |
| /cleanfreebusy | Clears and regenerates free/busy information. This switch can only be used when you are able to connect to your Microsoft Exchange server. | 2000, 2002/XP, 2003, 2007, 2010 |
| /cleanfromaddress | Removes all manually added From entries from the profile. | 2010 |
| /cleanips | Restores receival of new messages in Exchange Cached mode (KB968773) | 2007, 2010 |
| /cleanprofile | Removes invalid profile keys and recreates default registry keys where applicable. | 2003, 2007 |
| /cleanpst | Launches Outlook with a clean Personal Folders file (.pst) | 2003 |
| /cleanreminders | Clears and regenerates reminders. | 2000, 2002/XP, 2003, 2007, 2010 |
| /cleanroamedprefs | All previous roamed preferences are deleted and copied again from the local settings on the computer where this switch is used. This includes the roaming settings for reminders, free/busy grid, working hours, calendar publishing, and RSS rules. | 2007, 2010 |
| /cleanrules | Starts Outlook and deletes client- and server-based rules. | 2003, 2007, 2010 |
| /cleanschedplus | Deletes all Schedule+ data (free/busy, permissions, and .cal file) from the server and enables the free/busy information from the Outlook Calendar to be used and viewed by all Schedule+ 1.0 users. | 2000, 2002/XP, 2003 |
| /cleanserverrules | Starts Outlook and deletes server-based rules. | 2003, 2007, 2010 |
| /cleansharing | Removes all RSS, Internet Calendar, and SharePoint subscriptions from Account Settings, but leaves all the previously downloaded content on your computer. This is useful if you cannot delete one of these subscriptions within Outlook 2010. | 2010 |
| /cleansniff | Deletes duplicate reminder messages. | 2003, 2007, 2010 |
| /cleansubscriptions | Deletes the subscription messages and properties for subscription features. | 2003, 2007, 2010 |
| /cleanviews | Restores default views. All custom views you created are lost. | 2000, 2002/XP, 2003, 2007, 2010 |
| /designer | Starts Outlook without figuring out if Outlook should be the default client in the first run. | 2003 |
| /embedding <msgfilename> | Opens the specified message file (.msg) as an OLE embedding. Also used without command-line parameters for standard OLE co-create. | 2002/XP, 2003, 2007, 2010 |
| /explorer | Opens the new window in “explorer” mode (link bar on). | 2000, 2002/XP, 2003, 2007, 2010 |
| /f <msgfilename> | Opens the specified message file (.msg) or Microsoft Office saved search (.oss). (Support for oss-files has been dropped since Outlook 2003 SP2 due to security restrictions) |
2002/XP, 2003, 2007, 2010 |
| /finder | Opens the Advanced Find dialog box. | 2007, 2010 |
| /firstrun | Starts Outlook as if it were run for the first time. | 2003, 2007 |
| /folder | Opens a new window in “folder” mode (Navigation Pane off). | 2000, 2002/XP, 2003, 2007, 2010 |
| /hol <holfilename.hol> | Opens the specified .hol file. | 2003, 2007, 2010 |
| /ical <icsfilename> | Opens the specified .ics file. | 2003, 2007, 2010 |
| /importprf path:\<filename.prf> | Launches Outlook and opens/imports the defined MAPI profile (*.prf). If Outlook is already open, queues the profile to be imported on the next clean launch. | 2002/XP, 2003, 2007, 2010 |
| /l <olkfilename> | Opens the specified .olk file. | 2003 |
| /launchtraininghelp assetid | Opens a Help window with the Help topic specified in assetid. | 2003, 2007, 2010 |
| /m emailname | Provides a way for the user to add an e-mail name to the item. Only works in conjunction with the /c command-line parameter.Example: Outlook.exe /c ipm.note /m emailname |
2003, 2007, 2010 |
| /nocustomize | Starts Outlook without loading outcmd.dat (customized toolbars) and *.fav file. | 2003, 2007 |
| /noextensions | Starts Outlook with extensions turned off, but listed in the Add-In Manager. | 2003, 2007 |
| /nopollmail | Starts Outlook without checking mail at startup. | 2003 |
| /nopreview | Starts Outlook with the Reading Pane off and removes the option from the View menu. | 2000, 2002/XP, 2003, 2007, 2010 |
| /p <msgfilename> | Prints the specified message (.msg). Prior to Outlook 2007, this does not work with HTML messages. |
2002/XP, 2003, 2007, 2010 |
| /profile <profilename> | Loads the specified profile. If your profile name contains a space, enclose the profile name in quotation marks (“). | 2002/XP, 2003, 2007, 2010 |
| /profiles | Opens the Choose Profile dialog box regardless of the Options setting on the Tools menu. | 2002/XP, 2003, 2007, 2010 |
| /recycle | Starts Outlook using an existing Outlook window, if one exists. Used in combination with /explorer or /folder. | 2000, 2002/XP, 2003, 2007, 2010 |
| /regserver | Rewrites all Outlook specific registry keys and re-associates file extensions without having to reinstall Outlook or run setup with the /y switch. The settings are stored in the Outlook.srg file located in the same folder as the Outlook program. | 2000, 2002/XP |
| /remigratecategories | Starts Outlook and and initiates the following commands on the default mailbox:
Note: This is the same command as Upgrade to Color Categories in each Outlook mailbox properties dialog box. |
2007, 2010 |
| /remigrateconversations | 2010 | |
| /resetfoldernames | Resets default folder names (such as Inbox or Sent Items) to default names in the current Office user interface language.For example, if you first connect to your mailbox Outlook using a Russian user interface, the Russian default folder names cannot be renamed. To change the default folder names to another language such as Japanese or English, you can use this switch to reset the default folder names after changing the user interface language or installing a different language version of Outlook. | 2002/XP, 2003, 2007, 2010 |
| /resetfolders | Restores missing folders for the default delivery location. | 2000, 2002/XP, 2003, 2007, 2010 |
| /resetformregions | Empties the form regions cache and reloads the form region definitions from the Windows registry. | 2007, 2010 |
| /resetoutlookbar | Rebuilds the Outlook Bar. | 2000, 2002/XP |
| /resetnavpane | Clears and regenerates the Navigation Pane for the current profile. | 2003, 2007, 2010 |
| /resetquicksteps | Restores the default Quick Steps. All user-created Quick Steps are deleted. | 2010 |
| /resetsearchcriteria | Resets all Instant Search criteria so that the default set of criteria is shown in each module. | 2007, 2010 |
| /resetsharedfolders | Removes all shared folders from the Navigation Pane. | 2007, 2010 |
| /resettodobar | Clears and regenerates the To-Do Bar task list for the current profile. The To-Do Bar search folder is deleted and re-created. | 2007, 2010 |
| /restore | Attempts to open the same profile and folders that were open prior to an abnormal Outlook shutdown. | 2010 |
| /rpcdiag | Opens Outlook and displays the remote procedure call (RPC) connection status dialog. | 2003, 2007, 2010 |
| /s <filename> | Loads the specified shortcuts file (.fav). | 2002/XP, 2003 |
| /safe | Starts Outlook without extensions, Reading Pane, or toolbar customization. | 2000, 2002/XP, 2003, 2007, 2010 |
| /safe:1 | Starts Outlook with the Reading Pane off. | 2003, 2007, 2010 |
| /safe:2 | Starts Outlook without checking mail at startup. | 2003 |
| /safe:3 | Starts Outlook with extensions turned off, but listed in the Add-In Manager. | 2003, 2007, 2010 |
| /safe:4 | Starts Outlook without loading Outcmd.dat (customized toolbars) and *.fav file. | 2003, 2007 |
| /select foldername | Starts Outlook and opens the specified folder in a new window. For example, to open Outlook and display the default calendar use:"C:\Program Files\Microsoft Office\Office12\Outlook.exe" /select outlook:calendar |
2002/XP, 2003, 2007, 2010 |
| /share feed://URL/filename /share stssync://URL /share web://URL/filename |
Specifies a sharing URL to connect to Outlook. For example, use stssync://URL to connect a Microsoft Windows SharePoint Services 3.0 list to Outlook. | 2007, 2010 |
| /sniff | Starts Outlook and forces a detection of new meeting requests in the Inbox, and then adds them to the calendar. | 2003, 2007, 2010 |
| /t <oftfilename> | Opens the specified .oft file. | 2003, 2007, 2010 |
| /unregserver | Deletes all registry keys and file associations for Outlook. Its actions are based on the Outlook.srg file located in the same folder as the Outlook application. Use the /regserver switch to rewrite the registry keys and file associations after using this switch. | 2000, 2002/XP |
| /v <vcffilename> | Opens the specified .vcf file. | 2003, 2007, 2010 |
| /vcal <vcsfilename> | Opens the specified .vcs file. | 2003, 2007, 2010 |
| /x <xnkfilename> | Opens the specified .xnk file. | 2003, 2007 |
source: http://thedailyreviewer.com/server/view/sbs2008-dhcp-snapin-denied-me-as-the-administrator-of-the-sbs-server-104433939 (sbs 2008 dhcp server manager)
DHCP snap in there is a red circle with a minus sign on it. DHCP Server is running but not manageable.
In DHCP Manager -> add computer -> localhost
sources:
http://social.technet.microsoft.com/Forums/en/windowsbackup/thread/e58623bb-6f97-4a06-8f3d-e3c64fd27ea6
http://www.bitwizwebdesign.com/Blogs/Bryan-Soltis/September-2008/Windows-Server-2008-Backup-to-a-network-share
commandline-help: http://technet.microsoft.com/en-us/library/cc754015%28WS.10%29.aspx
wbadmin.exe start systemstatebackup -backupTarget:[Drive:]
wbadmin.exe start backup -backupTarget:\\[Server]\[Share name] -include:c:,d: -vssFull
commandline-help: http://msdn.microsoft.com/en-us/library/bb736357%28v=vs.85%29.aspx
schtasks /Create /SC Weekly /TN Backup-systemstate /TR “wbadmin.exe start systemstatebackup -backupTarget:[Drive:] -quiet” /ST 22:05 /D SUN /RL Highest
schtasks.exe /Create /SC Weekly /TN Backup-weekly /TR “wbadmin start backup -backupTarget:\\[Server]\[Share name] -include:c:,d: -vssFull -quiet” /ST 22:30 /D SUN /RL Highest
The SBSMonitoring database is nearing maximum size on SBS 2008
https://msmvps.com/blogs/bradley/archive/2006/05/25/97044.aspx
source: http://www.sbsfaq.com/?p=1139
Small Business Server 2008 (SBS 2008) requires a number of ports open on your firewall to allow inbound traffic from the Internet in to your network.
SBS 2008 needs a lower number of ports open than SBS 2003 did.
You will only need to open the ports below to enable all SBS 2008 functionality if you are using all facilities.
If you do not need a specific function open then there is no need to allow that port to be open inbound to the server.
This is required for inbound mail using the SMTP protocol – this will be needed on MOST SBS 2008 servers. If you are using an external third party mail filtering service such as Trend Micro Internet Messaging Security then you will want to restrict this port to be open ONLY to their servers. Closing this port to all traffic will prevent ANY inbound mail to your SBS 2008 server.
This port is used to redirect requests to the Remote Web Workplace for http://remote.mycompany.com through to the secured site on port 443. You do not need to have this port open for SBS 2008 to work, but if you close it then you must get your users to use https://remote.mycompany.com to get to their Remote Web Workplace. Closing this port will result in errors when users try to access Remote Web Workplace via http://remote.mycompany.com
This is the secured sockets layer (SSL) access to the Remote Web Workplace. All traffic over this port is encrypted for security. This port needs to be open in order for Remote Web Workplace to work. Closing this port will result in the Remote Web Workplace not being accessible outside of the office from the Internet.
This is another secured sockets layer (SSL) port that is used to allow access to the Companyweb from the Internet. It uses the same digital certificate as that on port 443. Closing this port will result in the Companyweb not being accessible outside of the office from the Internet.
PPTP is no longer considered a secure VPN technology because it relies upon MS-CHAPv2 which has been compromised. If you continue to use PPTP be aware that intercepted traffic can be decrypted by a third party, so it should be considered unencrypted. We advise migrating to another VPN type such as OpenVPN or IPsec.
This port is used for the PPTP VPN in SBS 2008. It only needs to be enabled if you have already configured the SBS 2008 server to be used as a VPN server. You can do this via the SBS 2008 console on the Network Tab using the Enable VPN wizard. Closing this port will result in the VPN not being accessible from the Internet.
SBS 2008 does NOT require the following ports to be opened BY DEFAULT.
This port is used for FTP access from the Internet to the SBS 2008 server. The SBS 2008 server is NOT configured as an FTP server by default. It is NOT recommended that you configure your SBS 2008 server as an FTP server as by default any password used to access it will go over the Internet in clear or plain text. This means that someone else can easily read your password and potentially compromise your network security.
This port is used for DIRECT access to the SBS 2008 servers console via the RDP protocol of the Remote Desktop Connection software. Allowing this port to be open to the Internet WILL increase the potential of your server being compromised via a password brute force attack. If you MUST have this port open to the Internet, it is recommended that you implement a two factor authentication solution called AuthAnvil from Scorpion Software
http://msmvps.com/blogs/bradley/archive/2010/11/08/throttling-the-memory-in-sbs-2008.aspx
http://mostlyexchange.blogspot.in/2007/08/restricting-ram-usage-in-exchange-2007.html
Install outlook-express in the windows xp microsoft software.
From there import mail from Outlook to Outlook-express.
Now start Windows Live Mail and import from outlook-express.
Now you can export again to a folder and import it backup to windows live mail on an other machine.
Call this the Microsoft way.! sight.
Office 2010
OEM Preinstall Kit – http://oem.microsoft.com/script/contentpage.aspx?pageid=566044
Office Customization Tool – http://www.microsoft.com/downloads/en/details.aspx?displaylang=en&FamilyID=64b837b6-0aa0-4c07-bc34-bec3990a7956
Deploy Office 2010 by using Group Policy computer startup scripts – http://technet.microsoft.com/en-us/library/ff602181.aspx
Custom.xml syntax – http://technet.microsoft.com/en-us/library/cc179195.aspx
Outlook Profile mail address history
Convert NK2 file to Stream_Autocomplete*.dat – http://social.technet.microsoft.com/Forums/en/outlook/thread/a4f7dc82-972b-4465-991e-c6b21c1f5765
Outlook howto – http://www.howto-outlook.com/howto/messagetemplates.htm
The Policy Templates and documentation are included in the Office Resource Kit. Use the links below to download the Resource Kit for your Outlook version.
Windows XP/2003 location – C:\Windows\inf
Windows 7/2008 location – C:\Windows\PolicyDefinitions
-=-
source: http://social.answers.microsoft.com/Forums/en-US/outlookacct/thread/00d5b4b1-ea2e-4376-a654-7daebcb59ab9
Which version of Outlook do you have on the old computer?
If you’re using Outlook 2007, then the following is a list of locations where Microsoft Office Outlook 2007 saves information.
Note: Some of the folders might be hidden folders. To display hidden folders, do the following:
Get to the locations mentioned below and backup the files mentioned.
1) C:\users\%username%\AppData\Local\Microsoft\Outlook
a. Personal address book if any and the extension for the same is.pab
b. Look for .dat file that holds command bar, menu customizations and Registered Microsoft Exchange extensions
c. Look for Outlook.xml file that contains the Navigation pane settings
d. Look for .nk2 file that contains the nicknames for outlook contacts
e. Look for.rwz file that contains which holds the rules for outlook
2) C:\users\%username%\AppData\Local\Microsoft\Signatures –Look for any.rtf, .txt and .htm file in this location that holds signatures for outlook
3) C:\users\%username%\AppData\Local\Microsoft\Stationary –Look for any .htm files that holds stationary for outlook
4) C:\users\%username%\AppData\Local\Microsoft\Forms –Look for any custom forms in the location
5) C:\users\%username%\AppData\Local\Microsoft\Proof – Look for.dic files
6) C:\users\%username%\AppData\Local\Microsoft\Templates – Look for .oft files that are templates.
Note: You can place the backed up files in the same locations in your new Windows 7 computer
-=-
source: http://www.slipstick.com/config/backup2010.asp
Microsoft Outlook 2010 Backup and Dual-Boot File Locations |
| We often get questions like “Where is my Microsoft Outlook data stored?” “Where are my contact?” “How do I backup my calendar?”
Everything, your mail, calendar, and contacts in your Outlook folders are either in a mailbox on an Exchange Server or in Personal Folders .pst files on your computer. Backup and dual-booting between Windows versions all involve using the same files. There is no backup process built into Outlook. To back up, simply exit Outlook, then copy the files you want to back up. Below we provide a chart of Outlook 2010 file locations, followed by notes on particular files. Note that unlike older versions of Outlook, many configuration files are stored in the mailbox or PST. If you are want to copy back and forth between machines so you can use the same information at the office and at home, for example. you’ll need to copy at least the pst file. If you have Outlook profiles, name them the same on both machines, so you can use the same files easily. Use File tab | Account Settings to open the pst files that you copied. If you dual-boot, your profile can point to the same .pst and .ost files (stored in a location both OS’s can see), but you would need to copy other files to the correct location on the second operating system. Note that if you dual boot, you should use the same version of Outlook on both partitions for best results. |
|||||||||||||||||||||||||||||||||||||||||||||||||||||||||||||||||
Windows XP File Locations |
Where do you find these files? You can always start by using your operating system’s Search or Find command to locate the particular file types. You may need to use Tools | Folder Options | View in Windows Explorer and select Show hidden files and folders.
New to Outlook 2010, Personal Folders Files (*.pst) are in the Outlook Files folder in your My Documents folder. When using Windows XP, Outlook stores *.ost, *.oab, and extend.dat in C:\Documents and Settings\<username>\Local Settings\Application Data\Microsoft\Outlook. Extend.dat and MSN Connector message stores can not be moved. All other Outlook configuration files are stored in C:\Documents and Settings\<username>\Application Data\Microsoft\Outlook and cannot be moved. Tip: Copy and paste these lines in Windows Explorer address bar to open the folder: To access the folder holding the toolbar, VBA, rules, and nickname files, copy and paste: To see the *.ost, *.oab files, copy and paste: Note: Storing Personal Folders on an network file share is not recommended and may cause corruption and data loss.
|
||||||||||||||||||||||||||||||||||||||||||||||||||||||||||||||||
Vista and Windows 7 File Locations |
Where do you find these files? You can always start by using your operating system’s Search or Find command to locate the particular file types. On Vista you may need to browse to Windows Explorer’s Organize | Folder and Search Options | View tab and select Show hidden files and folders.
New to Outlook 2010, Personal Folders Files (*.pst) are in the Outlook Files folder in your My Documents folder. Vista (and Win7) replaces Documents and Settings folder path with a Users path. As a result, you’ll find Outlook stores the *.ost, *.oab, and extend.dat, in C:\Users\<username>\AppData\Local\Microsoft\Outlook. Live Connector message stores cannot be moved but POP3 and Exchange offline or cache storage can be moved to other locations. All other Outlook configuration files are stored in C:\Users\<username>\AppData\Roaming\Microsoft\Outlook and cannot be moved. Tip: Copy the following lines and paste into Vista or Windows 7’s Start menu “Start Search” field to open these folders: To access the folder holding the toolbar, VBA, send & receive settings, and nickname files, copy and paste: To see the *ost, *.oab files, copy and paste: Note: Storing Personal Folders on an network file share is not recommended and may cause corruption and data loss.
|
||||||||||||||||||||||||||||||||||||||||||||||||||||||||||||||||
Personal Folders Files |
If you are not connecting to Microsoft Exchange Server, all your Microsoft Outlook data is stored in one or more Personal Folders (.pst) files.
Outlook 2010 creates new *.pst files in your My Documents folder, in a folder named Outlook Files. This will make it easier for you to backup your mail.If you upgraded from an older version and did not make a new profile or pointed the new profile to the old *.pst files, check the properties for Personal Folders in File tab | Account Settings | Data Files tab to determine the exact location on your system. Some people like to export a folder, such as Contacts, to a separate backup .pst file. That’s fine for the data, but it does not back up any folder customizations such as views and custom forms. If you want to back up those, too, copy the entire folder to a new .pst file instead of using the export feature. Also see: |
||||||||||||||||||||||||||||||||||||||||||||||||||||||||||||||||
Offline Folders File |
If you use Microsoft Exchange Server, you may have an offline or cache mode folders (.ost) file. You shouldn’t need to back it up, since you can always refresh it by synchronizing with the server. If something ever goes wrong with your Exchange Server mailbox, this technique can save time and information, but you must do it before you try to connect to the server again. | ||||||||||||||||||||||||||||||||||||||||||||||||||||||||||||||||
Ribbon and QAT |
Beginning with Outlook 2010, the ribbon is customizable and it and the quick access toolbar (QAT) can be exported from the Outlook interface (File, Options, Customize Ribbon), either to share with other computers or users or as a backup.
The ribbon and QATcustomizations are stored in olk*.officeUI files at C:\Users\username\AppData\Local\Microsoft\Office. Each Outlook item type that has a customized ribbon will have an office.UI file.
|
||||||||||||||||||||||||||||||||||||||||||||||||||||||||||||||||
Personal Address Book |
Most Outlook users no longer use a PAB because the Personal Address Book (.pab file) is depreciated. If you still have a PAB, the contents need be imported into your Contacts folder. The *.pab will not open in Outlook 2010.
To Import the *.pab, go to File Tab | Open | Import. Choose Import from another program or file, then scroll down and choose Personal Address Book. |
||||||||||||||||||||||||||||||||||||||||||||||||||||||||||||||||
Other Files |
Outlprnt file contains your custom print settings. This does not need to be backed up.
Some other miscellaneous files, not necessarily worth backing up: |
||||||||||||||||||||||||||||||||||||||||||||||||||||||||||||||||
Accounts |
Account information is held in the user’s Windows registry, not in a file, at HKEY_CURRENT_USER\Software\Microsoft\Windows NT\CurrentVersion\Windows Messaging Subsystem\Profiles
While you could export this key, its not generally recommended because it contains absolute paths to files (in your user account folders) and information about installed add-ins. If the path is not exact when you restore it the profile will be corrupt. |
||||||||||||||||||||||||||||||||||||||||||||||||||||||||||||||||
Notes |
If your network is set up so that you can use Outlook at any machine, your Outlook files may be in a different location. Try using Start | Find to locate each type of file. If you don’t see any .pst files after you search, you may need to adjust the settings in Windows Explorer to show hidden and system files. Choose Tools | Folder Options, then switch to the View tab, and select Show hidden files and folders.
Personal Folders .pst files are among the files that are normally not included in a Windows 2000 (or later) offline files synchronization. However, you can edit the system policy that controls the file types so that .pst files can be included. See Error Message Files of This Type Cannot Be Made Available Offline. |
||||||||||||||||||||||||||||||||||||||||||||||||||||||||||||||||
More Information |
|
||||||||||||||||||||||||||||||||||||||||||||||||||||||||||||||||
source: http://office.microsoft.com/en-us/outlook-help/command-line-switches-HP001003110.aspx?redir=0
/c messageclass
Creates a new item of the specified message class (Outlook forms or any other valid MAPI form).
Examples:
Requirements
Requirements for primary server
Processor 64-bit only, 2GHz minimum, maximum of 4 physical sockets (no limit on the number of cores)
Memory 4GB RAM minimum.
32GB RAM maximum.
OS Drive Partition 60GB minimum.
DVD-ROM Bootable from system BIOS
Network Adapter 1 x 100Mbps Ethernet adapteber
Monitor / video adapter Minimum 1024×768
Network devices Router that supports IPv4 NAT
Internet Connection Required
Firewall External firewall required
Requirements for second server (if you’re running SBS2008 Premium Edition)
Processor 2GHz (can be x86 OR x64)
Memory 2GB RAM minimum.
32GB RAM maximum.
OS Partition 10GB minimum.
40GB recommended.
To enable backup, you need minimum of 1 external drive (this must be a separate physical disk from any of the disks holding any of the SBS components / data).
Installation planning, and creating the Answer File
Microsoft provides a Windows Small Business Server 2008 Installation Worksheet.
The new Answer File Tools allows you to streamline the installation, and make your installations consistent. Allows options for whether to do installation attended or unattended, time zone, ewhether to install OneCare for Server and ForeFront for Exchange, fully qualified internal domain name, network settings, root certification authority name, etc. To run, Insert SBS2008 DVD1 on Windows XP or Vista and run SBSAfg.exe.
When you are MIGRATING to SBS2008, you MUST use the Answer File Tool. The tool will guide you through the process.
You can use the Answer File while doing either an OEM or Manual install. Simply load unattended.xml file onto a USB Key.
Clients must be on Windows XP Business SP2 (or higher) or Windows Vista Business / Ultimate.
Preparing the network
When you are ready to deploy, configure your network such that your router/firewall is configured as 192.168.x.1, and that your SBS2008 machine is configured as 192.168.x.2.
The “Connect to the Internet” wizard will look for a router at 192.168.x.1 and 192.168.x.254. If it finds the router, it verifies NAT functionality to make sure it can connect to the Internet. Then it configures DHCP on SBS, and requests the router to turn off DHCP. The resulting DHCP on SBS2008 is configured to be almost identical to the DHCP scope that was configured on the router.
If SBS2008 cannot automatically configure your router, you must (1) disable DHCP on your router, and (2) forward the following ports to 19.168.x.2:
* SMTP – TCP 25
* HTTP – TCP 80
* HTTPS – TCP 443
* HTTPS for SharePoint – TCP 987
* VPN – TCP 1723
* Note that port 4125 is NO LONGER NEEDED, as terminal services now goes through TS Gateway, which transfers traffic across port 443
Windows SBS installation will fail if the following conditions exist:
* The computer doesn’t have a NIC
* There is no link light
* The computer is not connected to a local router
* The computer is connected directly to the Internet and getting an Internet address instead of a local address
Windows SBS Installation – After the first phase (baseline setup) is complete
The first step that you are prompted for is to confirm that the date, time, and timezone are correct (important for server migrations).
Next, you are prompted to go online and get any critical updates. This includes any updates that they put out to improve the installation process, as well as any security or performance related patches.
The next thing that runs is the networking discovery, which will attempt to connect out through the router, try to auto-configure the network, etc. If it can’t configure the router (or if you haven’t forwarded the ports yourself), it won’t go out and get the latest updates.
Next screens prompt for information about the business (name, address, etc), the server name and internal domain name (if running with an answer file, it also prompts you for FQDN, which lets you specify an extension other than .local), and network administrator name / username / password.
You are then prompted for whether you want to install Windows Live OneCare for Server and/or Microsoft Forefront Security for Exchange Server. Both of these are 120-day trial versions.
All information you entered is then confirmed, as the server name and internal domain name cannot be changed after the installation is complete. This is not shown if you are using an unattended answer file.
Installation is then performed, and if all is successful you receive a “Successful installation” screen.
Sometimes there may be minor issues, which will be reported in an “Installation Issues” window. Each issue has a help topic associated with it to walk you through resolving the issue.
Connect to the Internet Wizard (CTIW)
Detects the presence of a DHCP server and requests that you turn it off.
Detects existing routers.
Configures the network.
Detects and Internet connection.
Internet Address Management Wizard
Launch Partners: GoDaddy, Register.com, eNomCentral.
Allows you to purchase a domain name and automatically configure DNS with the appropriate records. Keeps those records up to date over time. Also manages Dynamic DNS for your environment (if necessary) and will update your IP address at the registrar. Configures mail.domain.com, www.domain.com, and remote.domain.com.
Automatically configures: Outlook Anywehre, Exchange, Remote Web Workplace, Mobile Device connectivity, Certificates.
Configure Internet Mail Wizard
Can configure your mail to go out through a smart host, which is useful if you are on a dynamic IP address, so your email is not flagged as spam.
Move Data Wizards
By default, everything gets installed onto Drive 0. You can then move the data onto a different drive after installation. Microsoft recommends separating application and user data from the system drive, using the storage migration tools that are available after setup. RAID 1 recommended for system drive, and RAID 1 or RAID 5 for user data drive.
Backup and Storage page, Storage tab provides information about all of the drives, available space, etc.
There are a series of tasks on the right side of the screen that allow you to move the Microsoft Exchange Server data, Windows SharePoint Services data, Users’ shared data, User’s redirected documents, and Windows Update Repository data.
The interface prompts you to back up your data before it does any data moving.
source: John R. Pattison Deploying Windows Small Business Server 2008
– Vodafone mifi R201 – http://www.business.vodafone.com/site/bus/public/enuk/support/10_productsupport/wi_fi_devices/r201/05_summary/p_summary.jsp
Custom APN settings phone-internet providers netherlands
– Pluk’n’play